The content below is taken from the original ( Accelerate vCenter Migration using AWS Migration Service Agentless Migration), to continue reading please visit the site. Remember to respect the Author & Copyright.
Organizations often decide to move their applications from on-premises environments to the cloud with little to no architecture changes. This migration strategy is advantageous for large-scale applications to satisfy specific business goals, such as launching a product in an accelerated timeline or exiting an on-premises data center. Using a rehost migration strategy lets customers achieve the cloud benefits, such as reducing cost, increasing flexibility, scalability, agility, and high availability, as well as simultaneously reducing migration risk due to a tight timeline.
AWS Application Migration Service (MGN) is the primary migration service recommended for rehost (lift-and-shift) migrations to AWS Cloud. AWS MGN supports both agent-based and agentless snapshot approaches to replicate servers from on-premises to AWS. In this post, we will explain the differences between the two methods and provide guidance for when to choose each one. Furthermore, we will walk through an example that demonstrates how to migrate a source environment hosted on vCenter to AWS using the Agentless snapshot based replication that has been recently added to AWS MGN.
Let’s start by discussing the agent-based replication. First, it supports block level replication from virtually any source environment. The source environment for the replication can be any supporting Operating System (OS) that is on physical servers, virtual servers that are on-premises, or virtual machines (VMs) on other cloud providers such as Azure or GCP. Second, the agent-based replication supports Continuous Data Protection (CDP). CDP keeps the source environment in sync with the replication server in near real-time after the initial replication has finished. This provides a short cutover window and makes the Recovery Point Objective (RPO) provided by AWS MGN in the sub-second range for most cases.
To receive these benefits, we recommend that customers use the agent-based replication when possible. However, organizational and security policies, or limited server access, may prevent installation of the AWS replication agent on every server. Additionally, although automation orchestrations are built on top of AWS MGN to streamline agent installation and target environment setup, learning to use these solutions and integrating them with the organization’s platform might introduce additional tasks that customer want to avoid.
If any of those scenarios applies, then the AWS MGN Agentless approach may be another solution for the migration. For the Agentless approach, you must consider the following:
- AWS MGN Agentless approach currently only supports vCenter as a source environment.
- AWS MGN Agentless uses a process called “snapshot shipping”, not block-level replication, which is a long running process responsible for taking periodic VMWare snapshots from the discovered source VMs and sending them to AWS. The first snapshot will include the entire disk content, and following snapshots will only sync the disk changes. After the process completes, it creates a group of EBS volumes in your target AWS account that you can later use to launch your Test or Cutover instances.
- The AWS MGN vCenter client must be installed on a dedicated VM running in your vCenter environment.
Now that both migration methods have been discussed, let’s walk through an example of how to use the agentless replication to replicate a vCenter environment to AWS.
Solution overview
The following diagram depicts the AWS MGN agentless replication architecture.
To demonstrate this setup, I use an ESXi source environment that has a vCenter appliance v6.7 running on an m5.metal EC2 instance in the eu-west-1 Region. I created 4 VMs (Ubuntu 18.04, Centos8, Windows 2016, and Windows 2019). After making sure that the connectivity requirements for this replication are met (more about that later), I install the AWS MGN Agentless client, which will start discovering my VMs and replicate them to my destination Region on AWS. Next, I will walk you through the details.
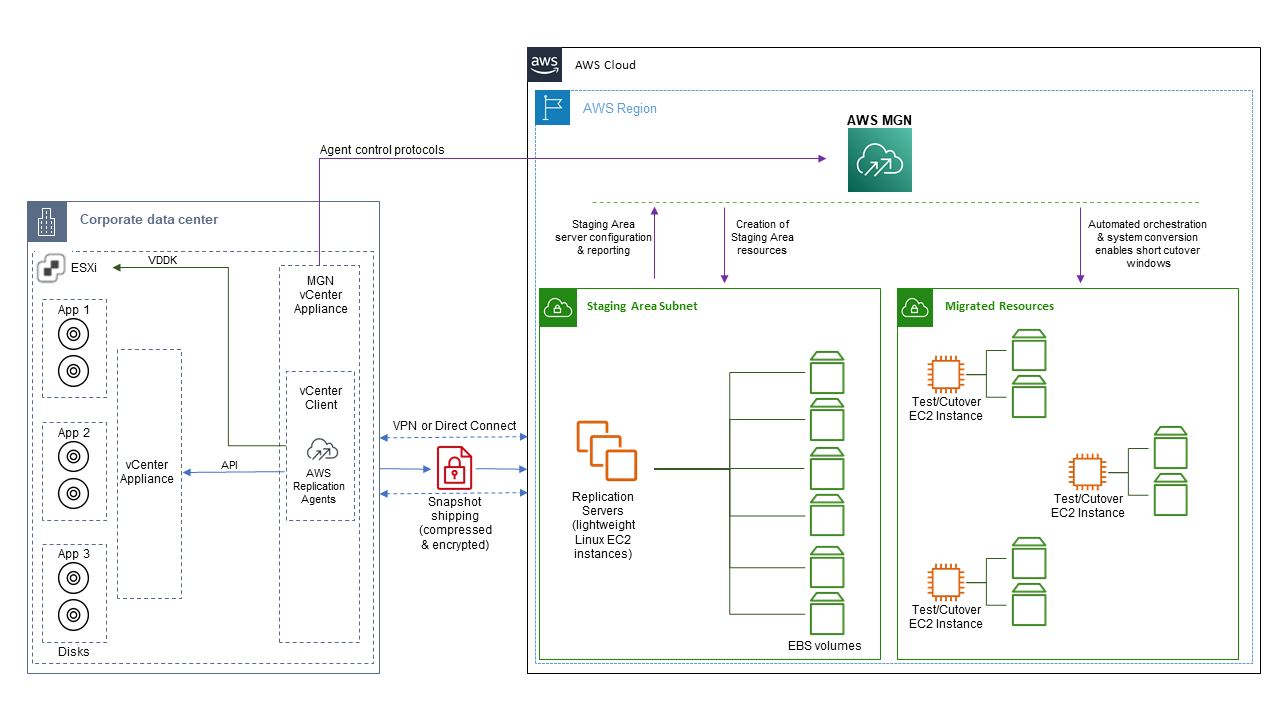

Figure 1: Agentless Architecture
1 – Setting up the destination environment on AWS
Before I’m able to install the MGN vCenter Appliance into my source environment I need to complete the following initial setup in the AWS Region where I will replicate the vCenter environment to.
- 1) Create an AWS Identity and Access Management (IAM) user for AWS MGN vCenter client and assign the required permissions. After creating the user, note the access key and the secret access key. For more details, check Generating vCenter IAM Credentials.
- 2) Create a Virtual Private Network (VPC) with two subnets. We will use the first subnet for AWS MGN staging area. The second subnet will be the destination subnet to which we will replicate the source environment servers. For more details on preparing MGN networking setup check Networking Setting Preparations.
- 3) Initialize AWS MGN: This process is required when you use AWS MGN for the first time. During initialization you will be directed to create Replication Settings template. This process also creates the IAM Roles needed for the service to work. For more details check Initialize Application Migration Service.
2 – Setting up the source environment on vCenter
I chose to download and install the MGN vCenter Appliance on CentOS8 VM in my source environment. Before I start the installation, I make sure the following networking requirements are satisfied on the VM. For more details on setting up networking for vCenter refer to this link.
- Egress TCP 443 from CentOS8 VM to the vCenter API. To check this connectivity in my lab, I use Telnet (or any other connectivity test tool) to connect from CentOS VM to the vCenter endpoint, and I confirm that it’s connected.


Figure 2: Telnet vcsa
- Egress TCP 443 from CentOS8 to AWS MGN API, which is eu-west-1.amazon.com in my case. Make sure that you replace your actual destination region in the endpoint if you use a region that is different from eu-west-1.


Figure 3: Telnet MGN
Once the networking configuration has been verified, the next step is to download and install the AWS MGN vCenter Appliance into the CentOS VM in your source environment.
- 1) The MGN vCenter Appliance installer requires Python3, so before I start the download, I install I connect to CentOS VM and install Python3
- 2) The installation also requires you to install the VMwareVirtual Disk Development Kit (VDDK) v6.7 EP1 to replicate disk changes to the destination environment. You can download it here. It requires a VMware Customer Connect account.
- 3) Now I’m ready to download the MGN vCenter Appliance. The URL to download will vary based on your region. For my lab environment, I use eu-west-1, so my download URL will look like the following:


Figure 4: Download Installer
- 4) I navigate to the directory where I download the file, and then I run the install command:
The installer will prompt you to enter the following details
- AWS Access Key ID: notes from step 1.1.
- AWS Secret Access Key: notes from step 1.1.
- AWS Region Name: destination region on AWS.
- vCenter IP or hostname: The IP or hostname where the server appliance is running.
- vCenter port: This is usually 443. If you have vCenter listening on a different port, specify that here. If not, just hit enter.
- vCenter username: The username to log in to vCenter. Check this link for details on permissions that this vCenter user needs.
- vCenter password: The password associated with that vCenter username.
- For the next question on vCenter root CA certificate, I pressed Enter to disable SSL certification validation.
- Path to VDDK tarball: This is where I provided the location of the VDDK tar file that I downloaded in step 2.2.
- For the next two questions on resource tags, I use default and press Enter.
The installer will now install the MGN vCenter client, and register with AWS MGN in your destination environment. Once this is done, all of VMs in your vCenter will be added to AWS MGN dashboard and they will have DISCOVERED state as we will detail in the next section.
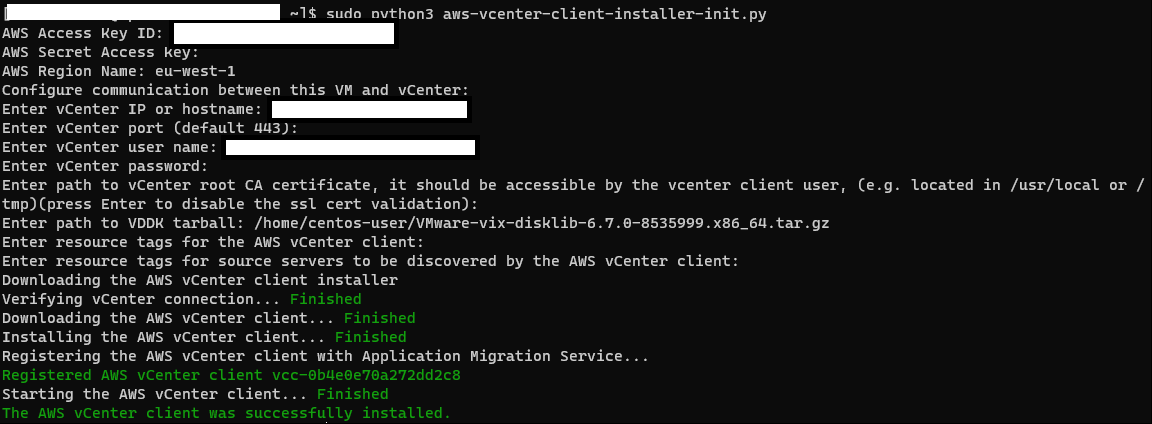

Figure 5: MGN Agent Installation
3 – Replicate source environment and cutover
Now that I’ve installed the MGN vCenter appliance, I must go to my AWS account in the same region that I specified above and connect to the AWS MGN console to start replicating the 4 VMs in my source environment. Navigate to the MGN console. From here, I must select Source servers from the menu. The Discovered source servers filter provides a list of servers discovered by the AWS MGN client that haven’t yet begun replicating.


Figure 6: MGN Console
After selecting the discovered source servers, I can see 4 VMs from my source environment. The CentOS VM that I used as the AWS MGN vCenter Appliance will neither be listed here nor replicated. Also note that the actual vCenter appliance from my source environment will show in the MGN console as a VM that we should not select for replication.
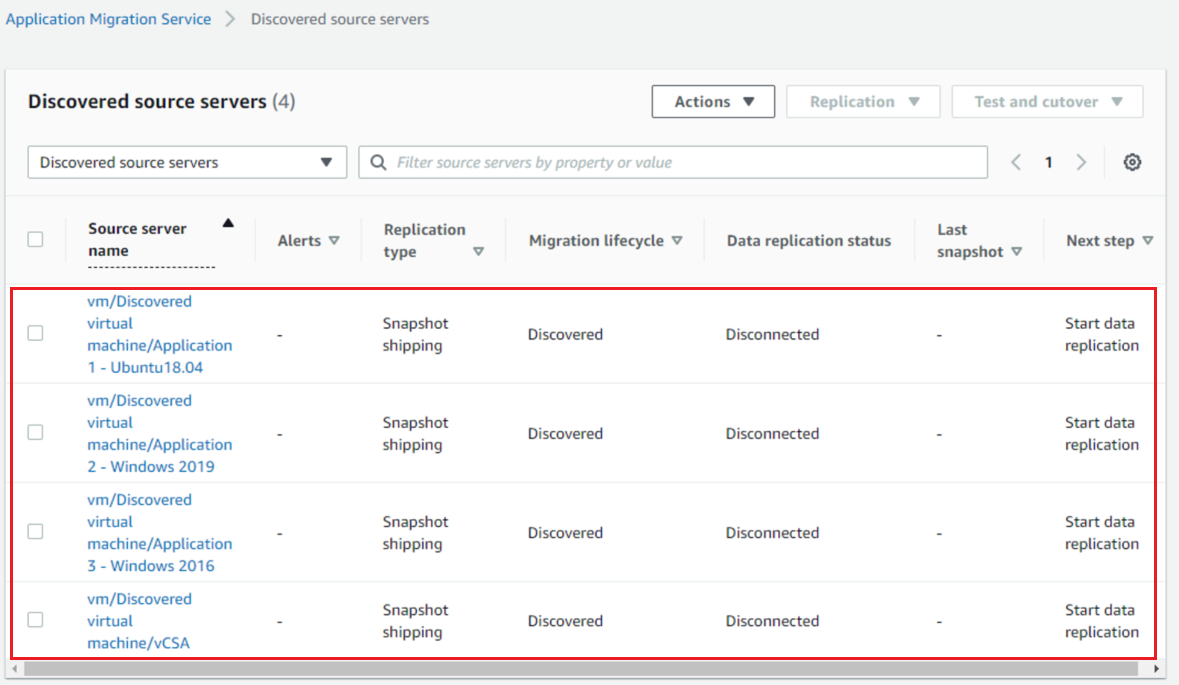

Figure 7: MGN Console discovered 4 vms
From here, select the servers that you’d like to replicate. For example, to replicate the VM that runs Ubuntu, select the checkbox for the VM, go to the Replication dropdown , and choose Start data replication.


Figure 8: MGN – Start replicating
This will start the snapshot replication from the vCenter source environment to my destination region on AWS. After some time, it will show as ‘Healthy’ in the Data replication status. This can be seen by switching back to Active source servers in the filtering menu. Find more details about launching Testing and Cutover instances in the AWS MGN documentation.
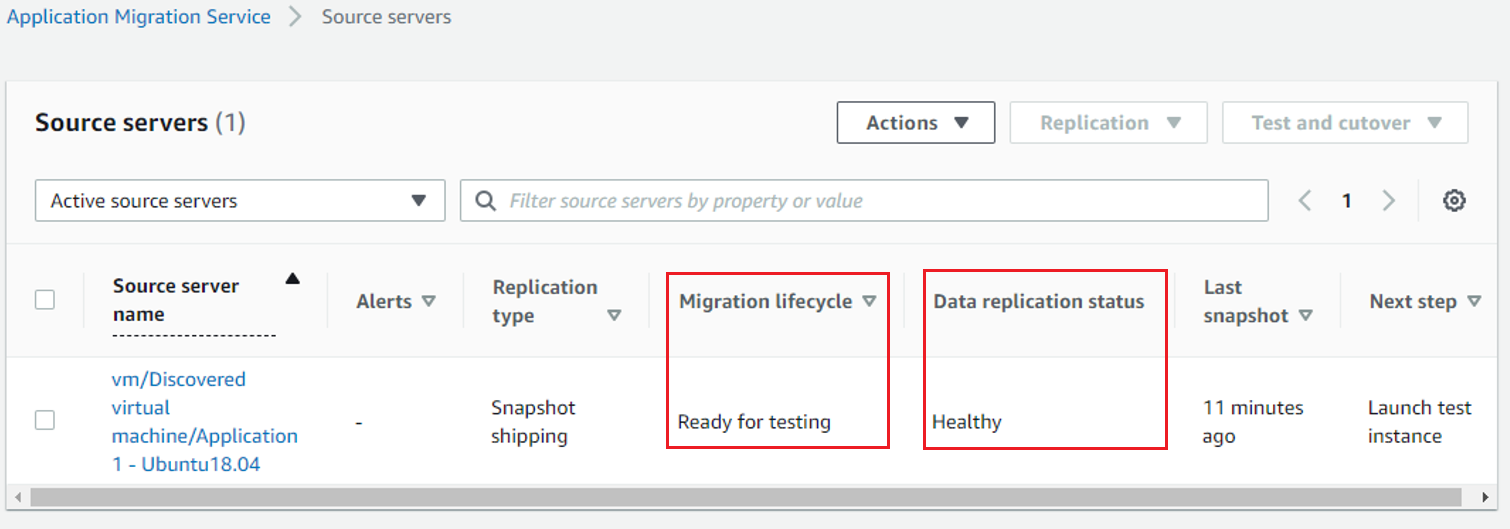

Figure 9: MGN – ready for testing
Then, I repeated the same steps to start data replication for the other two servers in my list. After some time, all three servers were showing Migration lifecycle status of Ready for testing.
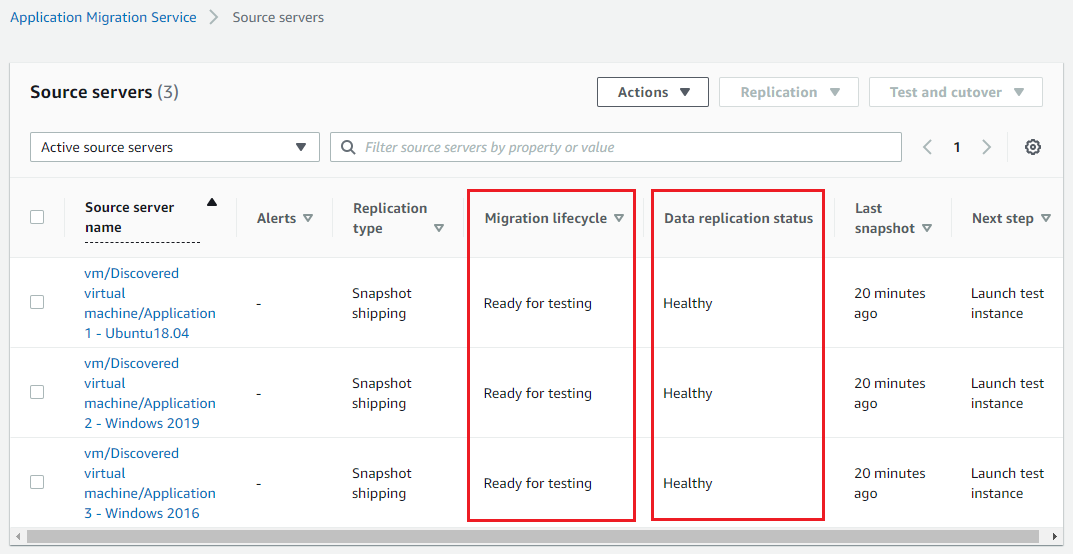

Figure 10: 3 servers ready for testing
Conclusion
In this post we discussed the two different approaches for migrations that the AWS MGN supports. The agent-based replication is a block-level replication strategy that uses a CDP mode to provide near real-time replication and a short cutover window. It’s always preferred to use agent-based replication. However, if your source environment consists primarily of vCenter, and you can’t fulfill the requirements for installing the AWS MGN agent on every source server, then we recommend using the Snapshot based replication. In the demo above, we walked you through the steps needed to install the AWS MGN vCenter appliance in the source environment, and then showed you how to perform an agentless snapshot replication to AWS.