The tool simplifies and automates the WVD deployment process leveraging the power of Azure DevOps. It can deploy a full WVD environment for you with the click of a button. How does it work? To understand how the WVD QuickStart works, let’s walk through a conceptual overview. As stated above, the WVD QuickStart takes much of the WVD deployment complexity away, simplifying and automating the process, making the platform more accessible to non-expert users. How exactly does the QuickStart achieve that? The diagram below shows a high-level conceptual overview of the deployment process:
Note: The WVD QuickStart is a free community tool with no implied support from Microsoft. It is not and should not be treated as an official product from the Windows Virtual Desktop team.
The content below is taken from the original ( Merging and sorting files on Linux), to continue reading please visit the site. Remember to respect the Author & Copyright.
There are a number of ways to merge and sort text files on Linux, but how to go about it depends on what you’re trying to accomplish – whether you simply want to put the content of multiple files into one big file, or organize it in some way that makes it easier to use. In this post, we’ll look at some commands for sorting and merging file contents and focus on how the results differ.
Using cat
If all you want to do is pull a group of files together into a single file, the cat command is an easy choice. All you have to do is type “cat” and then list the files on the command line in the order in which you want them included in the merged file. Redirect the output of the command to the file you want to create. If a file with the specified name already exists, it will be overwritten by the one you are creating. For example:
We’re pleased to share updates to our Google Cloud free programs so developers can get started even faster in solving real-world business challenges. With more and more developers building with the Google Cloud Platform every day, we’ve invested in a broad range of new hands-on resources, videos, tutorials, and comprehensive documentation to help you get started and grow and maintain momentum with Google Cloud. These include:
The Free Trial program. Last year more than 750,000 new developers trained on GCP, and many started with our hands-on free trial experience that provides a great on-ramp to use our 200+ cloud products and services. We’ve found that one of the highest predictors of developer success is developers completing a proof of concept during the first three months of our free trial program. As a result, we’ve updated the program so that, starting August 17th, users now have 90 days to use their $300 USD in Google Cloud credits. In addition to the free trial, users can also leverage our free products, resources, and training. This lets us focus on helping developers and organizations maximize the impact of their free trial in those critical first months. There will be no changes for customers already in a free trial. For more information, check out all of the details on our trial program here.
The Always Free Tier program. More than 20 of our most popular products and services are available for freeabove and beyond your $300 USD free trial credits, even after your free trial is complete. You can try everything from App Engine and Compute Engine, to industry-leading AI, data analytics, storage and security tools.
Better training—and more resources to help you get started. All Google Cloud free trial and free tier users can access:
Regularly updated documentation, from detailed cloud basics to enterprise guides, which gives you foundational concepts, quickstarts, top use cases, and advanced hands-on guides.
Like all Google Cloud services, we continue to improve our free trial programs based on your feedback. Please leave a note in any of the above channels letting us know what you think.
Posted by Mickey Kataria, Director of Product Management, Android for cars
This blog post is part of a weekly series for #11WeeksOfAndroid. For each week, we’re diving into a key area and this week we’re focusing on Android Beyond Phones. Today, we’ll be talking about cars.
Since 2014, Google has been committed to bringing the familiarity of apps and services from Android phones into the car in a safe and seamless way. We’re continuing to see strong momentum and adoption of both Android Auto and Android Automotive OS, and are excited to share new improvements that provide app developers the opportunity to reach more users in the car.
Android Auto momentum
We launched Android Auto for users to stay connected on-the-go and more easily access their Android phones on their car displays— while staying focused on the road. Android Auto is currently available with nearly every major car manufacturer and is on track to be in more than 100 million cars in the coming months. Many car manufacturers, including General Motors, BMW and Kia, have also added support for wireless connections, making it easier for drivers to use Android Auto as soon as they get into their car. We’re continuing to add new features to make the experience more seamless for users and help developers reach more drivers with in-car apps.
Expanding Android Auto’s app ecosystem
One of our most common requests for Android Auto continues to be support for more apps in the car. We currently have over 3,000 apps in Google Play whose in-car experiences have been purpose-built for driving.
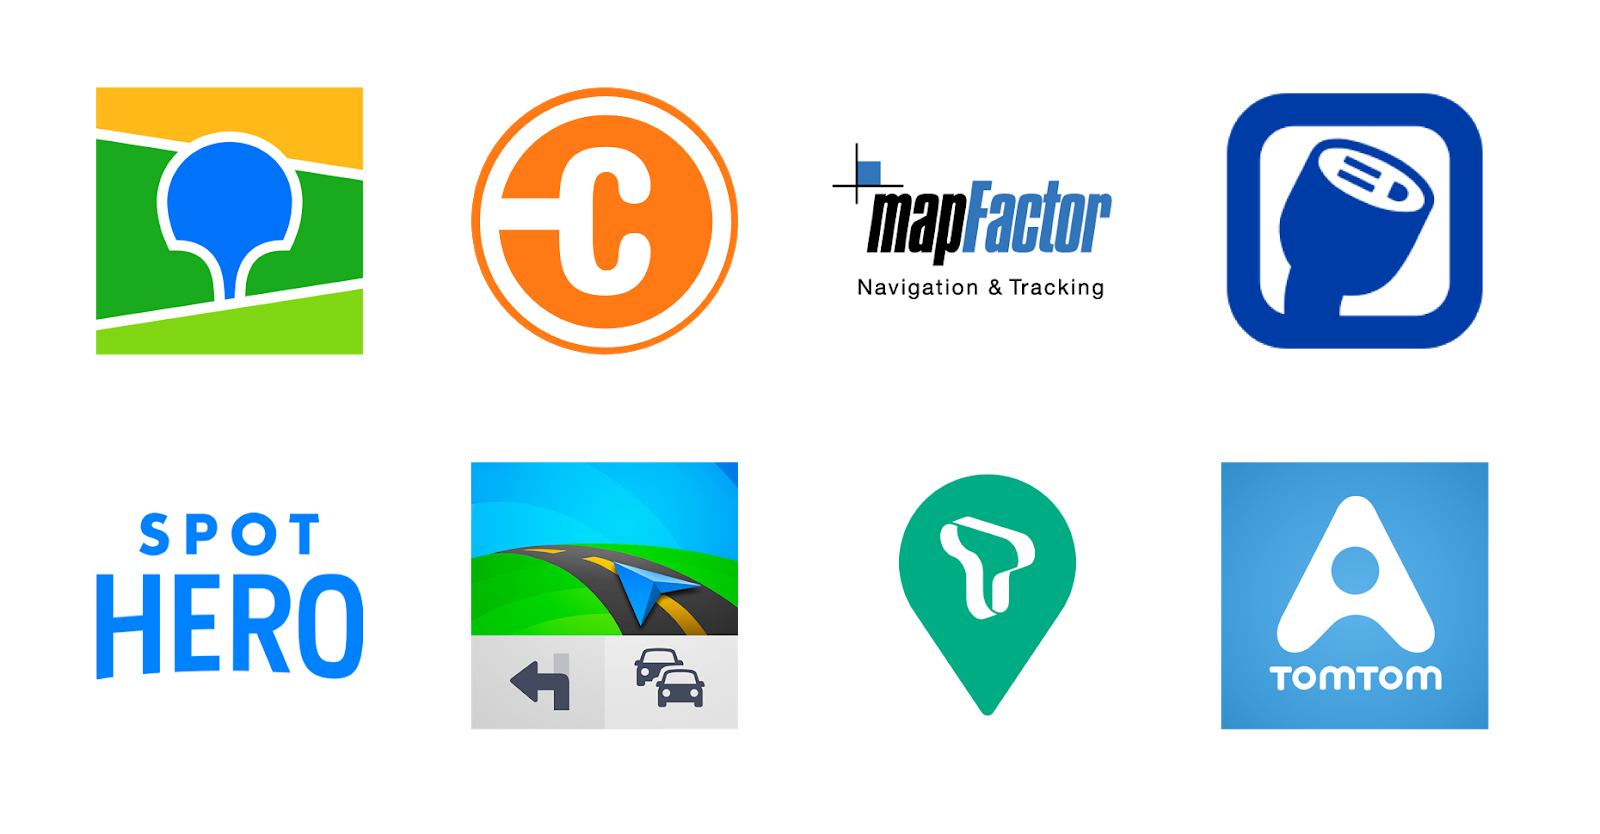
Today, we’re showcasing our work with early access partners to build apps in new categories for Android Auto, including navigation, parking and electric vehicle charging. Using our new Android for Cars App Library, we’re able to ensure that all tasks within an app can be achieved with minimal glances or taps.
Early access partners for new apps on Android Auto
To mitigate driver distraction, we collaborated with government, industry and academic institutions to develop our own best practice guidelines that we apply to every aspect of our product development process. With our standard templates and guidelines, developers have the tools to easily optimize their apps for cars, without needing to become an expert in driver distraction.
Our early access partners will be releasing new apps to their beta testers by the end of this year. Pending additional testing and feedback, we then plan to make these APIs publicly available for all developers to build Android Auto apps in these categories.
We’re partnering with some of the leading navigation, parking and electric vehicle charging apps around the world including ChargePoint, SpotHero and Sygic.
Android Automotive OS adoption
More recently, we introduced Android Automotive OS as a full-stack, open source and highly customizable platform powering vehicle infotainment systems. With Android Automotive OS, car manufacturers are able to have apps and services like Google Assistant, Google Maps and Google Play built into vehicles so that a mobile device is not required for common activities like navigation, downloading third-party apps and listening to media. Polestar 2, the first car running Android Automotive OS with Google built in, is now on the road and available for customers globally. In addition, Volvo Cars, Renault, General Motors and more have announced plans for infotainment systems powered by Android Automotive OS with Google apps and services built-in.
Extending the reach of media apps in cars
As more manufacturers begin to ship cars with infotainment systems powered by Android Automotive OS, developers have the opportunity to deliver a seamless media experience using Google Play in the car. If you already have a media app for Android Auto, you can extend the reach by adding support for Android Automotive OS. The process for porting over your apps is simple with most of the work already done, just follow these steps.
Making it easier to develop media apps for Android Automotive OS
For the past year, we have been on a journey to allow app developers to design, develop, test and publish media apps directly on Google Play in the car. We are happy to share that this is now possible.
Polestar 2 and Google Generic Automotive system images for Android emulator
We have made updates to the Android Automotive OS design guidelines and development documentation for you to add support for your media apps. We also launched updates to the emulator to include Google Assistant, Google Maps and Google Play, so you can develop and test your apps in an environment that more closely mirrors the software in the car. The Polestar 2 system image enables you to test your app on similar software that is available on the road today. Lastly, the Play Console now accepts Android Automotive OS APKs, enabling you to simply upload your app for quality review and publishing. These changes allow developers to seamlessly complete the end-to-end development process for Android Automotive OS.
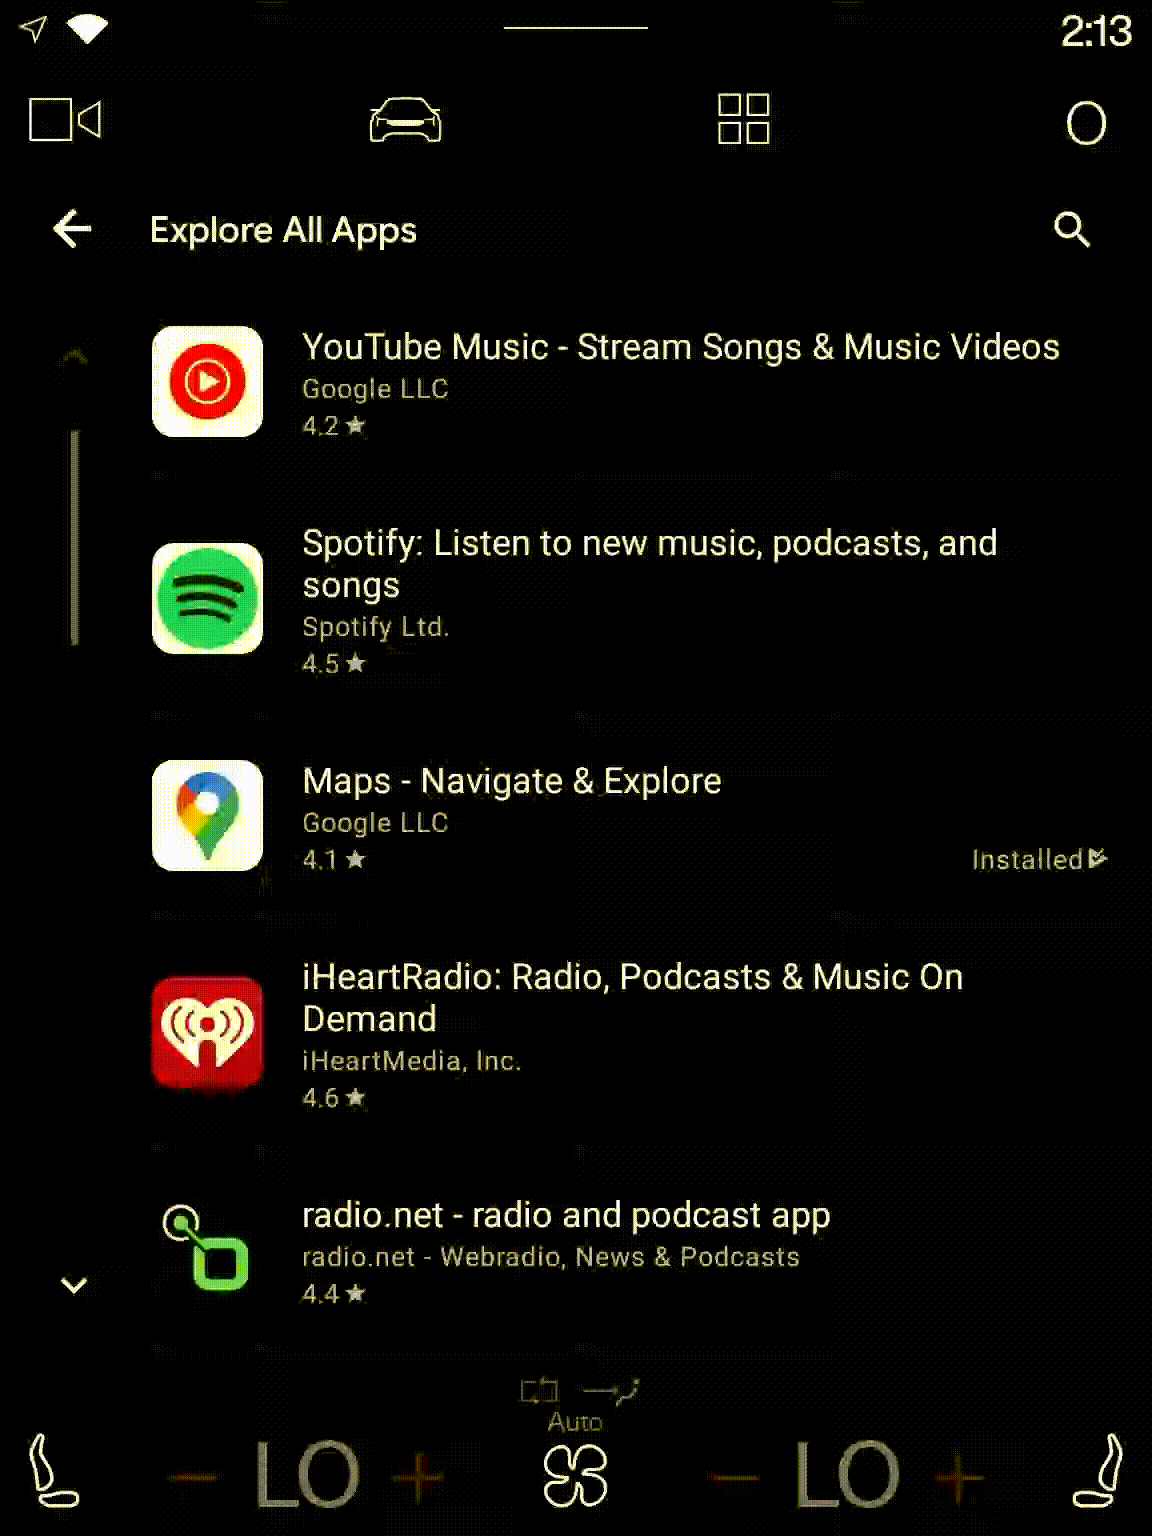
Google Play features many media apps today, including Spotify, iHeartRadio, NPR One and more.
To learn more about how to create an app for Android Automotive OS, look out for updates or post on the automotive-developers Google Group or Stack Overflow using android-automotive tags.
With new app expansion on Android Auto and improved development tools for Android Automotive OS, developers have more opportunity than ever to reach users with app experiences optimized for the car. Head over to developer.android.com/cars to get started!
Resources
You can find the entire playlist of #11WeeksOfAndroid video content here, and learn more about each week here. We’ll continue to spotlight new areas each week, so keep an eye out and follow us on Twitter and YouTube. Thanks so much for letting us be a part of this experience with you!
As part of its 10th anniversary celebration, Xiaomi revealed a transparent TV, the Mi TV Lux OLED Transparent Edition. When it’s turned off, the display looks like a piece of glass. When it’s turned on, images appear to float in thin air, or so Xiaom…
The idea of spending the night inside an old retail store may not sound fun at first glance, but add some blue and yellow paint, throw in and a dash of nostalgia, and suddenly it’s an experience fit for an Airbnb reservation war. The last Blockbuster in… in the w…
There is enterprise-level software for surveying Wi-Fi networks, but even in large wireless networks, simple freeware tools are handy for a quick peek at the airwaves during design, deployment or troubleshooting.
Here is a look at eight free tools – some for Windows and some for Mac OS X – that provide basic details about nearby Wi-Fi signals: SSIDs, signal strength, channels, MAC addresses and security status.
Some can even reveal “hidden” or non-broadcasted SSIDs, display the noise levels, or display statistics on successful and failed packets of your wireless connection. One of them includes Wi-Fi password-cracking tools that are useful for educational or penetration testing purposes.
The content below is taken from the original ( in /r/ msp), to continue reading please visit the site. Remember to respect the Author & Copyright.
We have created a set of PowerShell scripts that configure some baseline parameters in all tenants we manage. Nice, works, but clunky.
I've been looking around for something that can create a "template" we can push to each tenant. We've look around at tools like Proofpoint, but those are more focused on spam/malware/url/filtering, which is nice and needed, but not the need here.
Anybody using any online tools that are MSP friendly for this?
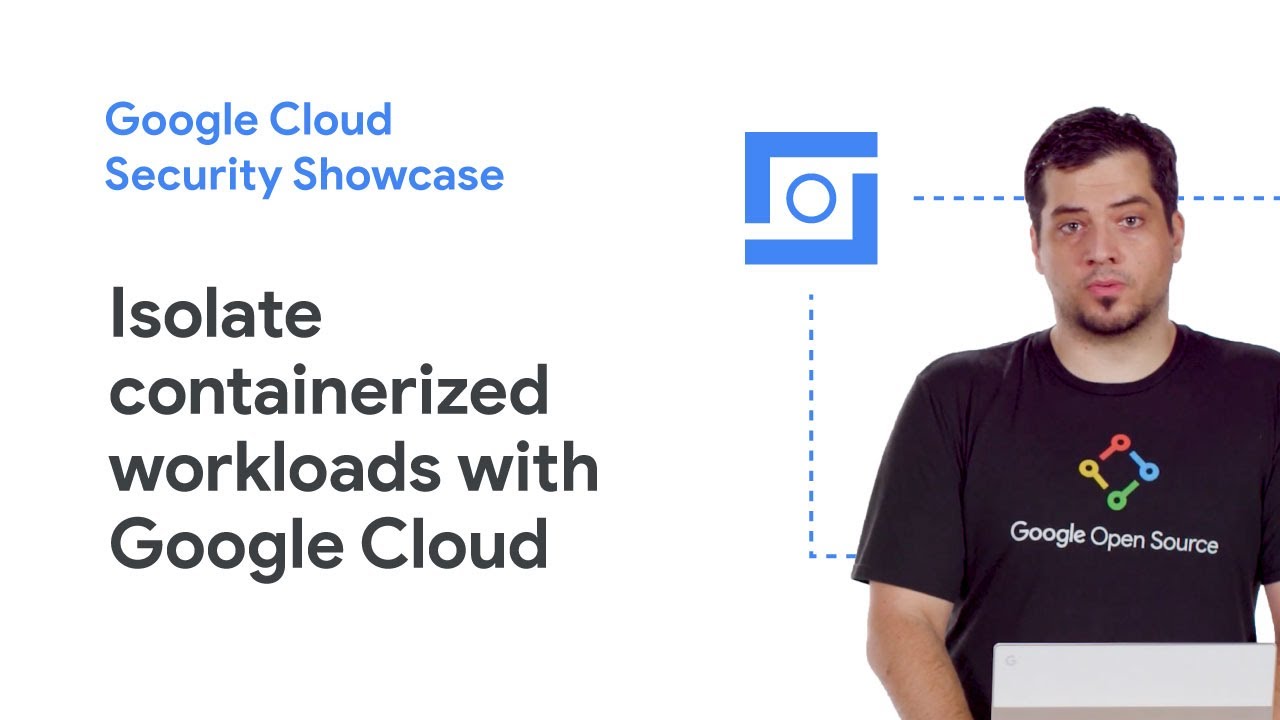
Security is at the heart of any cloud journey. On the one hand, as you adopt cloud services and move workloads to the cloud, you need to make sure you’re conforming to your established security policies. On the other hand, you can take advantage of new capabilities, use new tools, and help improve your security posture. We’ve had many conversations with our users to understand the most pressing security use cases they want to address in their cloud environments, and shared our expertise on how we can help. With the Google Cloud Security Showcase we want to share these insights with everyone.
The Google Cloud Security Showcase is a video resource that’s focused on solving security problems and helping you create a safer cloud deployment. The showcase currently has almost 50 step-by-step videos on specific security challenges or use cases—complete with actionable information to help you solve that specific issue—so there’s sure to be something for every security professional. In this blog we’ll highlight some of these use cases and example videos across major security domains to show what the Google Cloud Security Showcase is and how it can help you.
Topic: infrastructure security The videos in this section show how you can take advantage of key features in Google Cloud’s secure-by-design infrastructure.
How can I isolate my containerized workloads?
Topic: network security The videos in this area describe how to use Cloud products to define and enforce your perimeter and allow for network segmentation, remote access, and DoS defense.
How do I protect my web applications against DDoS attacks?
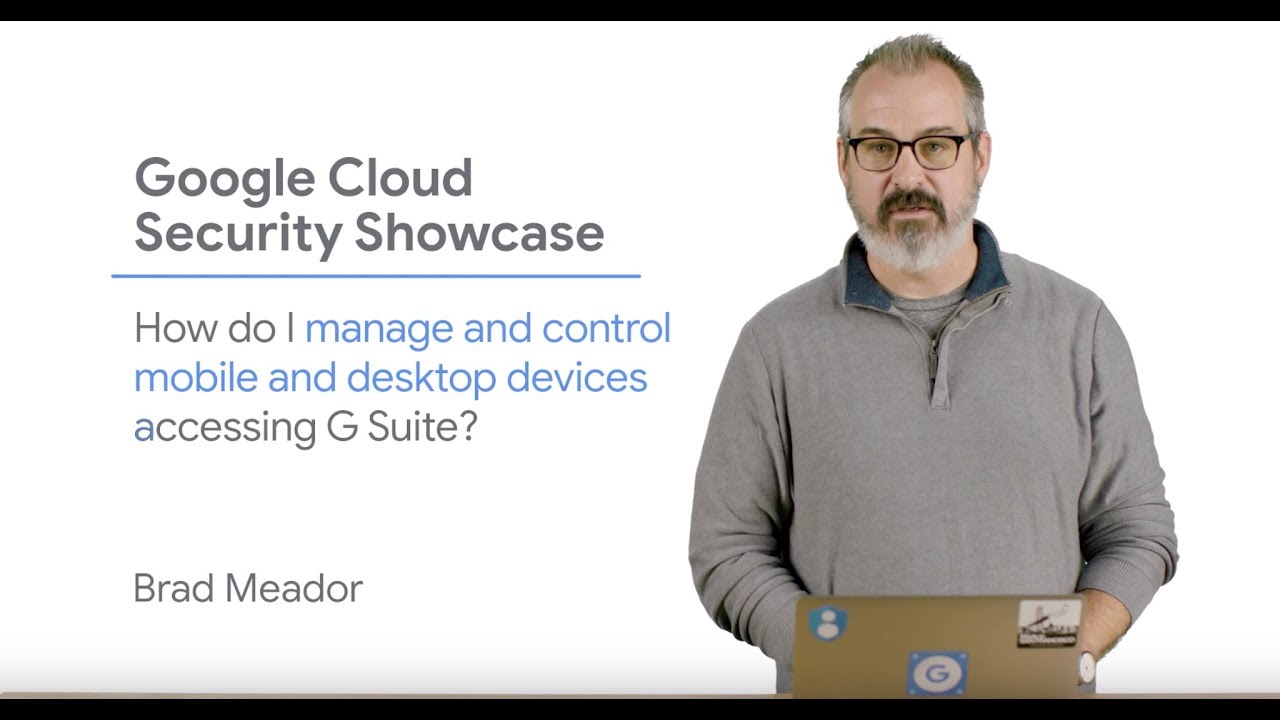
Topic: endpoint security The videos in this section demonstrate how to use Cloud controls that help secure endpoints and prevent device compromise with device hardening, device management, and patch and vulnerability management.
How do I configure my G Suite deployment to best protect my devices?
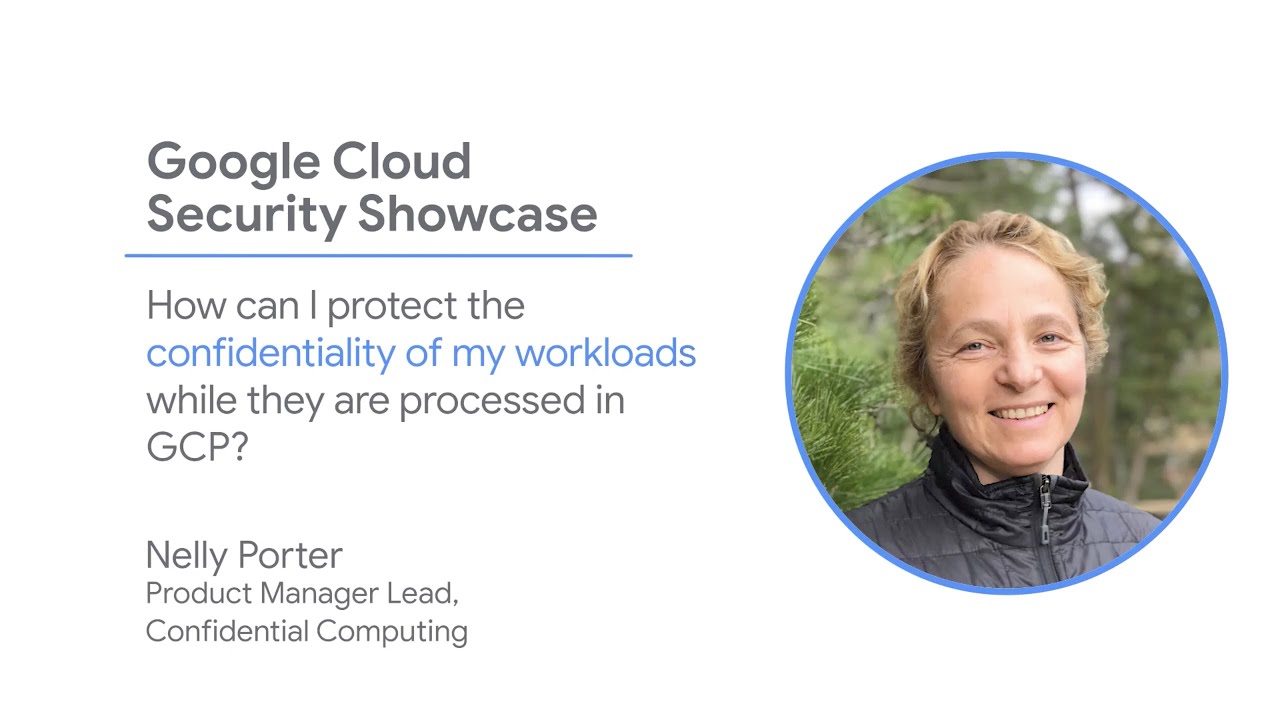
Topic: data security The videos here detail how you can employ data discovery, data governance, and native controls that help prevent loss, leakage, and exfiltration.
How can I protect the confidentiality of workloads while they’re processed?
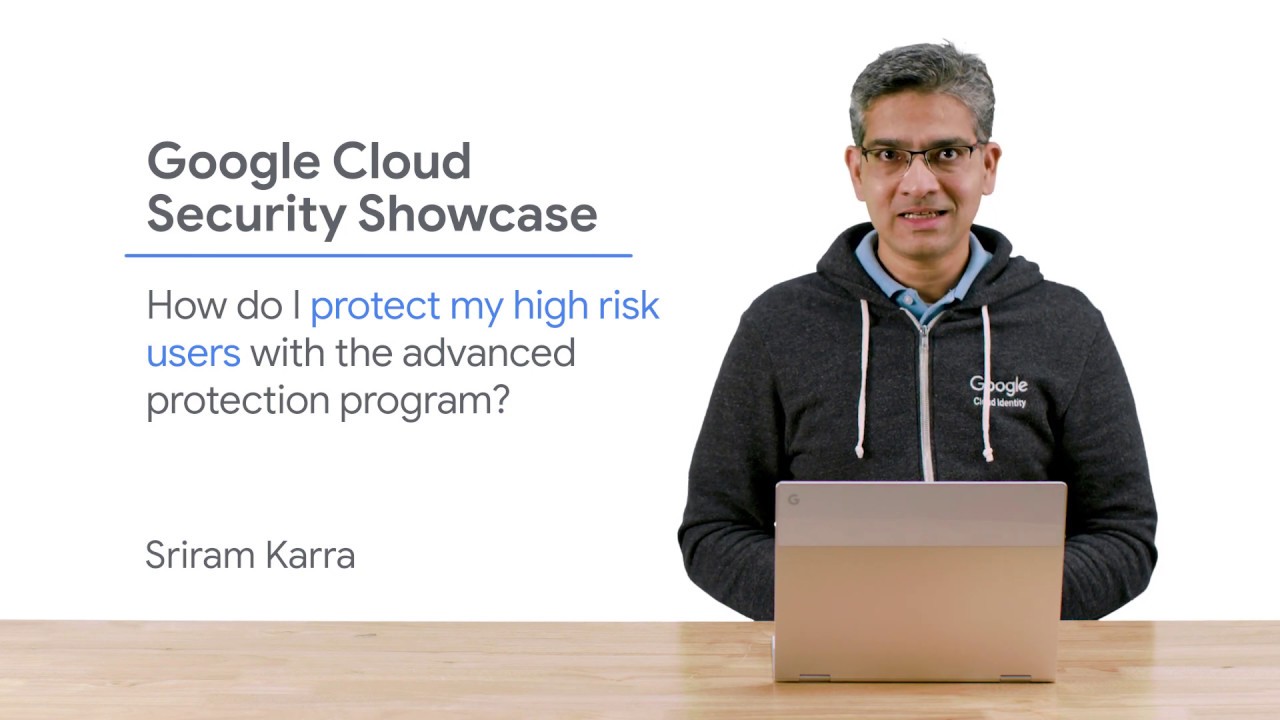
Topic: identity and access management The videos here detail ways you can use our platforms to manage and secure employee, partner, and customer identities, and their access to apps and data, both in the cloud and on-premises.
How do I protect my high-risk users with the advanced protection program?
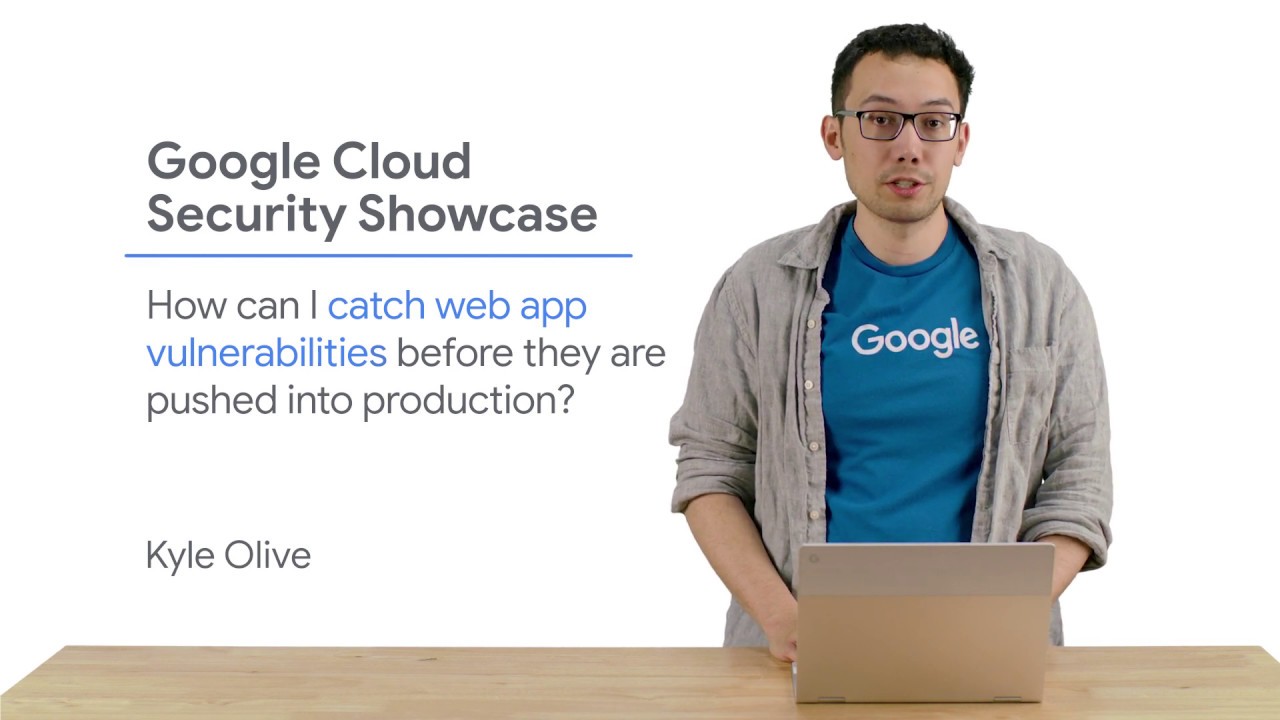
Topic: application security The videos on this topic detail how to better protect your applications with application testing, scanning, and API security features.
How can I catch web app vulnerabilities before they are pushed into production?
Topic: security monitoring and operations The videos in this section describe how to monitor for malicious activity, handle security incidents, and support your operational processes for preventing, detecting, and responding to threats.
How do I manage threats inside and outside Google Cloud Infrastructure?
Topic: Governance, risk, and compliance Videos here show how our controls, tools, and certifications can help support governance and compliance processes, including audits and risk assessments and compliance reporting.
How can Assured Workloads for Government help me meet regulatory compliance requirements?
These examples just scratch the surface of what’s available. We hope the security showcase makes it easier for IT admins and developers to protect your organization while saving time and effort. For the rest of the use-case-based security videos, check out our YouTube playlist.
Thanks to my role at Google Cloud, I’m privileged with a front-row seat to all of the amazing work our partners do on behalf of customers. Our partners play a critical role in delivering Google Cloud technology and solutions to organizations all over the world, so I am delighted to share the findings of a new study from IDC that shows Google Cloud is thriving, growing, and driving significant economic benefit for partners.
To summarize IDC’s study in a few words: Demand for cloud technology and services is growing rapidly, as businesses embark on digital transformations, and Google Cloud partners are particularly well-positioned to help customers plan and execute their digital transformation strategies.
According to IDC, “growth mode” continues for the IT market overall, and importantly, demand for cloud infrastructure, and cloud capabilities in areas like data analytics, artificial intelligence, IoT, and security is growing at an even faster pace. I’ve seen firsthand how the global pandemic has further increased businesses’ needs for these capabilities, as they seek to quickly adapt or even to take this opportunity to accelerate their digital transformations.
As IDC reports, “This is good news for Google Cloud partners, who by their nature are engaged across many of these technologies.” In fact, the analyst firm’s study forecasts that partners’ revenue from Google Cloud-related opportunities will more than triple by 2025, representing a tremendous opportunity for the ecosystem overall in building out their Google Cloud practices.
IDC’s research also found that Google Cloud partners’ businesses are growing at a fast clip. On average, partners are growing their Google Cloud businesses at a rate of 35% year-over-year, with a significant group of partners—one in five—growing even faster, at 75%-plus year-over-year.
All of this translates to a thriving ecosystem around Google Cloud technologies, and it’s encouraging to see how much value is passed through to our partners. Globally, for every $1 of Google Cloud technology sold in 2020, partners will generate $5.32 through their own offerings, services, and IP. IDC expects this number to grow, reaching $7.54 by 2025.
IDC’s study also provides insights into several other benefits that partners are seeing from working with Google Cloud:
Google Cloud partners are leading the way on digital transformation. IDC places a full half (50%) of Google Cloud partners in the “late stage of digital maturity,” and more than a third of Google Cloud partners have “fully integrated digital into their strategies and businesses,” meaning customers can trust Google Cloud partners to bring very strong expertise with modern cloud technologies and solutions.
At Google Cloud, we are focused on delivering end-to-end, best-in-class solutions. Many of our partners are extending these solutions, and IDC’s study found that these partners, who are creating their own unique IP around Google Cloud, are seeing very strong margins associated with these products.
Partners are benefitting from our goal of 100% partner attach on all customer sales, and partners are seeing strong margins across multiple activities, including resale, IaaS, PaaS, and SaaS add-ons, IT services, business services, and support for hardware and networking.
We have a tremendous opportunity together to help customers across industries and around the world transform their organizations with the cloud. I’m proud of the amazing work that our partners are doing, and we’re committed to continuing to work closely with partners to expand the Google Cloud economy together. To read IDC’s findings in full, you can download the report here.
Handy service for India and Nigeria, or feature creep that constricts competition?
Google has added a secure file locker to the “Files” “Files” app that it offers as a clean-up service for Android owners, and suggested it as ideal for users who share a smartphone.…
With a trio of talks to tempt you in The next meeting of the Wakefield RISC OS Computer Club (WROCC) is coming up and, in keeping with the current restrictions… Read more »
The 20.07 feature release contains new features for application development and tenant certificate renewal, additional promotions of beta features to long-term stable (LTS), and enhancements to improve stability and troubleshooting of device connections on Windows platforms.
Today, Leaseweb Global announced the launch of Leaseweb Cloud Connect – the hybrid cloud solution, that enables customers to seamlessly connect their Read more at VMblog.com.
Arista Networks announced several additions to its multi-cloud and cloud-native software product family with CloudEOS Edge : designed to integrate… Read more at VMblog.com.
In case you missed the announcement during 2019 re:Invent week, Amazon Fraud Detector was originally released in preview mode on December 3rd, 2019. But today it is now Generally Available for customers to check out.
What is Amazon Fraud Detector?
Amazon Fraud Detector is a fully managed service that makes it easy to identify potentially fraudulent online activities such as online payment fraud and the creation of fake accounts.
Did you know that each year, tens of billions of dollars are lost to online fraud world-wide?
Companies with online businesses have to constantly be on guard for fraudulent activity such as fake accounts and payments made with stolen credit cards. One way they try to identify fraudsters is by using fraud detection apps, some of which use Machine Learning (ML).
Enter Amazon Fraud Detector! It uses your data, ML, and more than 20 years of fraud detection expertise from Amazon to automatically identify potentially fraudulent online activity so you can catch more fraud faster. You can create a fraud detection model with just a few clicks and no prior ML experience because Fraud Detector handles all of the ML heavy lifting for you.
How it works..
“But how does it work?” you ask.
I’m so glad you asked! Let’s summarize this into 5 main steps.
Step 1: Define the event you want to assess for fraud.
Step 2: Upload your historical event dataset to Amazon S3 and select a fraud detection model type.
Step 3: Amazon Fraud Detector uses your historical data as input to build a custom model. The service automatically inspects and enriches data, performs feature engineering, selects algorithms, trains and tunes your model, and hosts the model.
Step 4: Create rules to either accept, review, or collect more information based on model predictions.
Step 5: Calls the Amazon Fraud Detector API from your online application to receive real-time fraud predictions and take action based on your configured detection rules.(Example: an ecommerce application can send an email and IP address and receive a fraud score as well as the output from your rule (e.g., review))
We begin by uploading fictitious generated training data to an S3 bucket. In fact, our user guide has a sample data set that we can use. Once we have downloaded that CSV file, we need to put this training data into an S3 bucket.
For context, let’s also go ahead open that CSV file and see what’s inside…
NOTE: With Amazon Fraud Detector, you’re able to choose a minimum of 2 variables to train a model, not just the email and IP address. (In fact, the model supports up to 100 inputs!)
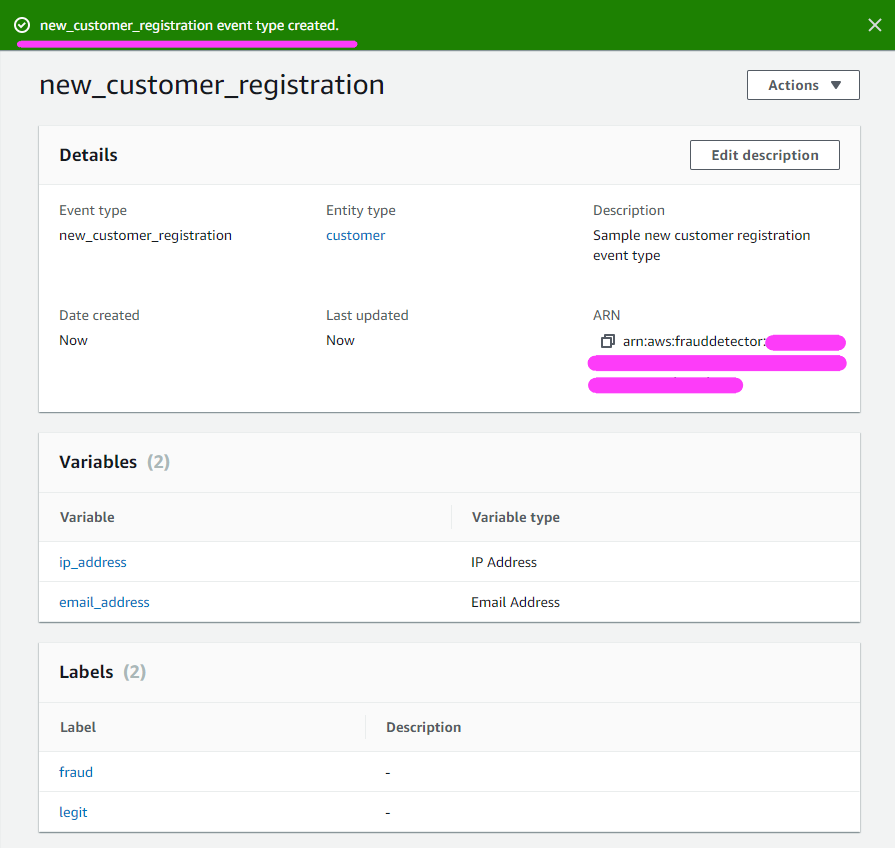
We continue by defining (creating) an event. An event is essentially a set of attributes about a particular event. We define the structure of the event we want to evaluate for fraud. (Amazon Fraud Detector evaluates ‘events’ for fraud.)
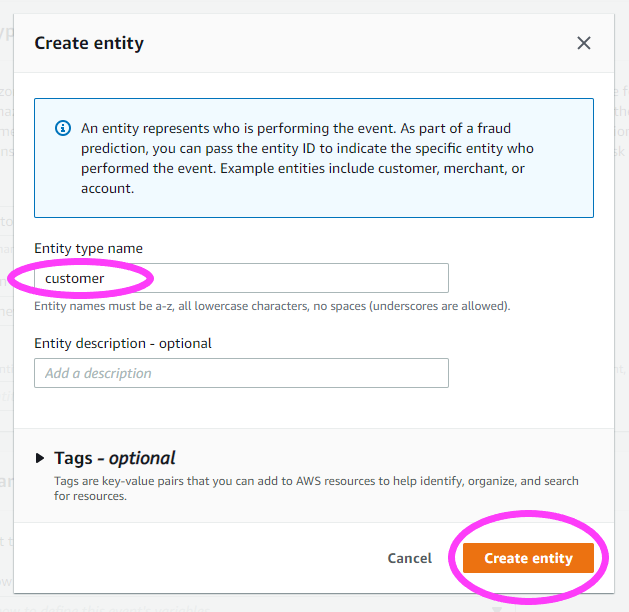
Let’s create a New Entity. This entity represents the person or thing that is triggering the event.
We move on to Event Variables. We will select variables from a training dataset. This will allow us to use the earlier mentioned CSV file and pull in the headers.
For the IAM role section, we create a new one. I am going to use the same name as my bucket I just created, ‘fraud-detector-training-data’.
And now we can upload the earlier mentioned CSV file to pull in the headers.
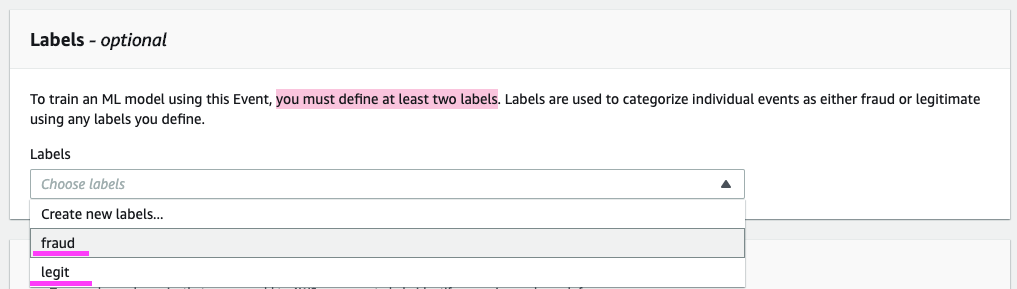
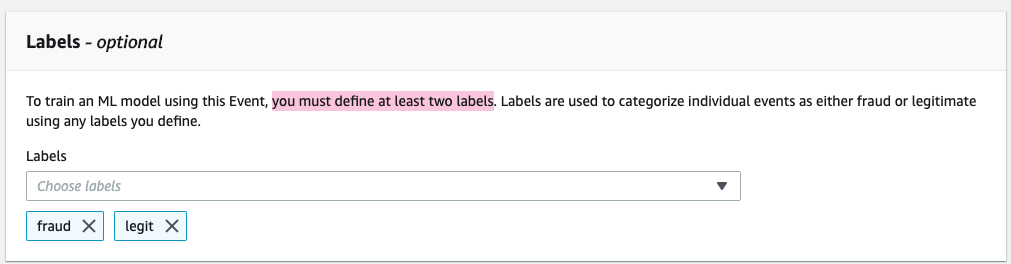
Because we are going to define a model, we must define at least two labels.
Let’s finalize creating our event!
If all goes well, we get a happy green bar that alerts us to the fact that our event was successfully created!
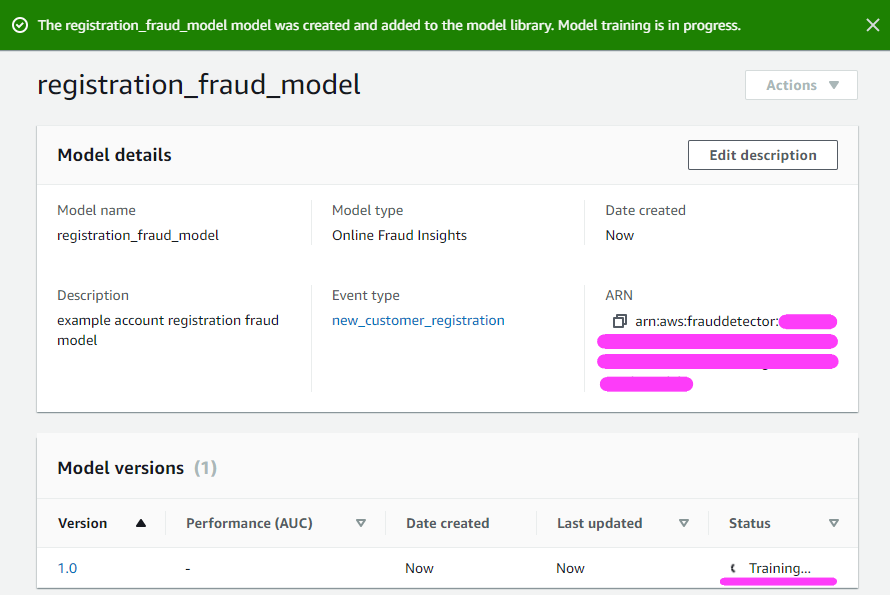
Now it’s time to create our Model.
Let’s take a moment to Define model details. We make sure to select our previously created event type.
We move on to Configure training and make sure to select the labels under Fraud and Legitimate labels. (This allows us to separate our classifications so that the model can learn to distinguish between these two labels.)
Models take about 30-40 minutes up to a couple hours depending on the dataset size. This example dataset takes around 40 minutes to train the model.
For the purpose of this blog post, let’s pretend we’ve already skipped ahead 40 minutes in time to a training model that is complete.
You can also check out your model’s performance metrics!
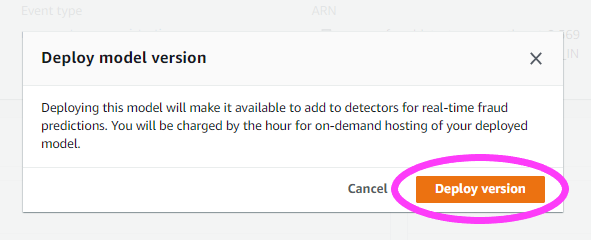
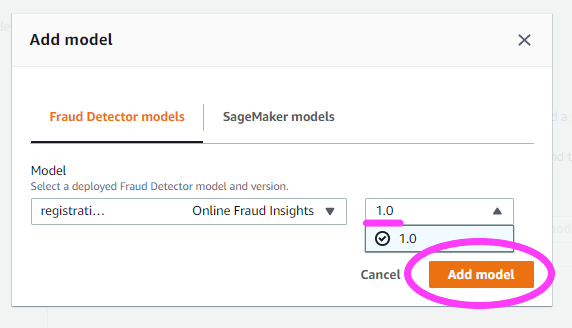
We can now proceed to deploy our Model.
A pop-up model asks us to confirm if this is the version we wish to Deploy.
Part B: Generate real-time fraud predictions
It’s time to generate real-time fraud predictions! Ready?
At this point you have a deployed model that you’re happy with and want to use to get predictions.
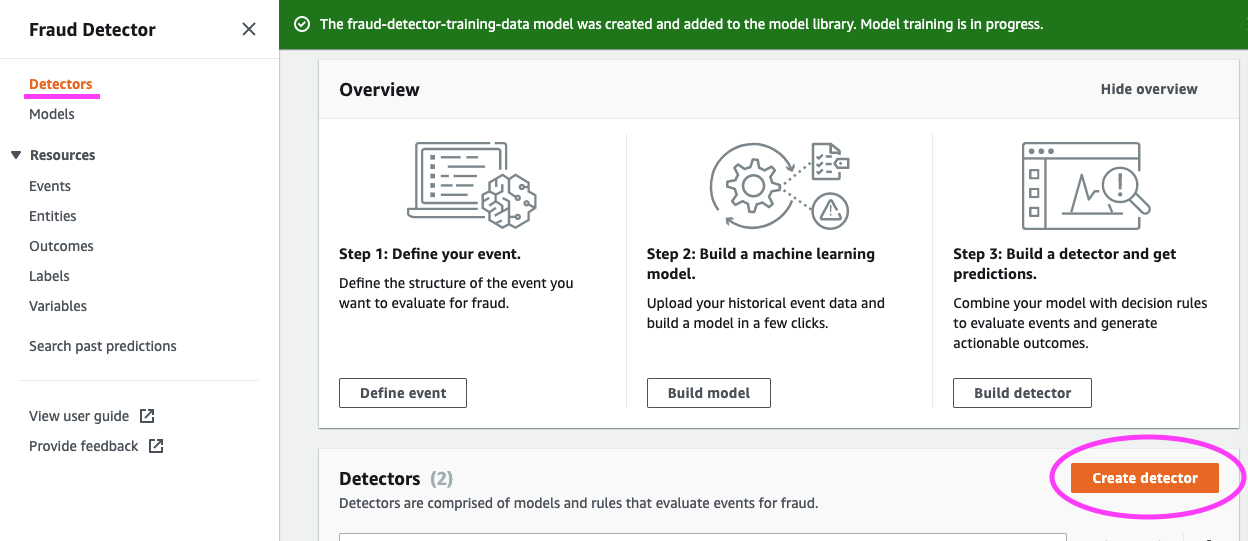
We must build a Detector, which is a container for your models and rules. It’s your detection logic that you want to apply to evaluate the event.
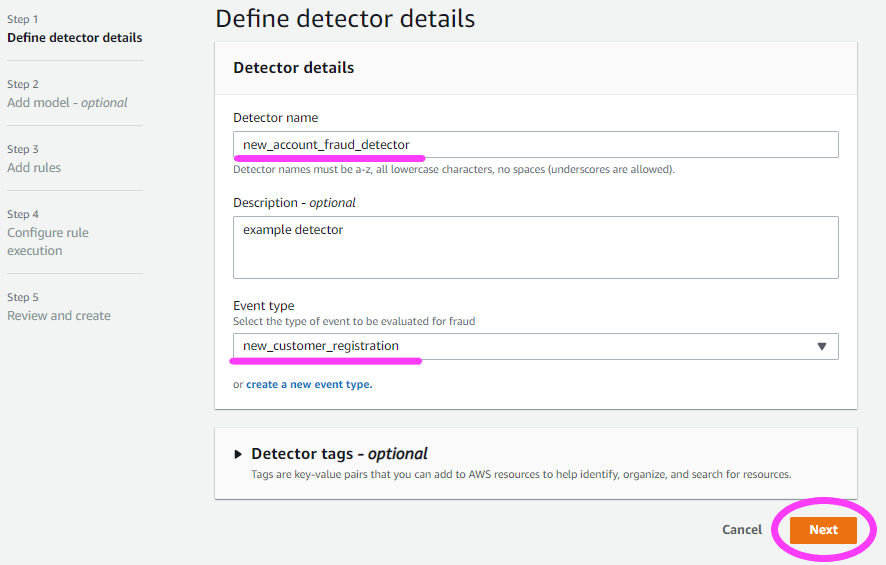
We go on to define the Detector details.
We also make sure to select our previously created Event.
Now we select a Model.
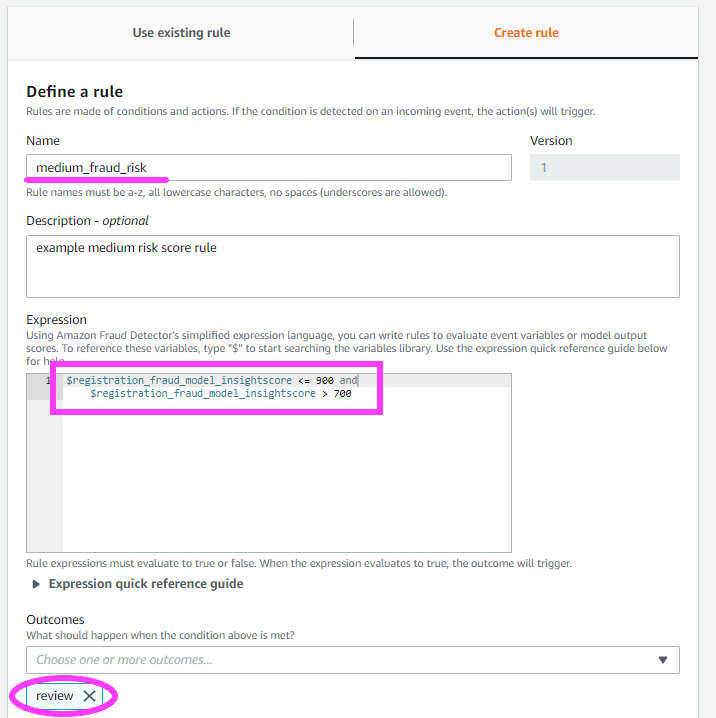
We move on to establish some threshold rules.
The rules interpret the output of the Model. They also determine the output of the Detector.
Let’s do two more rules.
Besides a high_fraud_risk label, we also want to add low_fraud_risk and medium_fraud_risk labels.
Remember that these rule threshold values are examples only. When creating rules for your own detector, you should use values that are appropriate based on your model, data and business.
Now in our example for this post, these particular threshold rules are never going to match at the same time.
This means that either Rule Execution modesare fine to use in our current example.
Yay! We’ve created our Detector.
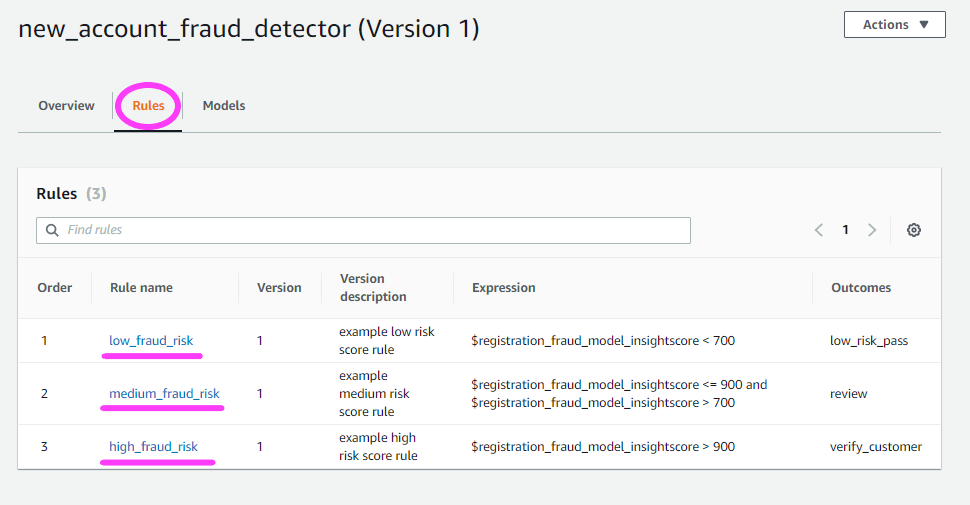
Now let’s click on the Rules tab.
We can also check out what models we have under the Models tab.
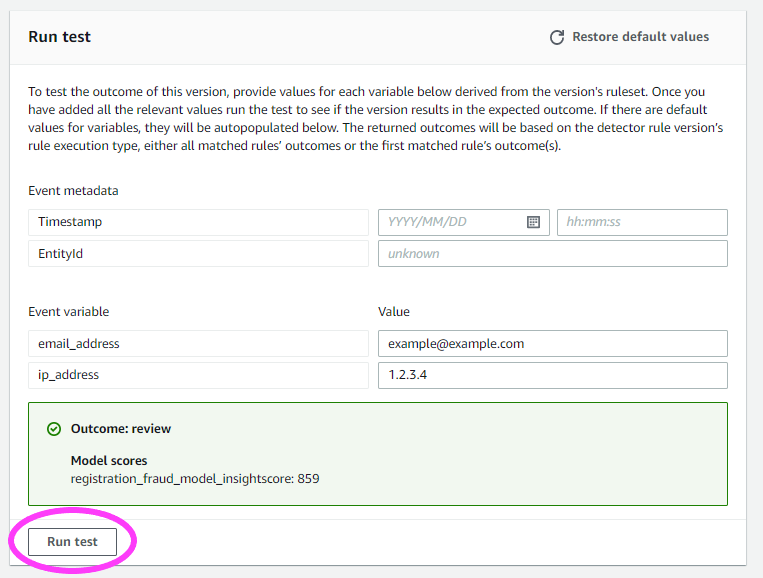
If we go back to the Overview tab, we can even run a quick test! We can run tests to sample the output from our Detector.
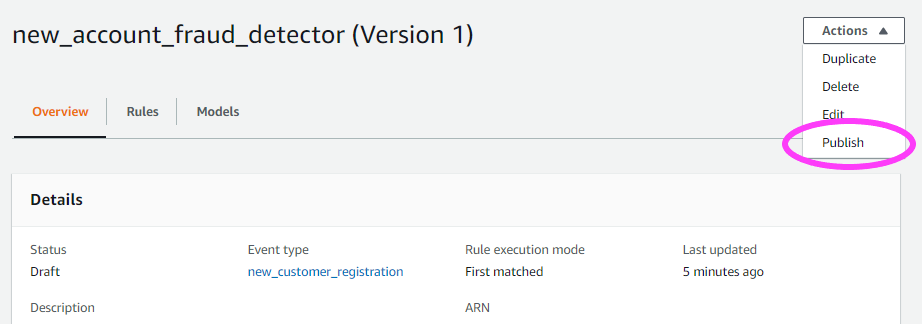
Once we’re ready, we can publish this version of the detector to make it the Active version. Each detector can have one Active version at a time.
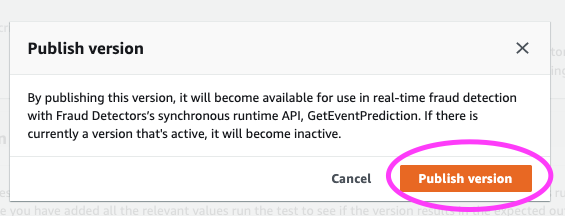
A pop-up modal asks us to confirm if we’re ready to publish this version.
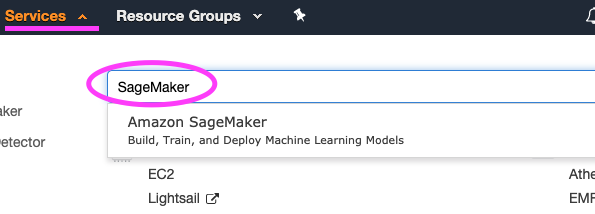
The next step is to run real time predictions! Let’s show a sample one-off prediction with an Amazon SageMaker notebook and see what that looks like.
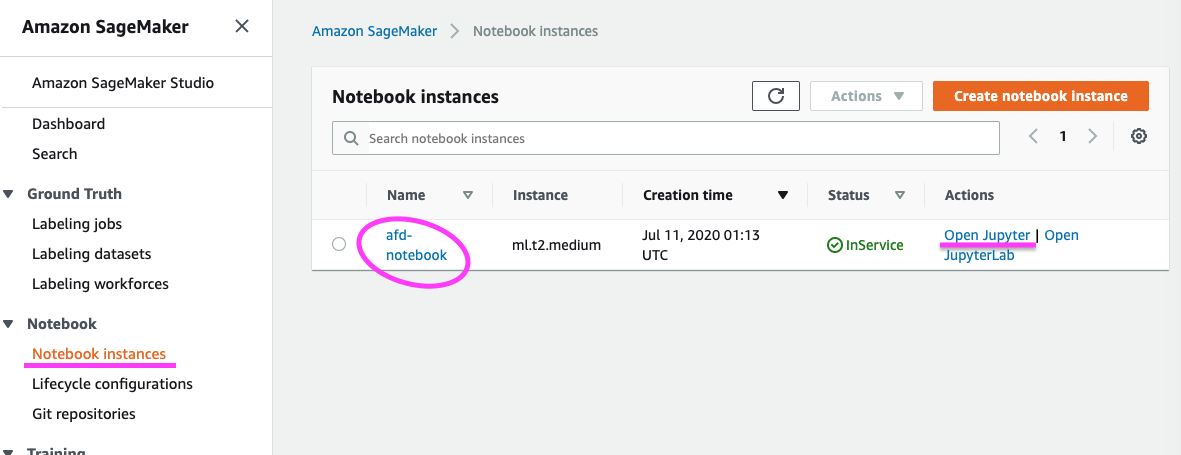
We move to the Amazon SageMaker console, and go to Notebook instances.
In this case you can see I already have a Jupyter Notebookready to go.
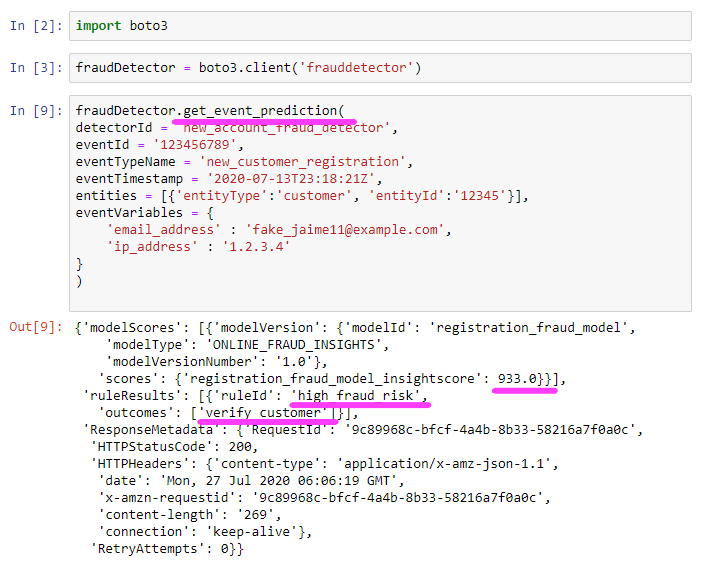
We’re going to run the get_event_prediction block. This is our main runtime API and customers can call it using a script to run a batch of sample predictions. Alternatively, customers can also integrate this API into their applications to generate real-time predictions, and adjust user experiences dynamically based on risk.
After running this block, here are the model score results we receive.
We had 1 model in this Detector and it returned a score of 933. According to the rules we created, this means we consider this transaction to return as a high_fraud_risk.
Let’s head back to the Amazon Fraud Detector console and check out the Rules in our Detector.
We can see from the Rules of our Detector that if the risk score is over 900, the Outcome should be verify_customer.
This completes the loop!
We now have confirmation that you can call this Detector in real time and get your Fraud Predictions.
PowerShell isn’t just a command-line tool for system administrators. Even savvy Windows 10 users can take advantage of the capabilities built-in. There are many cmdlets that expose advanced functionality built within Windows or just make performing GUI based operations even simpler.
In this article, we are going to group these commands into two buckets, gathering information and performing operations.
Gathering Information
Get-ComputerInfo
Get-EventLog
Get-AppXPackage
Get-Process
Get-LocalUser
Get-MpComputerStatus
Performing Operations
Restart-Computer
Start-Process
Remove-AppxPackage
Update-MpSignature
New-SmbShare
To use PowerShell, simply type Start→Run→”powershell” in the run dialog box. The version that will launch, by default, will be PowerShell 5.1, which is the last built-in version of PowerShell. Running the latest version, with its many performance enhancements and features, is recommended. You will want to navigate to the PowerShell development page, click on the Windows (x64) .msi under Downloads (Stable) and install the package.
Image #1Expand
At this point, you can type Start→Run→”pwsh” in the run dialog box, and you will be running the latest version of PowerShell, 7.0.3 at the time of this writing.
Gathering Information
PowerShell has a number of great commands for gathering information on a system. The ones listed below are some of them. In case you want to go further into the Windows operating system, reading through the help for PowerShell should point you in the right direction.
Get-ComputerInfo
Built-in to Windows is a function that allows you to easily pull specific system information all at once. As you can see from the screenshot below, Get-ComputerInfo shows information related to system information, user information, and the Windows installation itself.
Get-ComputerInfo
Get-EventLog
Of course, things can and will go wrong on your Windows 10 system. Most of these failures are recorded in the Application and System event logs. Although you can parse and filter those logs in the GUI, sometimes it is much easier to just pull those from the command line. Get-EventLog will easily show those details for you, and you can even filter by the -Newest number of entries, or the type of record, such as Information, Warning, or Error.
If you find that Get-EventLog is not available, you may be running PowerShell 7 (Core), as recommended. If this is the case, you simply need to install the WindowsCompatibility module and import the [Microsoft.PowerShell.Management](<http://microsoft.PowerShell.Management>) Windows PowerShell module.
One of the big enhancements to Windows 10 was the new packaging model that was created for Windows Store packages, known as AppX. If you use the Windows Store GUI, it’s possible to manage these applications, but it is often far quicker to do so on the command line.
In the example below, we are filtering out Microsoft applications, as there are many, and also returning only the Name and Version properties to make the output easier to read.
Get-AppXPackage | Where-Object Publisher -NotMatch "Microsoft" | Select-Object Name, Version
To see all of the AppX packages, simply remove the Where-Object command in the pipeline and you will see all Microsoft Packages as well.
Subscribe to Petri NewslettersOffice 365 Insider
Our Petri Office 365 Insider is dedicated to sharing detailed knowledge from top Office 365 experts. Delivered once a month to your inbox.
Petri.com may use your contact information to provide updates, offers and resources that may be of interest to you. You can unsubscribe at any time. To learn more about how we manage your data, you can read our Privacy Policy and Terms of Service.
!Already a Petri.com member? Login here for 1-click registration.
Get-Process
When your system starts to runs slowly, many folks will reach to see what is in the Task Manager. This is useful, especially to see a constantly updated graph of usage. But if you need to see more in depth information on a given process, then the Get-Process command will show much more than can be seen in the Task Manager.
Get-Process
As you can see, running Get-Process by itself will show a similar view to task manager, but by telling it to retrieve all properties of a single process, you can discover much more. As seen in the image below, you can see the process path, it’s version, when it was started, and much more that isn’t shown in the screenshot below.
Get-LocalUser
Every time you login to Windows you are using a user that is contained within a group or groups. Sometimes these are local users, those that are not in a domain (if you are in a corporate environment), or Microsoft Accounts. In the example below, we are selecting specific properties, one of which is PrincipalSource and is very useful to enumerate what type of account you are looking at, such as a Microsoft Account.
Finally, we will look at Get-MpComputerStatus for when you need to see if the Windows Defender antivirus is functioning properly, and to make sure that all relevant scans have been running as intended.
Get-MpComputerStatus
Performing Operations
As useful as gathering information is, sometimes you do need to take action to perform an operation based on what you have learned.
Restart-Computer
Simply running Restart-Computer will tell the system to start a restart process. You can use the -Force command to not wait for any processes and force an immediate system restart.
Restart-Computer -Force
Start-Process
Like using the Start→Run dialog, you can similarly start processes using the Start-Process cmdlet. This could be applications such as Notepad, Calculator, or even the modern control panel, as seen below. In the example, the following command will directly open the Display dialog.
Start-Process "ms-settings:display"
Remove-AppXPackage
Previously, we explored listing out AppX Packages that were installed on the system. What if we want to simply remove one of those packages? First we would find the package, using the same Get-AppXPackage command and then “pipe” the results to the Remove-AppXPackage command. As you can see in the example below, we are removing the Microsoft.ZuneMusic package, as it’s not needed.
Finally, it’s important to make sure that your antivirus is kept up to date. To make sure the latest signatures are installed for Windows Defender, you can run the Update-MpSignature cmdlet to force the signatures to update to the latest version.
Update-MpSignature
Conclusion
As you can see there are many different ways that PowerShell can be used to gather information, perform operations, and manage your system. This article only scratches the surface of the different ways that PowerShell can enhance how you use your Windows 10 system!
With the global pandemic, customers are relying on remote work more than ever, and Windows Virtual Desktop is helping customers rapidly deliver a secure Windows 10 desktop experience to their users. Charlie Anderson, CIO of Fife Council in the United Kingdom, was planning to modernize his companies’ existing Remote Destop Services (RDS) infrastructure, and then business requirements changed. He needed increased agility and scale to meet the changing requirements. In his own words:
“Windows Virtual Desktop was absolutely essential for us in terms of our response to the COVID-19 pandemic. Like many, we were faced with a continuity issue unparalleled in recent times. For us, this meant not only the continuation of services we already delivered, but also responding very quickly to new demands arising as a result of our public response to the pandemic.
To do that, we needed to provide as close to the “in-office” experience as we could to a workforce now working away from our offices. This meant multiplying previous remote working capacities by a factor of 15 almost overnight – something which would have been impossible without a scalable and cloud-based approach, which also worked well on a range of Council and self-provided devices.
There is little doubt that the Windows Virtual Desktop solution will not only be vital to the future resilience of our public services to the people of Fife, but it will also form a key part of our future device strategy as we seek to develop new, agile, and cost-effective approaches going forward.“
In April 2020, we released the public preview of Azure portal integration which made it easier to deploy and manage Windows Virtual Desktop. We also announced a new audio/video redirection (A/V redirect) capability that provided seamless meeting and collaboration experience for Microsoft Teams. We are humbled by the amazing feedback we’ve received from you on these capabilities, and that’s been a huge motivation for our team to accelerate development. We are happy to announce that both the Azure portal integration and A/V redirect in Microsoft Teams are now generally available.
Azure portal integration
With the Azure portal integration, you get a simple interface to deploy and manage your apps and virtual desktops. Host pool, workspace, and all other objects you create are Azure Resource Manager objects and are managed the same way you manage other Azure resources.
Customers who have existing deployments based on the previous (classic) model can continue using it. We will soon publish guidance on migrating to the new Azure Resource Manager-based deployment model so you can take advantage of all the new capabilities, including:
Azure role-based access control (RBAC)
You can use Azure RBAC to provide fine-grained access control to your Windows Virtual Desktop resources. There are four built-in admin roles that you can get started with, and you can create custom roles if necessary.
User management
Previously, you could only publish Remote Apps and Desktops to individual users. You can now publish resources to Azure Active Directory (Azure AD) groups, which makes it much easier to scale.
Monitoring
The monitoring logs are now stored in Azure Monitor Logs. You can analyze the logs with Log Analytics and create visualizations to help you quickly troubleshoot issues.
A/V redirect for Microsoft Teams
Many of you use Microsoft Teams to collaborate with your colleagues. Traditionally, virtual desktops have not been ideal for audio and video conferencing due to latency issues. That changes with the new A/V redirect feature in Windows Virtual Desktop. Once you enable A/V redirect in the Desktop client for Windows, the audio and video will be handled locally for Microsoft Teams calls and meetings. You can still use Microsoft Teams on Windows Virtual Desktop with other clients without optimized calling and meetings. Microsoft Teams chat and collaboration features are supported on all platforms.
The content below is taken from the original ( MP3 Is 25 Years Old!), to continue reading please visit the site. Remember to respect the Author & Copyright.
In the streaming era, music is accessed from a variety of online services, ephemeral in nature and never living on board the device. However, the online audio revolution really kicked off with the development of one very special format. The subject of bitter raps and groundbreaking lawsuits, this development from Germany transformed the music industry as we know it. Twenty-five years on from the date the famous “.mp3” filename was chosen, we take a look back at how it came to be, and why it took over the world.
Audio Big, Disks Small
1995 hard drive prices from an LA Trade ad in BYTE Magazine. The least expensive option rings in at $0.22 per megabyte, which means your 700 MB audio CD would cost $154 to store without compression (10x the cost of buying an album at the time).
The road to MP3 was a long one. The aim was to create a codec capable of encoding high-quality audio at low bitrates. Finding a method of compression that didn’t compromise audio quality was key. In an era where hard drives were measured in tens or hundreds of megabytes, storing uncompressed digital audio at CD quality — around 10MB per minute — wasn’t practical.
In the 1980s, researchers around the world were working on various encoding methods to solve this problem. Things began to pick up steam when, in 1988, the Moving Picture Experts Group called out for an audio encoding standard. The next year, 14 proposals were submitted. Four working groups were created, which began to work further on a variety of encoding methods.
Around the time the MP3’s name was decided upon, the Pentium was cutting-edge technology. Desktop computers at the time with clock speeds under 100MHz would struggle to play CD-quality files.
One of the main techniques to come out of the process was MUSICAM, which adopted a psychoacoustic model of human hearing to aid compression. This takes advantage of the effect of auditory masking, a perceptual limitation of human hearing where some sounds mask others from being heard at the same time. By eliminating data corresponding to these sounds that aren’t perceived anyway, it became possible to store more audio in less space without any perceived effect for the listener.
The MUSICAM technology became the basis for much of the original MPEG 1 Audio Layers I and II. A team of researchers at the Fraunhofer Institute took the psycoacoustic coding filter bank techniques, while mixing in some ideas gleaned from the competing ASPEC proposal to MPEG. The aim was to create the Layer III codec that could deliver the same quality at 128 kbps as Layer II could at 192 kbps. The final results were published in the MPEG 1 standard in 1993.
With the development of the Internet happening at a rapid pace, the Fraunhofer team realised their standard had the possibility of becoming a defacto standard for audio on the platform. With its small file size and high quality, it was perfect for sharing over the slow connections of the time period. In a fateful email on July 14, 1995, the team decided that their files should bear the now-famous .MP3 extension.
No Business Model Survives First Contact With The Enemy
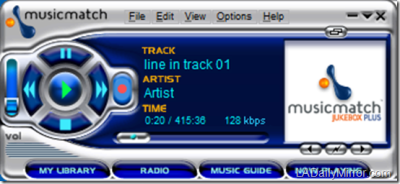
MusicMatch Jukebox was a popular CD ripper and MP3 player. MusicMatch are notable for having actually paid Fraunhofer for their MP3 license.
The original business plan was to monetise the technology through sales of encoders. These would be sold at a high price to companies that wished to create software or hardware capable of encoding MP3 files. To drive acceptance of the standard, the decoders used to play the MP3 files would be cheap or free, encouraging consumer uptake.
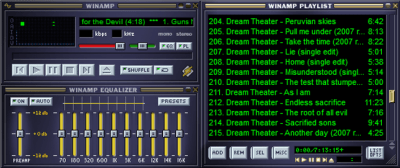
Winamp was one of the most popular audio players of the MP3 era. Teenagers of the time like yours truly loved it, because it looked like a cool vintage stereo.
While this initially seemed feasible, things quickly fell apart, thanks to the very Internet that Fraunhofer had pinned their fortunes on. In 1997, an Australian student purchased MP3 encoding software with a stolen credit card, before quickly sharing it on an FTP server online. Suddenly it was readily possible for anyone to create their own MP3 files. With the files out in the wild, calls to stop the spread of the software fell on deaf ears.
Within a short time, it was readily possible to download free programs to rip audio from CDs and store it in nearly the same quality at a tenth of the size as an MP3. Websites quickly sprung up, allowing users to freely download the music of their choice. While FTP servers were the defacto file sharing standard of the day, 1999 then saw the launch of Napster, a platform that allowed users with minimal technical knowledge to directly share their digital music collections with others. The music industry had just been changed forever.
Cats Don’t Go Back In Bags
Napster was the progenitor of the file streaming movement. While it lived a short life, it inspired many services to come.
Suddenly the idea of paying $16.98 for a CD seemed ludicrous, when it was readily possible to get the same music for free online. Record labels and artists scrambled to file lawsuits and sue music fans huge sums to discourage downloading. Despite some high profile legal fights, attitudes towards music had already been irrevocably altered. MP3 players had also hit the market, allowing users to carry huge numbers of songs around without having to juggle fragile CDs. These were similarly met with legal challenges, but the juggernaut that was MP3 could not be overcome.
Even in the wake of Napster’s bankruptcy, other services bloomed in the vacuum left by its closure. Pirates learned from the case, and decentralization became key to avoiding legal troubles. This put the onus of criminality on those sharing the files, rather than those running a peer-to-peer service which merely facilitated file transfers.
The Diamond Rio PMP3000 was one of the earliest MP3 players, attracting the ire of the RIAA on launch.
Services to sell digital audio would take many more years to flourish. Initial offerings lost out due to high prices and restrictive DRM that simply gave customers a worse experience than a clean, unencumbered MP3 available for free.
MP3s dominance only began to wane in the 2010s, when a transition to streaming technology and smartphones began to offer a better user experience. Rather than having to manage a multi-gigabyte collection of songs, and shuffle them from device to device, instead users could simply call up virtually any music they wanted at the click of a button. In the same way Facebook defeated Myspace, the ease of streaming quickly relegated MP3 players and the format itself to the past.
The Format Broke the Business of Recorded Music
While few of us still trawl file sharing networks looking for the latest albums, the MP3 was key in forever altering how people expected music to be delivered, and the price people were willing to pay for it.
The pay structure for artists and labels changed monumentally throughout this turbulent time. While post-MP3 services like iTunes once sold tracks at 99 cents a song, artists now receive fractions of a cent per stream. However, the lower importance of physical media has also, at least in theory, made it possible for artists to break out without needing a record label to shift product internationally. Genres like Soundcloud rap and Vaporwave sprung up organically from services that allowed budding musicians to share their music online. It’s easy to draw a direct link between such subcultures and the dawn of music sharing online spawned by MP3.
While Fraunhofer may not have gotten the business win they desired from the technology, the MP3 undoubtedly changed the face of music forever. Artists likely still weep at the diminishing returns from stingy streaming services versus album royalties of years past, and record labels will still grate at unlicenced copying as they have since the cassette era. However, MP3 remains a technology that democratized the access to and creation of music, and for that, it should be lauded. Happy birthday MP3, and here’s to another 25 years of quality compressed music!
The content below is taken from the original ( Digging Deep Into SD Card Secrets), to continue reading please visit the site. Remember to respect the Author & Copyright.
To some, an SD card is simply an SD card, notable only for the amount of storage it provides as printed on the label. However, just like poets, SD cards contain multitudes. [Jason Gin] was interested as to what made SanDisk’s High Endurance line of microSDXC cards tick, so he set out to investigate.
Naturally, customer service was of no help. Instead, [Jason] started by scraping away the epoxy covering which hides the card’s test points. Some delicate soldering was required to hook up the test points to a breakout board, while also connecting the SD interface to a computer to do its thing. A DS Logic Plus signal analyzer was used to pick apart the signals going to the chip to figure out what was going on inside.
After probing around, [Jason] was able to pull out the NAND Flash ID, which, when compared to a Toshiba datasheet, indicates the card uses BiCS3 3D TLC NAND Flash. 3D NAND Flash has several benefits over traditional planar Flash technology, and SanDisk might have saved [Jason] a lot of time investigating if they’d simply placed this in their promotional material.
As the technology requirements of your business or practice grow and change over time, deploying business-critical applications can increase complexity and overhead substantially. To help manage this ever-growing complexity, we are pleased to announce the introduction of the Microsoft Azure Well-Architected Framework. Following industry standards and terms, the Azure Well-Architected Framework provides a set of Azure architecture best practices to help you build and deliver great solutions.
The Azure Well-Architected Framework is divided into five pillars of architectural best practices: cost management, operational excellence, performance efficiency, reliability, and security. These pillars help you effectively and consistently optimize your workloads against Azure best practices and the specific business priorities that are relevant to you or your customers’ cloud journey.
Get started with the Azure Well-Architected Framework:
Read the framework content, reference material, and samples available in the Azure Architecture Center.
Here is how each of these modalities can help you improve your workloads and grow your business.
Get started
Designing and deploying a successful workload in any environment can be challenging. This is especially true as agile development and DevOps/SRE practices begin to shift responsibility for security, operations, and cost management from centralized teams to the workload owner. This transition empowers workload owners to innovate at a much higher velocity than they could achieve in a traditional data center, but it creates a broader surface area of topics that they need to understand to produce a secure, reliable, performant, and cost-effective solution.
As an example, consider a Dev/Test workload that you’ve deployed as a simple proof of concept to measure the feasibility of Azure. If you’ve never had to manage the security, cost, performance, and reliability constraints for a workload, how do you ensure that your proof of concept is valid? How do you know you’re even asking the right questions or reviewing the metrics that you have available? The Azure Well-Architected Framework helps you make all the appropriate considerations for your workload.
For existing workloads, an additional tool that aligns with the Azure Well-Architected Framework is Azure Advisor. The guidance provided by Azure Advisor helps you pinpoint specific resources in your application that can be improved across the five pillars. Additionally, recommendations are prioritized according to our best estimate of significance to your environment, and you can share them with your team or stakeholders.
Review your workloads consistently
The Azure Well-Architected Review is designed to help you evaluate your workloads against the latest set of Azure best practices. It provides you with a suite of actionable guidance that you can use to improve your workloads in the areas that matter most to your business. Every customer is on a unique cloud journey, so we designed the Azure Well-Architected Review to be tailored to an individual company’s needs. You can evaluate each workload against only the pillars that matter for that workload, so when evaluating one of your mission-critical workloads, you might examine reliability, performance efficiency, and security first and then later come back and look at the other pillars to improve your operational efficiency and cost footprint.
As you complete the assessment, you’re provided a score for each pillar that you chose to evaluate and an aggregate score across the entire workload. You also receive a set of actionable recommendations that you can follow to better align the workload with your business priorities.
At the current pace of technical innovation, having a well-architected workload is a moving target. As best practices and technology evolve, business priorities change, or other factors shift, what was best for your workload may move right along with it. To continuously meet these targets and requirements, update your process to regularly review and monitor your or your customers’ most important workloads to ensure that they’re reliable, secure, and operating as expected.
Learn how to build great solutions
At Microsoft Build 2020, we introduced the Build great solutions with the Microsoft Azure Well-Architected Framework learning path, which you’ll find helpful if you’re new to building solutions in the cloud or prefer a more interactive experience. This learning path consists of six modules: an overview of the framework along with one module for each pillar that provides a high-level conceptual overview without getting bogged down in the specific details of workload optimization.
Next steps
For a quick introduction to the Azure Well-Architected Framework please visit us at this session, or explore one of the modalities that we’ve detailed above.
We’re rapidly iterating to build out Azure Well-Architected across each of the channels we’ve detailed. If you have feedback, please reach out to us via GitHub, Facebook, and Twitter.
How do you know if your remote workers have access to the applications they need to be productive and if they do, are they using them? With work from Read more at VMblog.com.


 NOTE: With Amazon Fraud Detector, you’re able to choose a minimum of 2 variables to train a model, not just the


 y Canela


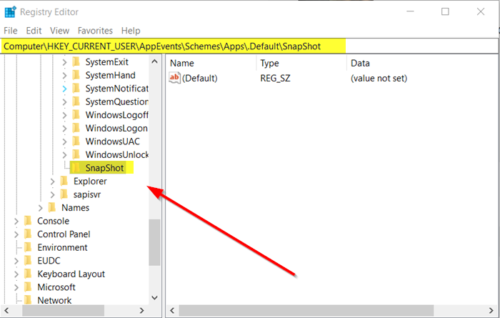
 You can add a sound to the Print Screen Key so that every time you press it to capture a screen sound, it will make […]