SharePoint Page Templates Have Finally Arrived, Here’s How to Use Them

The content below is taken from the original ( SharePoint Page Templates Have Finally Arrived, Here’s How to Use Them), to continue reading please visit the site. Remember to respect the Author & Copyright.


Since the introduction of SharePoint news, for the modern SharePoint experience, our customers have been asking for the ability to create templates. Unfortunately, this option wasn’t available. There was a workaround though.

You could create a copy of an existing news post:

The major downside of this workaround is usability. Business users have to browse to an existing news post, that’s not always easy to find, to create a duplicate. Business users want to create a news post, based upon a template, from the add a news post experience. You also have to realize it’s not easy, for the less technical folks, to build a news post with all the available web parts and sections. Although the experience can be user-friendly, it’s doesn’t implicate everyone is able to create beautiful news pages.

Template will finally solve this problem and they are starting to become available. This new SharePoint feature is, for now, only available for Targeted Release tenants. Let’s take a closer look at the new feature.

Three templates

The create a news post menu has a new look & feel:


Microsoft provides us with three templates:

  1. Blank
  2. Visual
  3. Basic text

You can create a news post based on one of these three templates. Let’s use the visual template:


Imagine, you want to provide your sales department with a template to quickly and easily announce sales-related items. You start with the canvas and build your template; this is easily accomplished by using the out-of-the-box SharePoint web parts. For example:

Are you done? Click on the arrow next to save as draft and click on save as template:

Confirm your new template and you are ready to go! Let’s go back to the home page and create a news post:


After completing these steps, the template is now available on the SharePoint site where we created the template. The template is saved within a brand new folder in the site pages library. Guess what’s it called? You guessed right. It’s called templates.

Conclusion

I really like the new template feature. That said, there is one important thing you have to be aware of: templates are created at the site level. There is, at least for now, no SharePoint hub integration available. You would have to create a page template for each site. I am very positive this is high on the priority list for Microsoft. Let’s keep our eyes open with the SharePoint Conference coming up near the end of May.

The post SharePoint Page Templates Have Finally Arrived, Here’s How to Use Them appeared first on Petri.

Arduino Unveils New Nano Family of Boards

The content below is taken from the original ( Arduino Unveils New Nano Family of Boards), to continue reading please visit the site. Remember to respect the Author & Copyright.

It’s Maker Faire Bay Area and that means new flavors of Arduino! The Italian boardmakers announced today a new family of affordable, low-power “Nano” sized microcontroller boards based on powerful Arm Cortex processors that may give you pause before buying another Chinese knockoff — you get Arduino quality starting at […]

Read more on MAKE

The post Arduino Unveils New Nano Family of Boards appeared first on Make: DIY Projects and Ideas for Makers.

Best free Automation software for Windows 10

The content below is taken from the original ( Best free Automation software for Windows 10), to continue reading please visit the site. Remember to respect the Author & Copyright.

Computers have changed the way we live our lives. They have found a place for themselves in every walk of our life. In the recent past, artificial intelligence and machine learning have given way to increased automation. Despite the development, […]

This post Best free Automation software for Windows 10 is from TheWindowsClub.com.

Bash script to create CSV file of all media in a folder (recursively)

The content below is taken from the original ( Bash script to create CSV file of all media in a folder (recursively)), to continue reading please visit the site. Remember to respect the Author & Copyright.

Realizing that some of my media (mostly older files) are in unacceptably poor quality, I was looking for something to scan my media to find said files, so I could know what to attempt to replace going forward. Couldn’t find anything, so I rolled my own. Thought it might be useful to some.

Save script as mi2csv, or whatever you want, in your executable path, and make it executable chmod +x mi2csv

Requires mediainfo to be installed. sudo apt install mediainfo or whatever similar on your system.

Usage:

mi2csv "/path/to/media" "mycsvfile.csv"

Will scan provided media path for all video and audio files and create the given CSV file with following layout, suitable for importing into your favorite spreadsheet application:

filename, ext, size, duration, width, height, fps, aspect "/plex/movies/Catwoman/Catwoman.avi", avi, 1466207024, 01:39:57.680, 720, 304, 25, 2.35:1 

Modifications to these fields should be fairly simple.

Hope someone finds it useful. Comments or recommendations are welcomed.

#!/bin/bash FormatFile="/tmp/inform.txt" FolderRoot="$1" CSVFile="$2" ExtList=".*\.\(mp4\|m4v\|m4p\|mkv\|avi\|asf\|wmv\|flv\|vob\|ts\|mpg\|mpeg\|mts\|m2ts\|webm\|ogv\|mov\|3gp\|3g2\|mp3\|m4a\|ogg\|flac\)" function cleanup () { rm "$FormatFile" } trap "cleanup" EXIT mi=$(which mediainfo) if [ $? -eq 1 ]; then echo "Failed to locate mediainfo on this system. This script won't work without it." exit; fi # Create the Format file used by mediainfo echo 'General;""%CompleteName%"", %FileExtension%, %FileSize%, %Duration/String3%, ' > "$FormatFile" echo 'Video;%Width%, %Height%, %FrameRate%, %DisplayAspectRatio/String%' >> "$FormatFile" # Create CSV file with headers echo "filename, ext, size, duration, width, height, fps, aspect" > "$CSVFile" find "$FolderRoot" -type f -iregex "$ExtList" -exec "$mi" --Inform="file://$FormatFile" {} \; >> "$CSVFile" exit; 

submitted by /u/haz3lnut to r/PleX
[link] [comments]

How to use GoPro as a Security Camera

The content below is taken from the original ( How to use GoPro as a Security Camera), to continue reading please visit the site. Remember to respect the Author & Copyright.

GoPro as a Security Camera

GoPro as a Security CameraGoPro cameras are widely used pocket-sized camera device popular among adventures, surfers, athletes, travelers and boggers for action photography. They are great for rugged use and is ideal for capturing videos when you are in beach, mountain, snow, diving into […]

This post How to use GoPro as a Security Camera is from TheWindowsClub.com.

Windows 10 Release information details, Versions, Known & resolved issues and more

The content below is taken from the original ( Windows 10 Release information details, Versions, Known & resolved issues and more), to continue reading please visit the site. Remember to respect the Author & Copyright.

Windows 10 release information

Windows 10 release informationThe past few years Microsoft has been more transparent than ever. The Redmond giant had published a page which lists down all known issues, date when the issue was resolved, information on when they were resolved, and support time left […]

This post Windows 10 Release information details, Versions, Known & resolved issues and more is from TheWindowsClub.com.

How SunPower is using Google Cloud to create a sustainable business

The content below is taken from the original ( How SunPower is using Google Cloud to create a sustainable business), to continue reading please visit the site. Remember to respect the Author & Copyright.

At Google, we have spent the past 20 years building and expanding our infrastructure to support billions of users and sustainability has been a key consideration throughout this journey. As our cloud business has taken off, we have continued to scale our operations to be the most sustainable cloud in the world. In 2017, we became the first company of our size to match 100% of our annual electricity consumption with purchases of new renewable energy. In fact, we have purchased over 3 gigawatts (GW) of renewables to-date, making us the largest corporate purchaser of renewable energy on the planet.

Our commitment to be the most sustainable cloud provider makes our work with SunPower even more impactful. Working together, we want to make it easy for homeowners and businesses to positively impact our planet.

SunPower makes the world’s most efficient solar panels which are distributed world-wide for residential and commercial customers. Since their beginning in 1985, they have installed over 10 GW of solar panels, which have cumulatively off-set about 40 million metric tons of carbon dioxide. To put that into perspective, that is the same amount of carbon dioxide nine million cars produce in a year.

Even with this impressive progress, rooftop solar design can still be a complicated process:

  • Potential solar buyers spend a significant amount of time online researching solar panels and understanding potential savings is challenging.

  • Once engaged with a provider, the design is a manual, time-intensive process and relies on the identification and understanding of factors unique to each home. These include chimneys or vents, legally-mandated access walkways, and the amount of sunlight exposure for every part of the roof.

At their current pace, SunPower’s solar designers would need over a century to create optimized systems and calculate cost savings for the 100 million future solar homes in the United States. By partnering with Google Cloud, SunPower significantly changed this timeline by developing Instant Design, a technology that allows homeowners and businesses to create their own design in seconds. This technology leverages Google Cloud in three important ways.

  • First, Instant Design uses Google Project Sunroof for access to both satellite and digital surface (DSM) data. By using the 1 petabyte of Sunroof data and imagery around the world, along with SunPower’s database of manually generated designs as a base, Instant Design can easily develop a model through a quick process of training, validation, and analyzing test sets.

  • Second, once SunPower built a satisfactory proof of concept, they leveraged Google Cloud’s AI Platform to iterate and improve upon their machine learning models and  quickly integrate them with their web application.

  • Third, Google Cloud allows the SunPower team to choose the processing power that best fits their needs, and can easily combine technologies for optimal performance. SunPower is using a combination of CPUs, GPUs, and Cloud TPUs to put the “instant” in Instant Design.

Our goal is to help SunPower empower their customers to make the transition to solar panels seamless. With the help of Google Cloud, homeowners can create their own design in seconds, which improves their buying experience, reduces barriers to going solar, and increases solar adoption on a larger scale.

At our Google Cloud Next ‘19 conference last month, Jacob Wachman, vice president of Digital Product and Engineering at SunPower, explained how Instant Design’s use of Google Cloud reflects the best of machine learning by providing applications that can improve the human condition and the health of our environment (see video here). We’re honored that SunPower has partnered with us to develop a technology that can advance our larger goal of a more sustainable future. Instant Design rolls out this summer and we’re excited to continue our work with the SunPower team.

More information on how SunPower is leveraging Google Cloud Platform can be found here. If you’re interested in how we are working with SunPower and other organizations across the globe to build a more sustainable future, check out cloud.google.com/sustainability.

API design: Why you should use links, not keys, to represent relationships in APIs

The content below is taken from the original ( API design: Why you should use links, not keys, to represent relationships in APIs), to continue reading please visit the site. Remember to respect the Author & Copyright.

When it comes to information modeling, how to denote the relation or relationship between two entities is a key question. Describing the patterns that we see in the real world in terms of entities and their relationships is a fundamental idea that goes back at least as far as the ancient Greeks, and is also the foundation of how we think about information in IT systems today.

For example, relational database technology represents relationships using a foreign key, a value stored in one row in a database table that identifies another row, either in a different table or the same table.

 Expressing relationships is very important in APIs too. For example, in a retailer’s API, the entities of the information model might be customers, orders, catalog items, carts, and so on. The API expresses which customer an order is for, or which catalog items are in a cart. A banking API expresses which customer an account belongs to or which account each credit or debit applies to.

The most common way that API developers express relationships is to expose database keys, or proxies for them, in the fields of the entities they expose. However, at least for web APIs, that approach has several disadvantages over the alternative: the web link.

Standardized by the Internet Engineering Task Force (IETF), you can think of a web link as a way of representing relationships on the web. The best-known web links are of course those that appear in HTML web pages expressed using the link or anchor elements, or in HTTP headers. But links can appear in API resources too, and using them instead of foreign keys significantly reduces the amount of information that has to be separately documented by the API provider and learned by the user.

A link is an element in one web resource that includes a reference to another resource along with the name of the relationship between the two resources. The reference to the other entity is written using a special format called Uniform Resource Identifier (URI), for which there is an IETF standard. The standard uses the word ‘resource’ to mean any entity that is referenced by a URI. The relationship name in a link can be thought of as being analogous to the column name of a relational database foreign key column, and the URI in the link is analogous to the foreign key value. By far the most useful URIs are the ones that can be used to get information about the referenced resource using a standard web protocol—such URIs are called Uniform Resource Locators (URLs)—and by far the most important kind of URL for APIs is the HTTP URL.

While links aren’t widely used in APIs, some very prominent web APIs use links based on HTTP URLs to represent relationships, for example the Google Drive API and the GitHub API. Why is that? In this post, I’ll show what using API foreign keys looks like in practice, explain its disadvantages compared to the use of links, and show you how to convert that design to one that uses links.

Representing relationships using foreign keys
Consider the popular pedagogic “pet store” application. The application stores electronic records to track pets and their owners. Pets have attributes like name, species and breed. Owners have names and addresses. Each pet has a relationship to its owner—the inverse of the relationship defines the pets owned by a particular owner.

In a typical key-based design the pet store application’s API makes two resources available that look like this:

Representing relationships using foreign keys.png

The relationship between Lassie and Joe is expressed in the representation of Lassie using the “owner” name/value pair. The inverse of the relationship is not expressed. The “owner” value, “98765,” is a foreign key. It is likely that it really is a database foreign key—that is, it is the value of the primary key of some row in some database table—but even if the API implementation has transformed the key values a bit, it still has the general characteristics of a foreign key.

The value “98765” is of limited direct use to a client. For the most common uses, the client needs to compose a URL using this value, and the API documentation needs to describe a formula for performing this transformation. This is most commonly done by defining a URI template, like this:

/people/{person_id}

The inverse of the relationship—the pets belonging to an owner—can also be exposed in the API by implementing and documenting one of the following URI templates (the difference between the two is a question of style, not substance):

APIs that are designed in this way usually require many URI templates to be defined and documented. The most popular language for documenting these templates for APIs isn’t the one defined in the IETF specification—it’s OpenAPI (formerly known as Swagger). Unfortunately, OpenAPI and similar offerings do not provide a way to specify which field values can be plugged into which templates, so some amount of natural language documentation from the provider or guesswork by the client is also required.

In summary, although this style is common, it requires the provider to document, and the client to learn and use, a significant number of URI templates whose usage is not perfectly described by current API specification languages. Fortunately there’s a better option.

Representing relationships using links
Imagine the resources above were modified to look like this:

Representing relationships using links.png

The primary difference is that the relationships are expressed using links, rather than foreign key values. In these examples, the links are expressed using simple JSON name/value pairs (see the section below for a discussion of other approaches to writing links in JSON).

Note also that the inverse relationship of the pet to its owner has been made explicit by adding the “pets” field to the representation of Joe.

Changing “id” to “self” isn’t really necessary or significant, but it’s a common convention to use “self” to identify the resource whose attributes and relationships are specified by the other name/value pairs in the same JSON object. “self” is the name registered at IANA for this purpose.

Viewed from an implementation point of view, replacing all the database keys with links is a fairly simple change—the server converted the database foreign keys into URLs so the client didn’t have to—but it significantly simplifies the API and reduces the coupling of the client and the server. Many URI templates that were essential for the first design are no longer required and can be removed from the API specification and documentation.

The server is now free to change the format of new URLs at any time without affecting clients (of course, the server must continue to honor all previously-issued URLs). The URL passed out to the client by the server will have to include the primary key of the entity in a database plus some routing information, but because the client just echoes the URL back to the server and the client is never required to parse the URL, clients do not have to know the format of the URL. This reduces coupling between the client and server. Servers can even obfuscate their URLs with base64 or similar encoding if they want to emphasize to clients that they should not make assumptions about URL formats or infer meaning from them.

In the example above, I used a relative form of the URIs in the links, for example /people/98765. It might have been slightly more convenient for the client (although less convenient for the formatting of this blog post), if I had expressed the URIs in absolute form, e.g., http://bit.ly/2LAwguK. Clients only need to know the standard rules of URIs defined in the IETF specifications to convert between these two URI forms, so which form you choose to use is not as important as you might at first assume. Contrast this with the conversion from foreign key to URL described previously, which requires knowledge that is specific to the pet store API. Relative URLs have some advantages for server implementers, as described below, but absolute URLs are probably more convenient for most clients, which is perhaps why Google Drive and GitHub APIs use absolute URLs.

In short, using links instead of foreign keys to express relationships in APIs reduces the amount of information a client needs to know to use an API, and reduces the ways in which clients and servers are coupled to each other.

Caveats
Here are some things you should think about before using links.

Many API implementations have reverse proxies in front of them for security, load-balancing, and other reasons. Some proxies like to rewrite URLs. When an API uses foreign keys to represent relationships, the only URL that has to be rewritten by a proxy is the main URL of the request. In HTTP, that URL is split between the address line (the first header line) and the host header.

In an API that uses links to express relationships, there will be other URLs in the headers and bodies of both the request and the response that would also need to be rewritten. There are a few different ways of dealing with this:

  1. Don’t rewrite URLs in proxies. I try to avoid URL rewriting, but this may not be possible in your environment.

  2. In the proxy, be careful to find and map all URLs wherever they appear in the header or body of the request and response. I have never done this, because it seems to me to be difficult, error-prone, and inefficient, but others may have done it.

  3. Write all links relatively. In addition to allowing proxies some ability to rewrite URLs, relative URLs may make it easier to use the same code in test and production, because the code does not have to be configured with knowledge of its own host name. Writing links using relative URLs with a single leading slash, as I showed in the example above, has few downsides for the server or the client, but it only allows the proxy to change the host name (more precisely, the parts of the URL called the scheme and authority), not the path. Depending on the design of your URLs, you could allow proxies some ability to rewrite paths if you are willing to write links using relative URLs with no leading slashes, but I have never done this because I think it would be complicated for servers to write those URLs reliably. Relative URLs without leading slashes are also more difficult for clients to use—they need to use a standards-compliant library rather than simple string concatenation to handle those URLs, and they need to be careful to understand and preserve the base URL. Using a standards-compliant library to handle URLs is good practice for clients anyway, but many don’t.

Using links may also cause you to re-examine how you do API versioning. Many APIs like to put version numbers in URLs, like this:

This is the kind of versioning where the data for a single resource can be viewed in more than one “format” at the same time—these are not the sort of versions that replace each other in time sequence as edits are made.

This is closely analogous to being able to see the same web document in different natural languages, for which there is a web standard; it is a pity there isn’t a similar one for versions. By giving each version its own URL, you raise each version to the status of a full web resource. There is nothing wrong with “version URLs” like these, but they are not suitable for expressing links. If a client asks for Lassie in the version 2 format, it does not mean that they also want the version 2 format of Lassie’s owner, Joe, so the server can’t pick which version number to put in a link. There may not even be a version 2 format for owners. It also doesn’t make conceptual sense to use the URL of a particular version in links—Lassie is not owned by a specific version of Joe, she is owned by Joe himself. So, even if you expose a URL of the form /v1/people/98765 to identify a specific version of Joe, you should also expose the URL /people/98765 to identify Joe himself and use the latter in links. Another option is to define only the URL /people/98765 and allow clients to request a specific version by including a request header. There is no standard for this header, but calling it Accept-Version would fit well with the naming of the standard headers. I personally prefer the approach of using a header for versioning and avoiding URLs with version numbers, but URLs with version numbers are popular, and I often implement both a header and “version URLs” because it’s easier to do both than argue about it. For more on API versioning, check out this blog post.

You might still need to document some URL templates
In most web APIs, the URL of a new resource is allocated by the server when the resource is created using POST. If you use this method for creation and you are using links for relationships, you do not need to publish a URI template for the URIs of these resources. However, some APIs allow the client to control the URL of a new resource. Letting clients control the URL of new resources makes many patterns of API scripting much easier for client programmers, and it also supports scenarios where an API is used to synchronize an information model with an external information source. HTTP has a special method for this purpose: PUT. PUT means “create the resource at this URL if it does not already exist, otherwise update it”1. If your API allows clients to create new entities using PUT, you have to document the rules for composing new URLs, probably by including a URI template in the API specification. You can also allow clients partial control of URLs by including a primary key-like value in the body or headers of a POST. This doesn’t require a URI template for the POST itself, but the client will still need to learn a URI template to take advantage of the resulting predictability of URIs.

The other place where it makes sense to document URL templates is when the API allows clients to encode queries in URLs. Not every API lets you query its resources, but this can be a very useful feature for clients, and it is natural to let clients encode queries in URLs and use GET to retrieve the result. The following example shows why.

In the example above we included the following name/value pair in the representation of Joe:

The client doesn’t have to know anything about the structure of this URL, beyond what’s written in standard specifications, to use it. This means that a client can get the list of Joe’s pets from this link without learning any query language, and without the API having to document its URL formats—but only if the client first does a GET on /people/98765. If, in addition, the pet store API documents a query capability, the client can compose the same or equivalent query URL to retrieve the pets for an owner without first retrieving the owner—it is sufficient to know the owner’s URI. Perhaps more importantly, the client can also form queries like the following ones that would otherwise not be possible:

The URI specification describes a portion of the HTTP URL for this purpose called the query component—the portion of the URL after the first “?” and before the first “#”. The style of query URI that I prefer always puts client-specified queries in the query component of the URI, but it’s also permissible to express client queries in the path portion of a URL. In either case, you need to describe to clients how to compose these URLs—you are effectively designing and documenting a query language specific to your API. Of course, you can also allow clients to put queries in the request body rather than the URL and use the POST method instead of GET. Since there are practical limits on the size of a URL—anything over 4k bytes is tempting fate—it is a good practice to support POST for queries even if you also support GET.

Because query is such a useful feature in APIs, and because designing and implementing query languages is not easy, technologies like GraphQL have emerged. I have never used GraphQL, so I can’t endorse it, but you may want to evaluate it as an alternative to designing and implementing your own API query capability. API query capabilities, including GraphQL, are best used as a complement to a standard HTTP API for reading and writing resources, not an alternative.

And another thing… What’s the best way to write links in JSON?
Unlike HTML, JSON has no built-in mechanism for expressing links. Many people have opinions on how links should be expressed in JSON and some have published their opinions in more or less official-looking documents, but there is no standard ratified by a recognized standards organization at the time of writing. In the examples above, I used simple JSON name/value pairs to express links—this is my preferred style, and is also the style used by Google Drive and GitHub. Another style that you will likely encounter looks like this:

I personally don’t see the merits of this style, but several variants of it have achieved some level of popularity.

There is another style for links in JSON that I do like, which looks like this:

The benefit of this style is that it makes it explicit that “/people/98765” is a URL and not just a string. I learned this pattern from RDF/JSON. One reason to adopt this pattern is that you will probably have to use it anyway whenever you have to show information about one resource nested inside another, as in the following example, and using it everywhere gives a nice uniformity:

For further ideas on how best to use JSON to represent data, see Terrifically Simple JSON.

Finally, what’s the difference between an attribute and a relationship?
I think most people would agree with the statement that JSON does not have a built-in mechanism for expressing links, but there is a way of thinking about JSON that says otherwise. Consider this JSON:

A common view is that shoeSize is an attribute, not a relationship, and 10 is a value, not an entity. However, it is also reasonable to say that the string ’10” is in fact a reference, written in a special notation for writing references to numbers, to the eleventh whole number, which itself is an entity. If the eleventh whole number is a perfectly good entity, and the string ’10’ is just a reference to it, then the name/value pair ‘”shoeSize”: 10’ is conceptually a link, even though it doesn’t use URIs.

The same argument can be made for booleans and strings, so all JSON name/value pairs can be viewed as links. If you think this way of looking at JSON makes sense, then it’s natural to use simple JSON name/value pairs for links to entities that are referenced using URLs in addition to those that are referenced using JSON’s built-in reference notations for numbers, strings, booleans and null.

This argument says more generally that there is no fundamental difference between attributes and relationships; attributes are just relationships between an entity and an abstract or conceptual entity like a number or color that has historically been treated specially. Admittedly, this is a rather abstract way of looking at the world—if you show most people a black cat, and ask them how many objects they see, they will say one. Not many would say they see two objects—a cat, and the color black—and a relationship between them.

Links are simply better
Web APIs that pass out database keys rather than links are harder to learn and harder to use for clients. They also couple clients and servers more tightly together by requiring more shared knowledge and so they require more documentation to be written and read. Their only advantage is that because they are so common, programmers have become familiar with them and know how to produce them and consume them. If you strive to offer your clients high-quality APIs that don’t require a ton of documentation and maximize independence of clients from servers, think about exposing URLs rather than database keys in your web APIs.

For more on API design, read the eBook “Web API Design: The Missing Link.

1. This meaning can be refined using the if-match and if-not-match headers

Play the original ‘Minecraft’ in your browser, for free

The content below is taken from the original ( Play the original ‘Minecraft’ in your browser, for free), to continue reading please visit the site. Remember to respect the Author & Copyright.

Minecraft is celebrating its 10th birthday by making its Classic version easily playable on web browsers. You don't need to download any files to make it work, and you don't have to pay a cent for access. Since Classic was only the second phase in th…

Creating and deploying a model with Azure Machine Learning Service

The content below is taken from the original ( Creating and deploying a model with Azure Machine Learning Service), to continue reading please visit the site. Remember to respect the Author & Copyright.

In this post, we will take a look at creating a simple machine learning model for text classification and deploying it as a container with Azure Machine Learning service. This post is not intended to discuss the finer details of creating a text classification model. In fact, we will use the Keras library and its Reuters newswire dataset to create a simple dense neural network. You can find many online examples based on this dataset. For further information, be sure to check out and buy 👍 Deep Learning with Python by François Chollet, the creator of Keras and now at Google. It contains a section that explains using this dataset in much more detail!

Machine Learning service workspace

To get started, you need an Azure subscription. Once you have the subscription, create a Machine Learning service workspace. Below, you see such a workspace:

My Machine Learning service workspace (gebaml)

Together with the workspace, you also get a storage account, a key vault, application insights and a container registry. In later steps, we will create a container and store it in this registry. That all happens behind the scenes though. You will just write a few simple lines of code to make that happen!

Note the Authoring (Preview) section! These were added just before Build 2019 started. For now, we will not use them.

Azure Notebooks

To create the model and interact with the workspace, we will use a free Jupyter notebook in Azure Notebooks. At this point in time (8 May 2019), Azure Notebooks is still in preview. To get started, find the link below in the Overview section of the Machine Learning service workspace:

Getting Started with Notebooks

To quickly get the notebook, you can clone my public project: ⏩⏩⏩ https://notebooks.azure.com/geba/projects/textclassificationblog.

Creating the model

When you open the notebook, you will see the following first four cells:

Getting the dataset

It’s always simple if a prepared dataset is handed to you like in the above example. Above, you simply use the reuters class of keras.datasets and use the load_data method to get the data and directly assign it to variables to hold the train and test data plus labels.

In this case, the data consists of newswires with a corresponding label that indicates the category of the newswire (e.g. an earnings call newswire). There are 46 categories in this dataset. In the real world, you would have the newswire in text format. In this case, the newswire has already been converted (preprocessed) for you in an array of integers, with each integer corresponding to a word in a dictionary.

A bit further in the notebook, you will find a Vectorization section:

Vectorization

In this section, the train and test data is vectorized using a one-hot encoding method. Because we specified, in the very first cell of the notebook, to only use the 10000 most important words each article can be converted to a vector with 10000 values. Each value is either 1 or 0, indicating the word is in the text or not.

This bag-of-words approach is one of the ways to represent text in a data structure that can be used in a machine learning model. Besides vectorizing the training and test samples, the categories are also one-hot encoded.

Now the dense neural network model can be created:

Dense neural net with Keras

The above code defines a very simple dense neural network. A dense neural network is not necessarily the best type but that’s ok for this post. The specifics are not that important. Just note that the nn variable is our model. We will use this variable later when we convert the model to the ONNX format.

The last cell (16 above) does the actual training in 9 epochs. Training will be fast because the dataset is relatively small and the neural network is simple. Using the Azure Notebooks compute is sufficient. After 9 epochs, this is the result:

Training result

Not exactly earth-shattering: 78% accuracy on the test set!

Saving the model in ONNX format

ONNX is an open format to store deep learning models. When your model is in that format, you can use the ONNX runtime for inference.

Converting the Keras model to ONNX is easy with the onnxmltools:

Converting the Keras model to ONNX

The result of the above code is a file called reuters.onnx in your notebook project.

Predict with the ONNX model

Let’s try to predict the category of the first newswire in the test set. Its real label is 3, which means it’s a newswire about an earnings call (earn class):

Inferencing with the ONNX model

We will use similar code later in score.py, a file that will be used in a container we will create to expose the model as an API. The code is pretty simple: start an inference session based on the reuters.onnx file, grab the input and output and use run to predict. The resulting array is the output of the softmax layer and we use argmax to extract the category with the highest probability.

Saving the model to the workspace

With the model in reuters.onnx, we can add it to the workspace:

Saving the model in the workspace

You will need a file in your Azure Notebook project called config.json with the following contents:

{
     "subscription_id": "<subscription-id>",
     "resource_group": "<resource-group>",
     "workspace_name": "<workspace-name>" 
} 

With that file in place, when you run cell 27 (see above), you will need to authenticate to Azure to be able to interact with the workspace. The code is pretty self-explanatory: the reuters.onnx model will be added to the workspace:

Models added to the workspace

As you can see, you can save multiple versions of the model. This happens automatically when you save a model with the same name.

Creating the scoring container image

The scoring (or inference) container image is used to expose an API to predict categories of newswires. Obviously, you will need to give some instructions how scoring needs to be done. This is done via score.py:

score.py

The code is similar to the code we wrote earlier to test the ONNX model. score.py needs an init() and run() function. The other functions are helper functions. In init(), we need to grab a reference to the ONNX model. The ONNX model file will be placed in the container during the build process. Next, we start an InferenceSession via the ONNX runtime. In run(), the code is similar to our earlier example. It predicts via session.run and returns the result as JSON. We do not have to worry about the rest of the code that runs the API. That is handled by Machine Learning service.

Note: using ONNX is not a requirement; we could have persisted and used the native Keras model for instance

In this post, we only need score.py since we do not train our model via Azure Machine learning service. If you train a model with the service, you would create a train.py file to instruct how training should be done based on data in a storage account for instance. You would also provision compute resources for training. In our case, that is not required so we train, save and export the model directly from the notebook.

Training and scoring with Machine Learning service

Now we need to create an environment file to indicate the required Python packages and start the image build process:

Create an environment yml file via the API and build the container

The build process is handled by the service and makes sure the model file is in the container, in addition to score.py and myenv.yml. The result is a fully functional container that exposes an API that takes an input (a newswire) and outputs an array of probabilities. Of course, it is up to you to define what the input and output should be. In this case, you are expected to provide a one-hot encoded article as input.

The container image will be listed in the workspace, potentially multiple versions of it:

Container images for the reuters ONNX model

Deploy to Azure Container Instances

When the image is ready, you can deploy it via the Machine Learning service to Azure Container Instances (ACI) or Azure Kubernetes Service (AKS). To deploy to ACI:

Deploying to ACI

When the deployment is finished, the deployment will be listed:

Deployment (ACI)

When you click on the deployment, the scoring URI will be shown (e.g. http://IPADDRESS:80/score). You can now use Postman or any other method to score an article. To quickly test the service from the notebook:

Testing the service

The helper method run of aci_service will post the JSON in test_sample to the service. It knows the scoring URI from the deployment earlier.

Conclusion

Containerizing a machine learning model and exposing it as an API is made surprisingly simple with Azure Machine learning service. It saves time so you can focus on the hard work of creating a model that performs well in the field. In this post, we used a sample dataset and a simple dense neural network to illustrate how you can build such a model, convert it to ONNX format and use the ONNX runtime for scoring.

Now generally available: Android phone’s built-in security key

The content below is taken from the original ( Now generally available: Android phone’s built-in security key), to continue reading please visit the site. Remember to respect the Author & Copyright.

Phishing—when an attacker tries to trick you into turning over your online credentials—is one of the most common causes of security breaches. At Google Cloud Next ‘19, we enabled you to help your users defend against phishing with a security key built into their Android phone, bringing the benefits of a phishing-resistant two-factor authentication (2FA) to more than a billion users worldwide. This capability is now generally available.

While Google automatically blocks the overwhelming majority of malicious sign-in attempts (even if an attacker has a username or password), 2FA, also known as 2-Step Verification (2SV), considerably improves user security. At the same time, sophisticated attacks can skirt around some 2FA methods to compromise user accounts. We consider security keys based on FIDO standards, including Titan Security Key and Android phone’s built-in security key, to be the strongest, most phishing-resistant methods of 2FA. FIDO leverages public key cryptography to verify a user’s identity and URL of the login page, so that an attacker can’t access users’ accounts even if users are tricked into providing their username and password.

User experience on Pixel 3 .gif

Security keys are now available built-in on phones running Android 7.0+ (Nougat) at no additional cost. That way, your users can use their phones as their primary 2FA method for work (G Suite, Cloud Identity, and GCP) and personal Google Accounts to sign in on Bluetooth-enabled Chrome OS, macOS X, or Windows 10 devices with a Chrome browser. This gives them the strongest 2FA method with the convenience of a phone that’s always in their pocket.

As the Google Cloud administrator, start by activating Android phone’s built-in security key to protect your own work or personal Google Account following these simple steps:

  1. Add your work or personal Google Account to your Android phone.
  2. Make sure you’re enrolled in 2-Step Verification (2SV).
  3. On your computer, visit the 2SV settings and click “Add security key”.
  4. Choose your Android phone from the list of available devices—and you’re done!
2-Step Verification (2SV) settings page.png

When signing in, make sure Bluetooth is turned on on both your phone and the device you are signing in on. You can find more detailed instructions here.

To help ensure the highest levels of account protection, you can also require the use of security keys for your users in G Suite, Cloud Identity, and GCP, letting them choose between using a physical security key, their Android phone, or both. We recommend that users register a backup security key to their account and keep it in a safe place, so that they can gain access to their account if they lose their phone. Hardware security keys are available from a number of vendors, including Google with our Titan Security Key.

How to Spot an AI-Generated Photo

The content below is taken from the original ( How to Spot an AI-Generated Photo), to continue reading please visit the site. Remember to respect the Author & Copyright.

The first time I explained to my son, as a preschooler, that cartoon characters were not really real but drawn and animated on a computer, it blew his mind. How could something that looked so realistic actually be fake? I think I now know how he felt; lately, the more I learn about AI-generated photos, the more my…

Read more…

Traffic-free days have begun in Edinburgh city centre

The content below is taken from the original ( Traffic-free days have begun in Edinburgh city centre), to continue reading please visit the site. Remember to respect the Author & Copyright.

(Photo by Stewart Kirby/SOPA Images/LightRocket via Getty Images)

The scheme is part of a plan to reduce air pollution in the city

How to Tell if a News Site Is Reliable

The content below is taken from the original ( How to Tell if a News Site Is Reliable), to continue reading please visit the site. Remember to respect the Author & Copyright.

It’s happened before, and with another presidential election looming next year, it’s going to happen again and again. The spread of “fake news,” the incorrect labeling of real news as “fake,” and overall confusion as to how to tell the difference.

Read more…

Steve Fryatt talks lesser known software in Wakefield on 1st May

The content below is taken from the original ( Steve Fryatt talks lesser known software in Wakefield on 1st May), to continue reading please visit the site. Remember to respect the Author & Copyright.

Even though the show they organise took place only yesterday, the Wakefield RISC OS Computer Club (WROCC) will be holding their next meeting this week, on Wednesday 1st May. The guest speaker will be the group’s own Steve Fryatt. Steve […]

An easier way to integrate Chrome devices with Active Directory infrastructure

The content below is taken from the original ( An easier way to integrate Chrome devices with Active Directory infrastructure), to continue reading please visit the site. Remember to respect the Author & Copyright.

In 2017, when we launched Active Directory integration as part of our Chrome Enterprise announcement, we aimed to help customers with on-premise infrastructure leverage the benefits of Chrome devices in their organizations. This integration allowed for use of Active Directory credentials to authenticate across devices, support for Android applications through managed Google Play, and management of user and device policies for IT admins via GPO. All of this can be done without additional infrastructure, minimizing disruption for users and IT alike.

With the release of Chrome Enterprise version 74, we have made Active Directory integration available to existing Chrome Enterprise customers who are already managing Chrome devices with cloud management on their domain currently. Administrators can now configure their Chrome devices to be managed by Active Directory or cloud management, without the need to set up a separate domain. We have also made it easy to switch management methods based on what is most appropriate for your organization at any given time. This can be completed with a simple administration policy.

microsoft active drive chrome integration.png

In recent months, we’ve also have made other features available that offer IT admins greater control and access. These features include support for native Samba (SMB) file shares with kerberos authentication and app configuration via ADMX templates for Chrome apps and extensions that support policy for configuration.

Native integration with Active Directory is a good option for customers who wish to move incrementally towards a cloud-native solution while continuing to leverage their existing Active Directory environment. Use cases include:

  • Quick pilots: Deploy Chrome Enterprise quickly by integrating with existing identity, infrastructure, and management systems to pilot and test with minimal friction.

  • Supporting kerberos: Integrate easily with your existing infrastructure and applications that require kerberos authentication.

  • Handling on-prem: Support environments where an on-premises solution is required or preferred for managing devices, identity, and policy.

  • Centralizing management: Support mixed device deployments to manage all your devices from a single, Active Directory-based management solution

Current users of Active Directory integration will be automatically upgraded to the new version. This means all your existing devices will continue to function in the same way and administrators now have added flexibility to enable or disable Active Directory management based on your organization’s needs—no manual changes necessary.

To learn more, read ourhelp center article.

How to Create a Windows Virtual Desktop Tenant with Windows Virtual Desktop

The content below is taken from the original ( How to Create a Windows Virtual Desktop Tenant with Windows Virtual Desktop), to continue reading please visit the site. Remember to respect the Author & Copyright.


In the first part of this series, I described what Microsoft’s Windows Virtual Desktop (WVD) service is and the basic requirements. If you haven’t already read that article, I suggest you do before continuing with WVD because there are some important prerequisites that need to be in place.

Before you can create a host pool in the Azure management portal, you need to create a Windows Virtual Desktop tenant. There are several steps to this process:

  1. Give Azure Active Directory permissions to the Windows Virtual Desktop enterprise app.
  2. Assign an AAD user the Windows Virtual Desktop TenantCreator application role.
  3. Create a Windows Virtual Desktop tenant.

Please note that everything in this article is subject to change because Windows Virtual Desktop is in preview. Additionally, when using an AAD user account, make sure that it is a work or school account and not a Microsoft Account (MSA). I’ll remind you about this again.

Grant Azure Active Directory Permissions to Windows Virtual Desktop Service

Giving ADD permissions to the WVD service lets it query the directory for administrative and end-user actions. All you need to do is click here to open the Windows Virtual Desktop consent page in a browser.

  • There are two consent options: Server App and Client App. Make sure that Server App is selected.
  • In the AAD Tenant GUID or Name box, type the name or GUID of your AAD and click Submit. If you are not sure what your AAD name is, open the Azure AD management portal here and click Azure Active Directory on the left of the portal.
Creating a Windows Virtual Desktop Tenant (Image Credit: Russell Smith)
Creating a Windows Virtual Desktop Tenant (Image Credit: Russell Smith) Creating a Windows Virtual Desktop Tenant (Image Credit: Russell Smith)
  • You’ll be prompted to sign in to AAD. Use a Global Administrator account that is a work or school account. I.e. Not a Microsoft Account (MSA). If you are not sure which AAD users are work and school accounts, open the Azure AD management portal here, click Users on the left of the portal, and you’ll see the user type listed in the Source column for each user account. Work and school accounts will be listed as Azure Active Directory under Source.
  • Once signed in, you’ll be asked to accept a series of permissions for the Windows Virtual Desktop app. Click Accept. You’ll be redirected to a confirmation page.
Creating a Windows Virtual Desktop Tenant (Image Credit: Russell Smith)
Creating a Windows Virtual Desktop Tenant (Image Credit: Russell Smith) Creating a Windows Virtual Desktop Tenant (Image Credit: Russell Smith)
  • Wait one minute for the Server App permissions to register in AAD and then repeat this process for Client App.

Assign TenantCreator Role to AAD User

Now you need to assign the TenantCreator application role to an AAD user.

  • Open the Azure AD management portal here.
  • Sign in to AAD with a global administrator account.
  • Click Enterprise Applications on the left of the portal.
  • In the list of apps, you should see Windows Virtual Desktop and Windows Virtual Desktop Client. Click Windows Virtual Desktop.
  • Click Users and groups on the left of the portal window.
  • Click + Add user.
Creating a Windows Virtual Desktop Tenant (Image Credit: Russell Smith)
Creating a Windows Virtual Desktop Tenant (Image Credit: Russell Smith) Creating a Windows Virtual Desktop Tenant (Image Credit: Russell Smith)
  • Under Add Assignment, click Users.
  • Select a Global Administrator work or school account from the list, i.e. not an MSA account, and then click Select.
  • Click Assign under Add Assignment.
  • Close the AAD management portal.

Create a Windows Virtual Desktop Tenant

The last step is to create the tenant itself.

  • Open a PowerShell prompt in Windows 10.
  • Download and import the Windows Virtual Desktop PowerShell module.

Install-Module -Name Microsoft.RDInfra.RDPowerShell
Import-Module -Name Microsoft.RDInfra.RDPowerShell

  • Sign in to Windows Virtual Desktop using the AAD account to which you assigned the TenantCreator application role above.

Add-RdsAccount -DeploymentUrl "https://rdbroker.wvd.microsoft.com"

  • Create a new tenant using the New-RdsTenant cmdlet as shown here, replacing the AadTenantID with your Azure AD directory ID and the AzureSubscriptionId with your subscription’s ID. You can find your Azure subscription ID in the Subscriptions section of the Azure management portal. Similarly, you can find your Azure AD directory ID in the Azure AD portal under Azure Active Directory > Properties.

New-RdsTenant -Name PetriWVD -AadTenantId xxxx-xxxx-xxxxx-xxxxx -AzureSubscriptionId xxxx-xxxx-xxxxx-xxxxx

Creating a Windows Virtual Desktop Tenant (Image Credit: Russell Smith)
Creating a Windows Virtual Desktop Tenant (Image Credit: Russell Smith) Creating a Windows Virtual Desktop Tenant (Image Credit: Russell Smith)

And that is it! Now you are ready to create a hosting pool in the Azure management portal. As you can see, the process of creating a tenant isn’t exactly intuitive or straightforward. Which is a shame because creating a hosting pool is easier. But this is just the preview stage and Microsoft will hopefully make this process simpler and integrate it with the Azure management portal before general availability.

In the third part of this series, I’ll show you how to create a hosting pool in the Azure management portal.


The post How to Create a Windows Virtual Desktop Tenant with Windows Virtual Desktop appeared first on Petri.

How to Introduce Your Kid to Coding Without a Computer

The content below is taken from the original ( How to Introduce Your Kid to Coding Without a Computer), to continue reading please visit the site. Remember to respect the Author & Copyright.

If you want to teach your kid how to code, there’s certainly no shortage of apps, iPad-connected toys, motorized kits and programmable pets that you can buy for your future Google employee. Some are great, no doubt, but many focus on isolated skills, which may or may not be relevant in the decades ahead. For young…

Read more…

How to Secure Hybrid Office 365 Authentication

The content below is taken from the original ( How to Secure Hybrid Office 365 Authentication), to continue reading please visit the site. Remember to respect the Author & Copyright.


Office 365 hybrid authentication lets organizations manage and control authentication to Office 365 using on-premise Windows Server Active Directory. The advantage is that there is a single set of user identities that can be centrally managed, as opposed to using cloud-only identities for Office 365 and Active Directory accounts for access to on-premise resources.

Traditional wisdom has it that Active Directory Federation Services (ADFS), or a third-party identity provider, is the most secure way to extend Windows Server Active Directory (AD) to Office 365. There are definitely some advantages to this approach, including:

  • Single sign-on for browser apps and Outlook.
  • No synchronization of password hashes to the cloud.
  • Advanced security features like IP address filtering.
  • Supports other SAML-based cloud services.
  • Supports SmartLinks.
  • Smartcard-based authentication.
  • Supports third-party multifactor authentication.

But the costs are great. Not only do you need a two-server farm, preferably at separate sites for redundancy but also another couple of servers should be placed in your DMZ to securely publish ADFS to the Internet. This involves additional infrastructure and cost, but it also adds extra points of failure. If ADFS, AD, or the DMZ servers go down, users won’t be able to access Office 365. Although, it is possible to combine ADFS with Password Hash Synchronization (PHS) so that users can still log in to Office 365 in the event of a problem.

Who’s Afraid of Password Hash Synchronization?

The idea of synchronizing password hashes to the cloud seems like a scary idea for some organizations. But is it really that bad? If you don’t trust Azure AD to be the guardian of your Office 365 data, then you’ve already got a problem. You need to decide whether Azure AD is up to the job of securing sensitive data in the cloud. Azure AD can be vulnerable to brute-force and password spray attacks through remote PowerShell, but this can be mitigated by enabling multifactor authentication (MFA) and disabling access to remote PowerShell for some or all users.

When AD Connect is configured to synchronize password hashes from AD to the cloud, SHA256 password data is stored in Azure AD, which is a hash of the MD4 hash stored in on-premise Active Directory. So the password hashes in Azure AD are more secure hashes of your on-premise AD password hashes. Or in other words, hashes of hashes. Furthermore, the SHA256 hashes in Azure AD cannot be used in Pass-the-Hash (PtH) attacks against your on-premise AD.

PHS gives users seamless single sign-on access to Office 365 regardless of whether ADFS and on-premise AD are accessible, which can be handy in an outage. It is also simpler to set up than federated authentication or Pass-Through Authentication (PTA), both of which require some onsite infrastructure. PHS fully supports Microsoft’s Azure AD defense technologies, like Azure Password Protection and Smart Lockout.

For more information on custom banned password lists (Azure Password Protection) and Smart Lockout see Azure AD Password Protection to Prevent Password Spraying Attacks on Petri. Here can find more details on Azure AD Conditional Access.

Federated Authentication versus Password Hash Synchronization

If you are planning an Office 365 deployment or reviewing existing security strategies, I recommend looking at Password Hash Synchronization first. It could simplify your infrastructure, reduce costs, improve availability, and even make you more secure in the long run. But that’s not to say that federated authentication and Pass-Through Authentication don’t have their places. Just don’t rule out PHS until you’ve evaluated it properly.


The post How to Secure Hybrid Office 365 Authentication appeared first on Petri.

Game Backup Monitor lets you backup games automatically

The content below is taken from the original ( Game Backup Monitor lets you backup games automatically), to continue reading please visit the site. Remember to respect the Author & Copyright.

If you often play games on your computer, you should check out Game Backup Monitor. It will help you automatically backup the configuration files of your games. It is a free and open-source software that is available for multiple computer […]

This post Game Backup Monitor lets you backup games automatically is from TheWindowsClub.com.

How to stay on top of Azure best practices

The content below is taken from the original ( How to stay on top of Azure best practices), to continue reading please visit the site. Remember to respect the Author & Copyright.

Optimizing your cloud workloads can seem like a complex and daunting task. We created Azure Advisor, a personalized guide to Azure best practices, to make it easier to get the most out of Azure. Azure Advisor helps you optimize your Azure resources for high availability, security, performance, and cost by providing free, personalized recommendations based on your usage and configurations.

We’ve posted a new video series to help you learn how to use Advisor to optimize your Azure workloads. You’ll find out how to:

Watch one of the first videos in the series now:

Once you’re comfortable with Advisor, you can begin reviewing and remediating your recommendations. Visit Advisor in the Azure portal to get started, and for more in-depth guidance see the Advisor documentation. Let us know if you have a suggestion for Advisor by submitting an idea via our tool, or send us an email at [email protected].

Deploying Grafana for production deployments on Azure

The content below is taken from the original ( Deploying Grafana for production deployments on Azure), to continue reading please visit the site. Remember to respect the Author & Copyright.

This blog is co-authored by Nick Lopez, Technical Advisor at Microsoft.

Grafana is one of the popular and leading open source tools for visualizing time series metrics. Grafana has quickly become the preferred visualization tool of choice for developers and operations teams for monitoring server and application metrics. Grafana dashboards enable operation teams to quickly monitor and react to performance, availability, and overall health of the service. You can now also use it to monitor Azure services and applications by leveraging the Azure Monitor data source plugin, built by Grafana Labs. This plugin enables you to include all metrics from Azure Monitor and Application Insights in your Grafana dashboards. If you would like to quickly setup and test Grafana with Azure Monitor and Application Insights metrics, we recommend you refer to the Azure Monitor Documentation.

Grafana dashboard using Azure Monitor as a data source to display metrics for Contoso dev environment.


Grafana server image in Azure Marketplace provides a great QuickStart deployment experience. The image provisions a virtual machine (VM) with a pre-installed Grafana dashboard server, SQLite database  and the Azure plugin. The default setup with a single VM deployment is great for a proof of concept study and testing. For high availability of monitoring dashboards for your critical applications and services, it’s essential to think of high availability of Grafana deployments on Azure. The following is the proposed and proven architecture to setup Grafana for high availability and security on Azure.

Setting up Grafana for production deployments

Grafana high availability deployment architecture on Azure.

Grafana Labs recommends setting up a separate highly available shared MySQL server for setting up Grafana for high availability. The Azure Database for MySQL and MariaDB are managed relational database services based on the community edition of MySQL and the MariaDB database engine. The service provides high availability at no additional cost, predictable performance, elastic scalability, automated backups and enterprise grade security with secure sockets layer (SSL) support, encryption at rest, advanced threat protection, and VNet service endpoint support. Utilizing a remote configuration database with Azure Database for MySQL or Azure Database for MariaDB service allows for horizontal scalability and high availability of Grafana instances required for enterprise production deployments.

Leveraging Bitnami Multi-Tier Grafana templates for production deployments

Bitnami lets you deploy a multi-node, production ready Grafana solution from the Azure Marketplace with just a few clicks. This solution uses several Grafana nodes with a pre-configured load balancer and Azure Database for MariaDB for data storage. The number of nodes can be chosen at deployment time depending on your requirements. Communication between the nodes and the Azure Database for MariaDB service is also encrypted with SSL to ensure security.

A key feature of Bitnami’s Grafana solution is that it comes pre-configured to provide a fault-tolerant deployment. Requests are handled by the load balancer, which continuously tests nodes to check if they are alive and automatically reroutes requests if a node fails. Data (including session data) is stored in the Azure Database for MariaDB and not on the individual nodes. This approach improves performance and protects against data loss due to node failure.

For new deployments, you can launch Bitnami Grafana Multi-Tier through the Azure Marketplace!

Configuring existing installations of Grafana to use Azure Database for MySQL service

If you have an existing installation of Grafana that you would like to configure for high availability, you can use the following steps that demonstrate configuring Grafana instance to use Azure Database for MySQL server as the backend configuration database. In this walkthrough, we will be using an example of Ubuntu with Grafana installed and configure Azure Database for MySQL as a remote database for Grafana setup.

  1. Create an Azure Database for MySQL server with the General Purpose tier which is recommended for production deployments. If you are not familiar with the database server creation, you can read the QuickStart tutorial to familiarize yourself with the workflow. If you are using Azure CLI, you can simply set it up using az mysql up.
  2. If you have already installed Grafana on the Ubuntu server, you’ll need to edit the grafana.ini file to add the Azure Database for MySQL parameters. As per the Grafana documentation on the Database settings, we will focus on the database parameters noted in the documentation. Please note: The username must be in the format user@server due to the server identification method of Azure Database for MySQL. Other formats will cause connections to fail.
  3. Azure Database for MySQL supports SSL connections. For enterprise production deployments, it is recommended to always enforce SSL. Additional information around setting up SSL with Azure Database for MySQL can be found in the Azure Database for MySQL documentation. Most modern installations of Ubuntu will have the necessary Baltimore Cyber Trust CA certificate already installed in your /etc/ssl/certs location. If needed, you can download the SSL Certificate CA used for Azure Database for MySQL from  this location. The SSL mode can be provided in two forms, skip-verify and true. With skip-verify we will not validate the certificate provided but the connection is still encrypted. With true we are going to ensure that the certificate provided is validated   by the Baltimore CA. This is useful for preventing “man in the middle” attacks. Note that in both situations, Grafana expects the certificate authority (CA) path to be provided.
  4. Next, you have the option to store the sessions of users in the Azure DB for MySQL in the table session. This is configured in the same grafana.ini under the session section. This is beneficial for instance in situations where you have load balanced environments to maintain sessions for users accessing Grafana. In the provider_config parameter, we need to include the user@server, password, full server and the TLS/SSL method. In this manner, this can be true or ssl-verify. Note that this is the go-sql-driver/mysql driver where more documentation is available.
  5. After this is all set, you should be able to start Grafana and verify the status with the commands below:
  • systemctl start grafana-server
  • systemctl status grafana-server

If you see any errors or issues, the default path for logging is /var/log/grafana/ where you can confirm what is preventing the startup. The following is a sample error where the username was not provided as user@server but rather just user.

lvl=eror msg="Server shutdown" logger=server reason="Service init failed: Migration failed err: Error 9999: An internal error has occurred. Please retry or report your issues.

Otherwise you should see the service in an Ok status and the initial startup will build all the necessary tables in the Azure DB for MySQL database.

Key takeaways

  • The single VM setup for Grafana is great for quick start, testing and a proof of concept study but it may not be suitable for production deployments.
  • For enterprise production deployments of Grafana, separating the configuration database to the dedicated server enables high availability and scalability.
  • The Bitnami Grafana Multi-Tier template provides production ready template leveraging the scale out design and security to provision Grafana with a few clicks with no extra cost.
  • Using managed database services like Azure Database for MySQL for production deployments provides built-in high availability, scalability, and enterprise security for the database repository.

Additional resources

Get started with Bitnami Multi-Tier Solutions on Microsoft Azure

Monitor Azure services and applications using Grafana

Monitor your Azure services in Grafana

Setting up Grafana for high availability

Azure Database for MySQL documentation

Acknowledgments

Special thanks to Shau Phang, Diana Putnam, Anitah Cantele and Bitnami team for their contributions to the blog post.

The Wide World of Microsoft Windows on AWS

The content below is taken from the original ( The Wide World of Microsoft Windows on AWS), to continue reading please visit the site. Remember to respect the Author & Copyright.

You have been able to run Microsoft Windows on AWS since 2008 (my ancient post, Big Day for Amazon EC2: Production, SLA, Windows, and 4 New Capabilities, shows you just how far AWS come in a little over a decade). According to IDC, AWS has nearly twice as many Windows Server instances in the cloud as the next largest cloud provider.

Today, we believe that AWS is the best place to run Windows and Windows applications in the cloud. You can run the full Windows stack on AWS, including Active Directory, SQL Server, and System Center, while taking advantage of 61 Availability Zones across 20 AWS Regions. You can run existing .NET applications and you can use Visual Studio or VS Code build new, cloud-native Windows applications using the AWS SDK for .NET.

Wide World of Windows
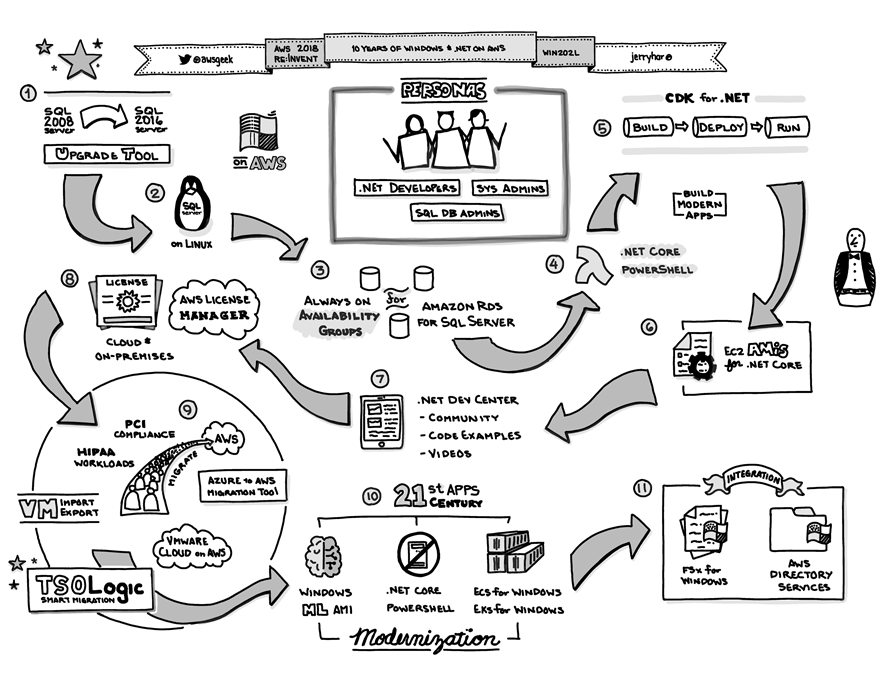
Starting from this amazing diagram drawn by my colleague Jerry Hargrove, I’d like to explore the Windows-on-AWS ecosystem in detail:

1 – SQL Server Upgrades
AWS provides first-class support for SQL Server, encompassing all four Editions (Express, Web, Standard, and Enterprise), with multiple version of each edition. This wide-ranging support has helped SQL Server to become one of the most popular Windows workloads on AWS.

The SQL Server Upgrade Tool (an AWS Systems Manager script) makes it easy for you to upgrade an EC2 instance that is running SQL Server 2008 R2 SP3 to SQL Server 2016. The tool creates an AMI from a running instance, upgrades the AMI to SQL Server 2016, and launches the new AMI. To learn more, read about the AWSEC2-CloneInstanceAndUpgradeSQLServer action.

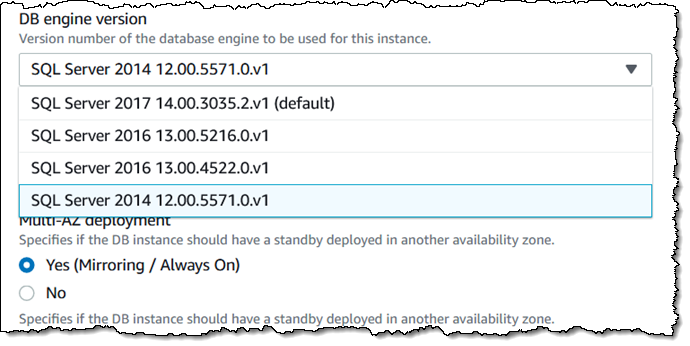
Amazon RDS makes it easy for you to upgrade your DB Instances to new major or minor upgrades to SQL Server. The upgrade is performed in-place, and can be initiated with a couple of clicks. For example, if you are currently running SQL Server 2014, you have the following upgrades available:

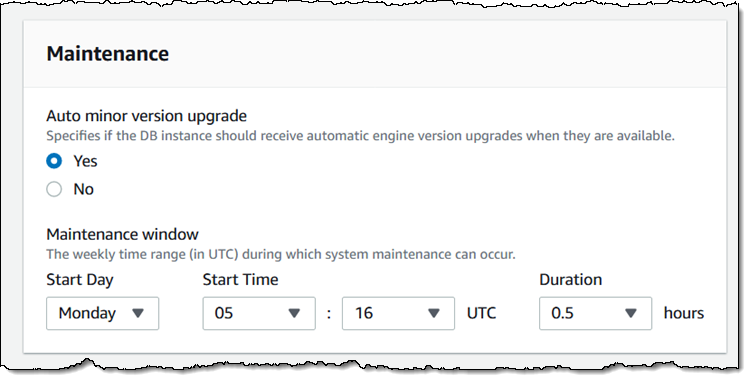
You can also opt-in to automatic upgrades to new minor versions that take place within your preferred maintenance window:

Before you upgrade a production DB Instance, you can create a snapshot backup, use it to create a test DB Instance, upgrade that instance to the desired new version, and perform acceptance testing. To learn more, about upgrades, read Upgrading the Microsoft SQL Server DB Engine.

2 – SQL Server on Linux
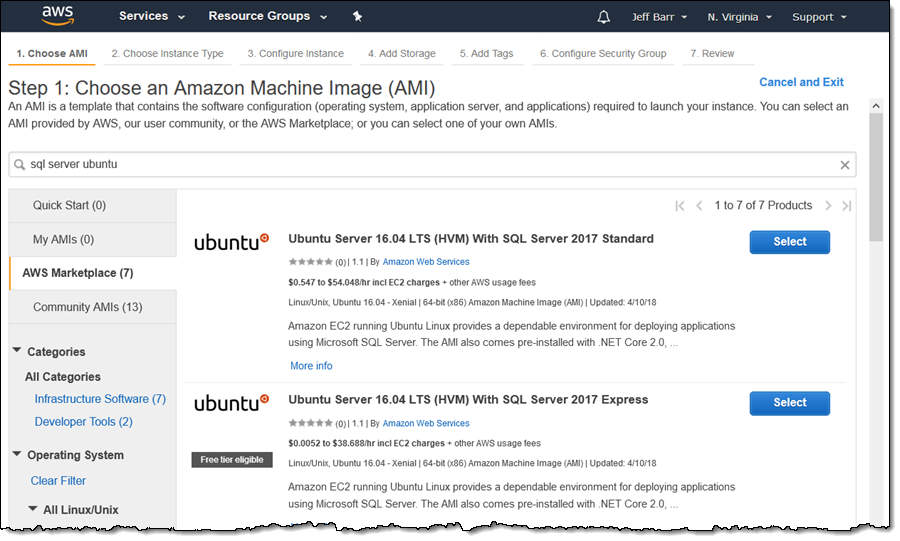
If your organization prefers Linux, you can run SQL Server on Ubuntu, Amazon Linux 2, or Red Hat Enterprise Linux using our License Included (LI) Amazon Machine Images. Read the most recent launch announcement or search for the AMIs in AWS Marketplace using the EC2 Launch Instance Wizard:

This is a very cost-effective option since you do not need to pay for Windows licenses.

You can use the new re-platforming tool (another AWS Systems Manager script) to move your existing SQL Server databases (2008 and above, either in the cloud or on-premises) from Windows to Linux.

3 – Always-On Availability Groups (Amazon RDS for SQL Server)
If you are running enterprise-grade production workloads on Amazon RDS (our managed database service), you should definitely enable this feature! It enhances availability and durability by replicating your database between two AWS Availability Zones, with a primary instance in one and a hot standby in another, with fast, automatic failover in the event of planned maintenance or a service disruption. You can enable this option for an existing DB Instance, and you can also specify it when you create a new one:

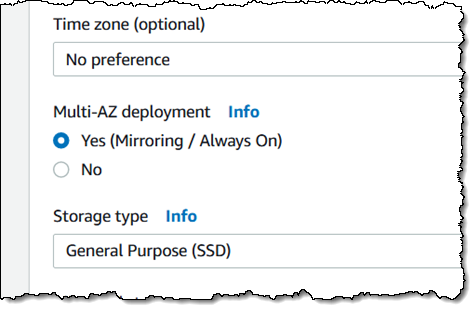
To learn more, read Multi-AZ Deployments Using Microsoft SQL Mirroring or Always On.

4 – Lambda Support
Let’s talk about some features for developers!

Launched in 2014, and the subject of continuous innovation ever since, AWS Lambda lets you run code in the cloud without having to own, manage, or even think about servers. You can choose from several .NET Core runtimes for your Lambda functions, and then write your code in either C# or PowerShell:

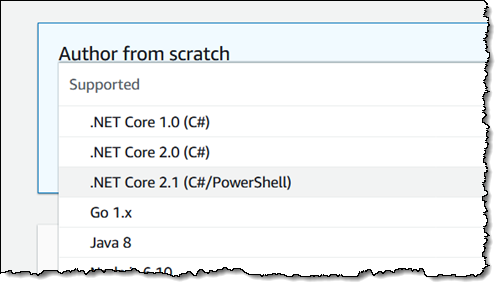
To learn more, read Working with C# and Working with PowerShell in the AWS Lambda Developer Guide. Your code has access to the full set of AWS services, and can make use of the AWS SDK for .NET; read the Developing .NET Core AWS Lambda Functions post for more info.

5 – CDK for .NET (Developer Preview)
The Developer Preview of the AWS CDK (Cloud Development Kit) for .NET lets you define your cloud infrastructure as code and then deploy it using AWS CloudFormation. For example, this code (stolen from this post) will generate a template that creates an Amazon Simple Queue Service (SQS) queue and an Amazon Simple Notification Service (SNS) topic:

var queue = new Queue(this, "MyFirstQueue", new QueueProps
{
    VisibilityTimeoutSec = 300
}
var topic = new Topic(this, "MyFirstTopic", new TopicProps
{
    DisplayName = "My First Topic Yeah"
});

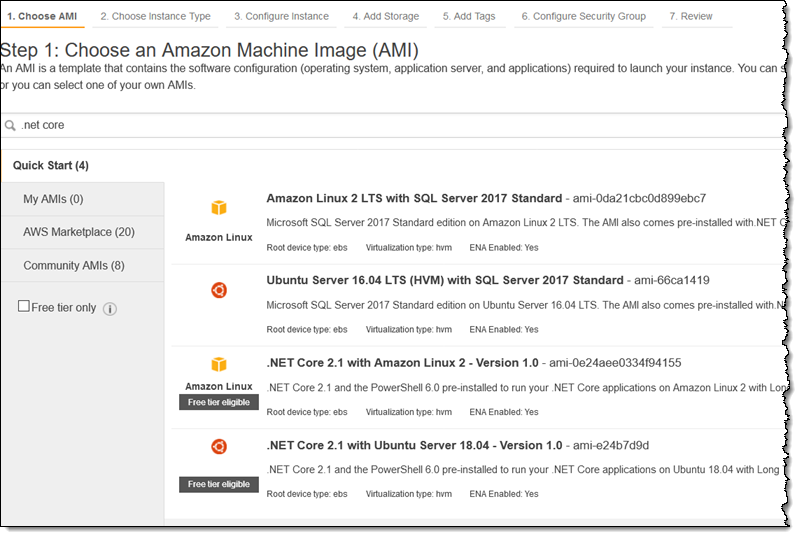
6 – EC2 AMIs for .NET Core
If you are building Linux applications that make use of .NET Core, you can use use our Amazon Linux 2 and Ubuntu AMIs. With .NET Core, PowerShell Core, and the AWS Command Line Interface (CLI) preinstalled, you’ll be up and running— and ready to deploy applications—in minutes. You can find the AMIs by searching for core when you launch an EC2 instance:
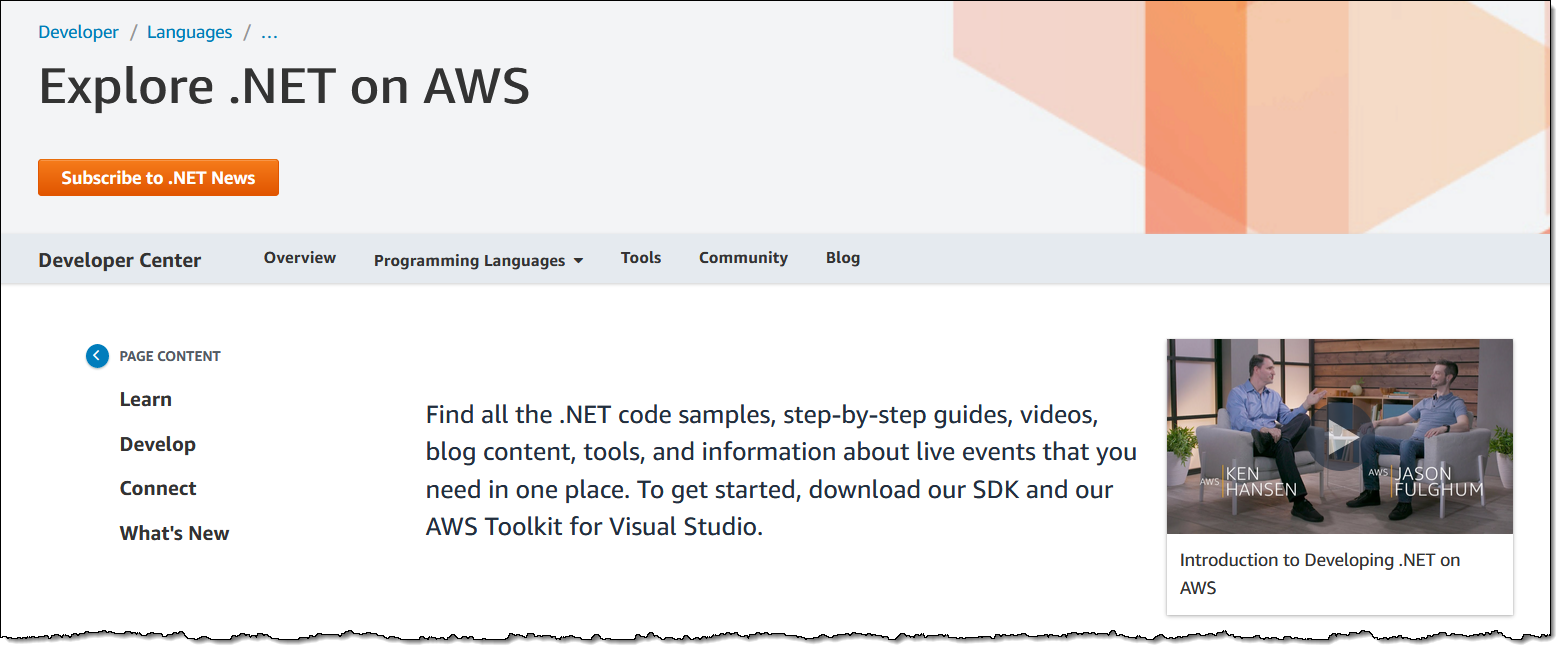
7 – .NET Dev Center
The AWS .Net Dev Center contains materials that will help you to learn how design, build, and run .NET Applications on AWS. You’ll find articles, sample code, 10-minute tutorials, projects, and lots more:

8 – AWS License Manager
We want to help you to manage and optimize your Windows and SQL Server applications in new ways. For example,  AWS License Manager helps you to manage the licenses for the software that you run in the cloud or on-premises (read my post, New AWS License Manager – Manage Software Licenses and Enforce Licensing Rules, to learn more). You can create custom rules that emulate those in your licensing agreements, and enforce them when an EC2 instance is launched:

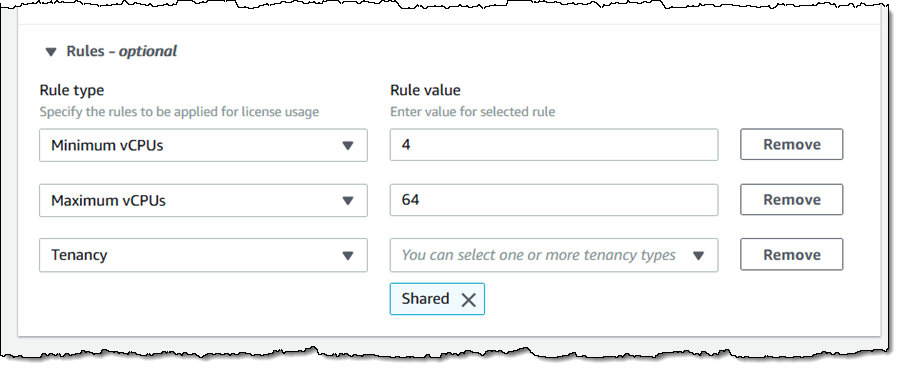
The License Manager also provides you with information on license utilization so that you can fine-tune your license portfolio, possibly saving some money in the process!

9 – Import, Export, and Migration
You have lots of options and choices when it comes to moving your code and data into and out of AWS. Here’s a very brief summary:

TSO Logic – This new member of the AWS family (we acquired the company earlier this year) offers an analytics solution that helps you to plan, optimize, and save money as you make your journey to the cloud.

VM Import/Export – This service allows you to import existing virtual machine images to EC2 instances, and export them back to your on-premises environment. Read Importing a VM as an Image Using VM Import/Export to learn more.

AWS Snowball – This service lets you move petabyte scale data sets into and out of AWS. If you are at exabyte scale, check out the AWS Snowmobile.

AWS Migration Acceleration Program – This program encompasses AWS Professional Services and teams from our partners. It is based on a three step migration model that includes a readiness assessment, a planning phase, and the actual migration.

10 – 21st Century Applications
AWS gives you a full-featured, rock-solid foundation and a rich set of services so that you can build tomorrow’s applications today! You can go serverless with the .NET Core support in Lambda, make use of our Deep Learning AMIs for Windows, host containerized apps on Amazon ECS, AWS Fargate, or Amazon EKS, and write code that makes use of the latest AI-powered services. Your applications can make use of recommendations, forecasting, image analysis, video analysis, text analytics, document analysis, text to speech, translation, transcription, and more.

11 – AWS Integration
Your existing Windows Applications, both cloud-based and on-premises, can make use of Windows file system and directory services within AWS:

Amazon FSx for Windows Server – This fully managed native Windows file system is compatible with the SMB protocol and NTFS. It provides shared file storage for Windows applications, backed by SSD storage for fast & reliable performance. To learn more, read my blog post.

AWS Directory Service – Your directory-aware workloads and AWS Enterprise IT applications can use this managed Active Directory that runs in the AWS Cloud.

Join our Team
If you would like to build, manage, or market new AWS offerings for the Windows market, be sure to check out our current openings. Here’s a sampling:

Senior Digital Campaign Marketing Manager – Own the digital tactics for product awareness and run adoption campaigns.

Senior Product Marketing Manager – Drive communications and marketing, create compelling content, and build awareness.

Developer Advocate – Drive adoption and community engagement for SQL Server on EC2.

Learn More
Our freshly updated Windows on AWS and SQL Server on AWS pages contain case studies, quick starts, and lots of other useful information.

Jeff;

How Blockchain Will Help Banks Tap New Markets in MENA

The content below is taken from the original ( How Blockchain Will Help Banks Tap New Markets in MENA), to continue reading please visit the site. Remember to respect the Author & Copyright.

One of the most striking aspects of the oil-rich Gulf states are their large migrant populations: 88 percent of people in the United Arab Emirates (UAE), 75 percent in Qatar and 74 percent in Kuwait are foreign-born. The majority of these immigrants are workers on temporary visas to do jobs that their predominantly wealthy hosts won’t do. Many leave their families behind but remain the primary source of income for those dependents back home.

The Gulf states are largely cash economies. This is good for migrants whose temporary and low-paid status makes it difficult and expensive to open and maintain bank accounts. But lack of access to regular banking facilities forces them to use slow and expensive cross-border remittance services when it’s time to send money home.

Cross-border cash transfers can eat up as much as 9 percent of the amount sent, which makes it as profitable for the service providers as it is a bad deal for customers. It’s no surprise that fintech companies are using blockchain technology, mobile devices, social network plug-ins and chat services to disrupt the existing remittances process.

Blockchain Is Disrupting Traditional Remittances and Banks

According to the recently published “Remittance Market & Blockchain Technology” report by Blockdata, blockchain-based transactions are on average 388 times faster and 127 times cheaper than traditional remittances. By slashing the usual five-day process to a matter of minutes, while leaving users with significantly more money in their pockets, blockchain services are attracting the attention of migrants and native-born customers in the Gulf and beyond.

UAE-based mobile payments service Beam Wallet has already reached one-sixth of the country’s population in just two years. The company has processed more than $250 million of small value payments for groceries, cups of coffee and even fuel for their cars.

While traditional banks are often uninterested in serving these customers, Beam is demonstrating the potential of transforming cash-based economies into transaction-fee generators with fast and user-friendly mobile payment services. Cross-border remittances are an even bigger opportunity.

Replacing an Inefficient and Expensive Process

In 2018, the remittance market to developing countries was $528 billion, while the global market is expected to rise to $715 billion in 2019. This potential source of value is not confined to the Middle East. The US remains the top remittance-sending country in the world, while people in Germany and Switzerland sent nearly $50 billion across borders in 2017.

The current cross-border remittance process for banks involves dealing with a complicated correspondent banking network, tying up capital in prefunded nostro accounts and using outdated and expensive SWIFT technology. It means that enabling a migrant worker to send $100 to her family is not a priority for banks, no matter how big the overall market.

If the process was more effective and scalable, banks could easily unlock access to billions of dollars of new revenues. Blockchain technology enables direct connection to a recipient bank, which dramatically reduces the cost and increases the speed of processing, while removing the need for pre-funded accounts. All a bank has to do is tap into these new networks, which already exist and are growing every day.

Generating Greater Lifetime Value

Expanding their foothold in remittances is just the beginning for banks. Migrants and low-income households with access to bank accounts often become wealthier. One study shows that families given a savings accounts had 25 percent more monetary assets after a year than those without one. In Kenya, using mobile services to manage their money instead of cash helped 185,000 women switch from subsistence agriculture to business jobs with better prospects.

More financial stability allows people to become candidates for additional financial products and services like loans and credit cards, boosting their lifetime value for banks. Cross-border remittances can act as the banks’ entry strategy to winning new customers and becoming a top-of-wallet service that will turn a single-payment customer into a multi-transactional money-spinner.  

Early Blockchain Adopters Will Thrive

Migrant communities—whether in the Middle East, the US or Europe—are typically tight-knit. The products and services that made their lives easier and better are passed on by word of mouth and become the go-to option across the community. Innovative new blockchain services have already raised customer expectations about how long remittances take, how much they cost and how easy they are to carry out.

If traditional banks do not move fast enough and become part of the blockchain revolution, they will be left behind. Forward-thinking banks who act to provide all customers with the kind of accessible, user-friendly, cheap, fast and transparent experiences they find elsewhere, will open up new markets, reach more customers and generate greater value for everyone.

About the Author

Roel Wolfert is Managing Partner at VGRIP and has more than 20 years of international experience on the edge of business and technology in retail & transactional banking, payments, cards, management consulting, IT and venture capital.

The post How Blockchain Will Help Banks Tap New Markets in MENA appeared first on Ripple.