The content below is taken from the original ( in /r/ sffpc), to continue reading please visit the site. Remember to respect the Author & Copyright.
https://ift.tt/34svJRC


The content below is taken from the original ( in /r/ sffpc), to continue reading please visit the site. Remember to respect the Author & Copyright.
https://ift.tt/34svJRC
The content below is taken from the original ( Citrix CTP Shares How to Troubleshoot ‘Citrix is Slow’ for Remote Workers), to continue reading please visit the site. Remember to respect the Author & Copyright.
Remote worker issues continue for IT Pros – from dealing with slow logons, poor session performance, applications dropping, and personal devices not… Read more at VMblog.com.
The content below is taken from the original ( Introducing Cloudflare Radar), to continue reading please visit the site. Remember to respect the Author & Copyright.


Unlike the tides, Internet use ebbs and flows with the motion of the sun not the moon. Across the world usage quietens during the night and picks up as morning comes. Internet use also follows patterns that humans create, dipping down when people stopped to applaud healthcare workers fighting COVID-19, or pausing to watch their country’s president address them, or slowing for religious reasons.
And while humans leave a mark on the Internet, so do automated systems. These systems might be doing useful work (like building search engine databases) or harm (like scraping content, or attacking an Internet property).
All the while Internet use (and attacks) is growing. Zoom into any day and you’ll see the familiar daily wave of Internet use reflecting day and night, zoom out and you’ll likely spot weekends when Internet use often slows down a little, zoom out further and you might spot the occasional change in use caused by a holiday, zoom out further and you’ll see that Internet use grows inexorably.
And attacks don’t only grow, they change. New techniques are invented while old ones remain evergreen. DDoS activity continues day and night roaming from one victim to another. Automated scanning tools look for vulnerabilities in anything, literally anything, connected to the Internet.
Sometimes the Internet fails in a country, perhaps because of a cable cut somewhere beneath the sea, or because of government intervention. That too is something we track and measure.
All this activity, good and bad, shows up in the trends and details that Cloudflare tracks to help improve our service and protect our customers. Until today this insight was only available internally at Cloudflare, today we are launching a new service, Cloudflare Radar, that shines a light on the Internet’s patterns.
Each second, Cloudflare handles on average 18 million HTTP requests and 6 million DNS requests. With 1 billion unique IP addresses connecting to Cloudflare’s network we have one of the most representative views on Internet traffic worldwide.
And by blocking 72 billion cyberthreats every day Cloudflare also has a unique position in understanding and mitigating Internet threats.
Our goal is to help build a better Internet and we want to do this by exposing insights, threats and trends based on the aggregated data that we have. We want to help anyone understand what is happening on the Internet from a security, performance and usage perspective. Every Internet user should have easy access to answer the questions that they have.
There are three key components that we’re launching today: Radar Internet Insights, Radar Domain Insights and Radar IP Insights.
At the top of Cloudflare Radar we show the latest news about events that are currently happening on the Internet. This includes news about the adoption of new technologies, browsers or operating systems. We are also keeping all users up to date with interesting events around developments in Internet traffic. This could be traffic patterns seen in specific countries or patterns related to events like the COVID-19 pandemic.

Sign up for Radar Alerts to always stay up-to-date.
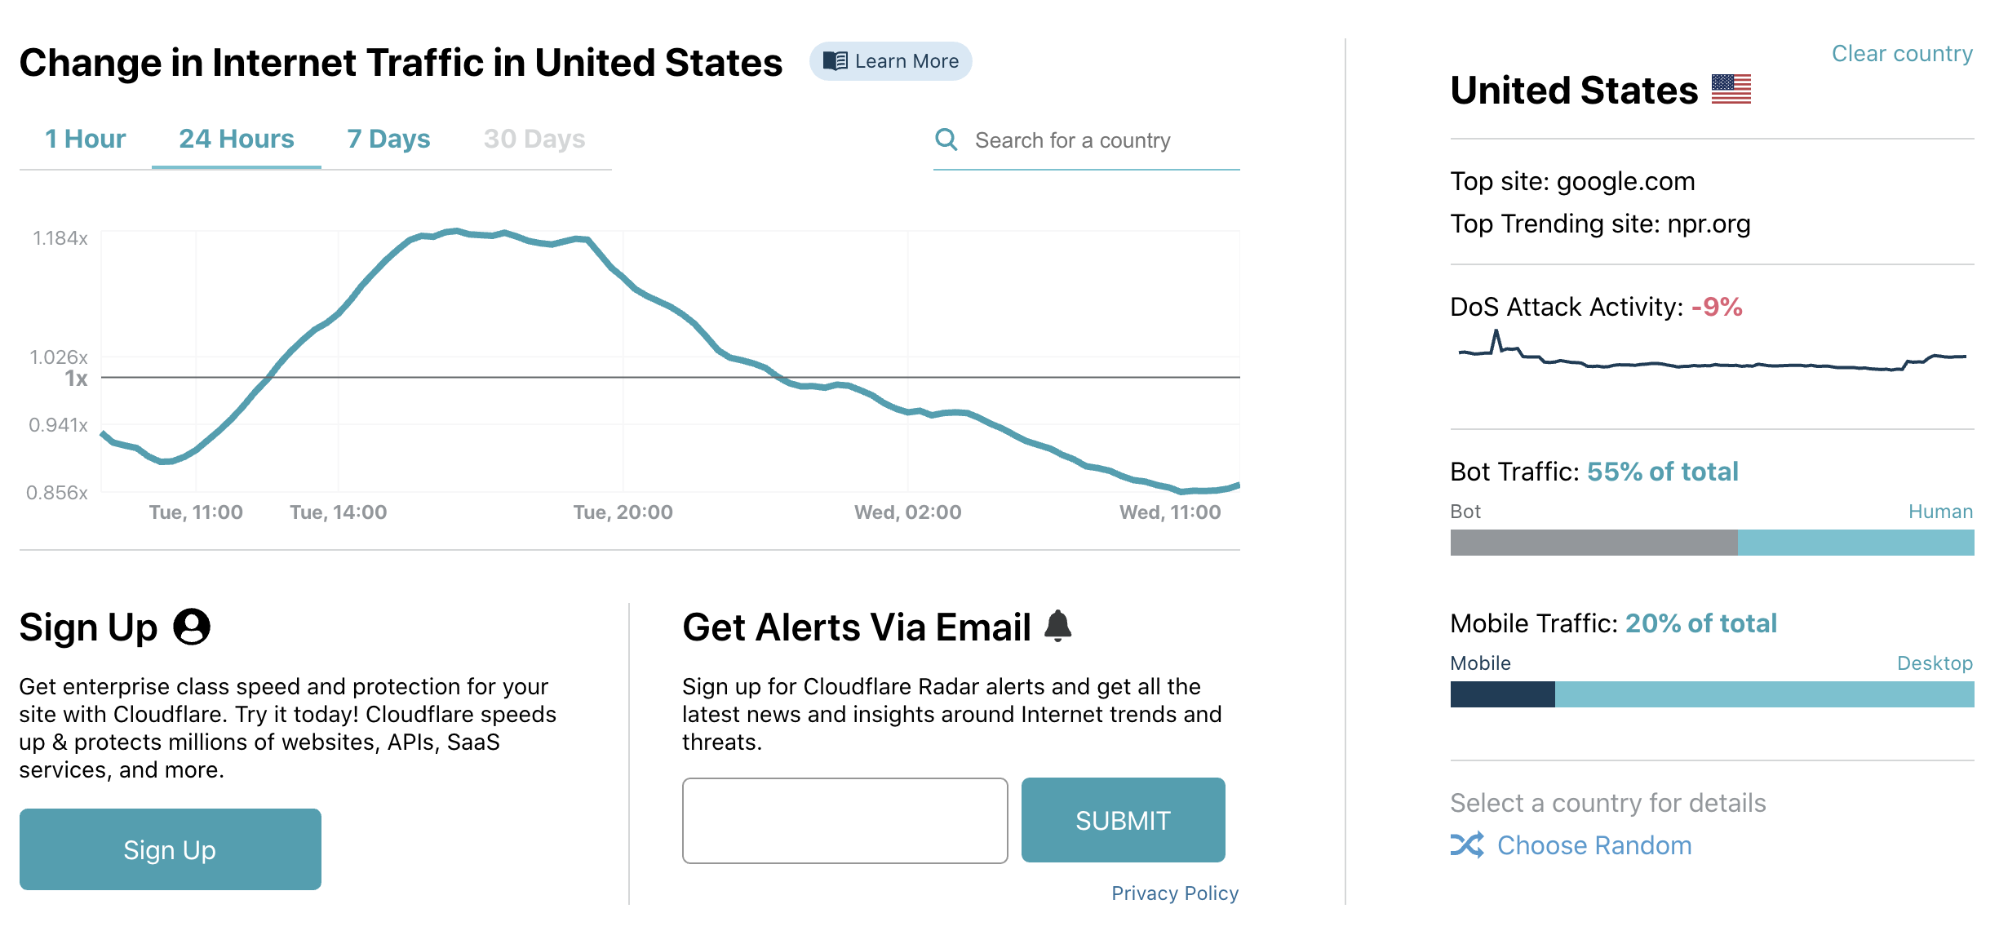
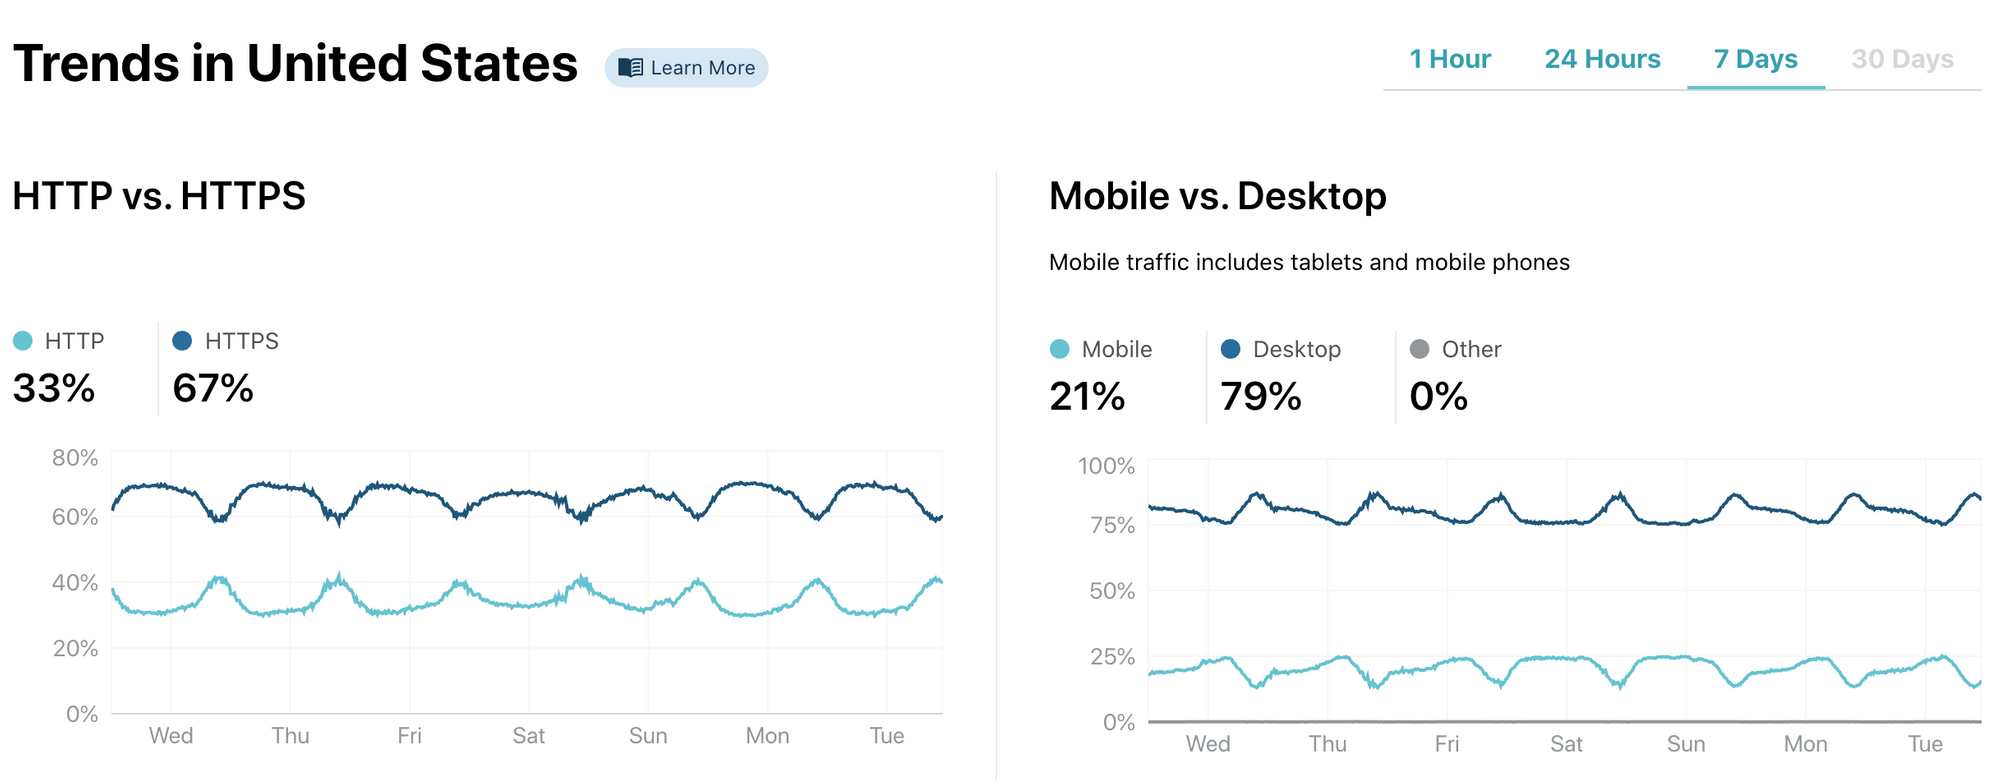
Below the news section users can find rapidly updated trend data. All of which can be viewed worldwide or by country. The data is available for several time frames: last hour, last 24 hours, last 7 days. We’ll soon make available the 30 days time frame to help explore longer term trends.
You can drill down on specific countries and Cloudflare Radar will show you the change in aggregate Internet traffic seen by our network for that country. We also show an info box on the right with a snapshot of interesting data points.
Worldwide and for individual countries we have an algorithm calculating which domains are most popular and have recently started trending (i.e. have seen a large change in popularity). Services with multiple domains and subdomains are aggregated to ensure best comparability. We show here the relative rank of domains and are able to spot big changes in ranking to highlight new trends as they appear.
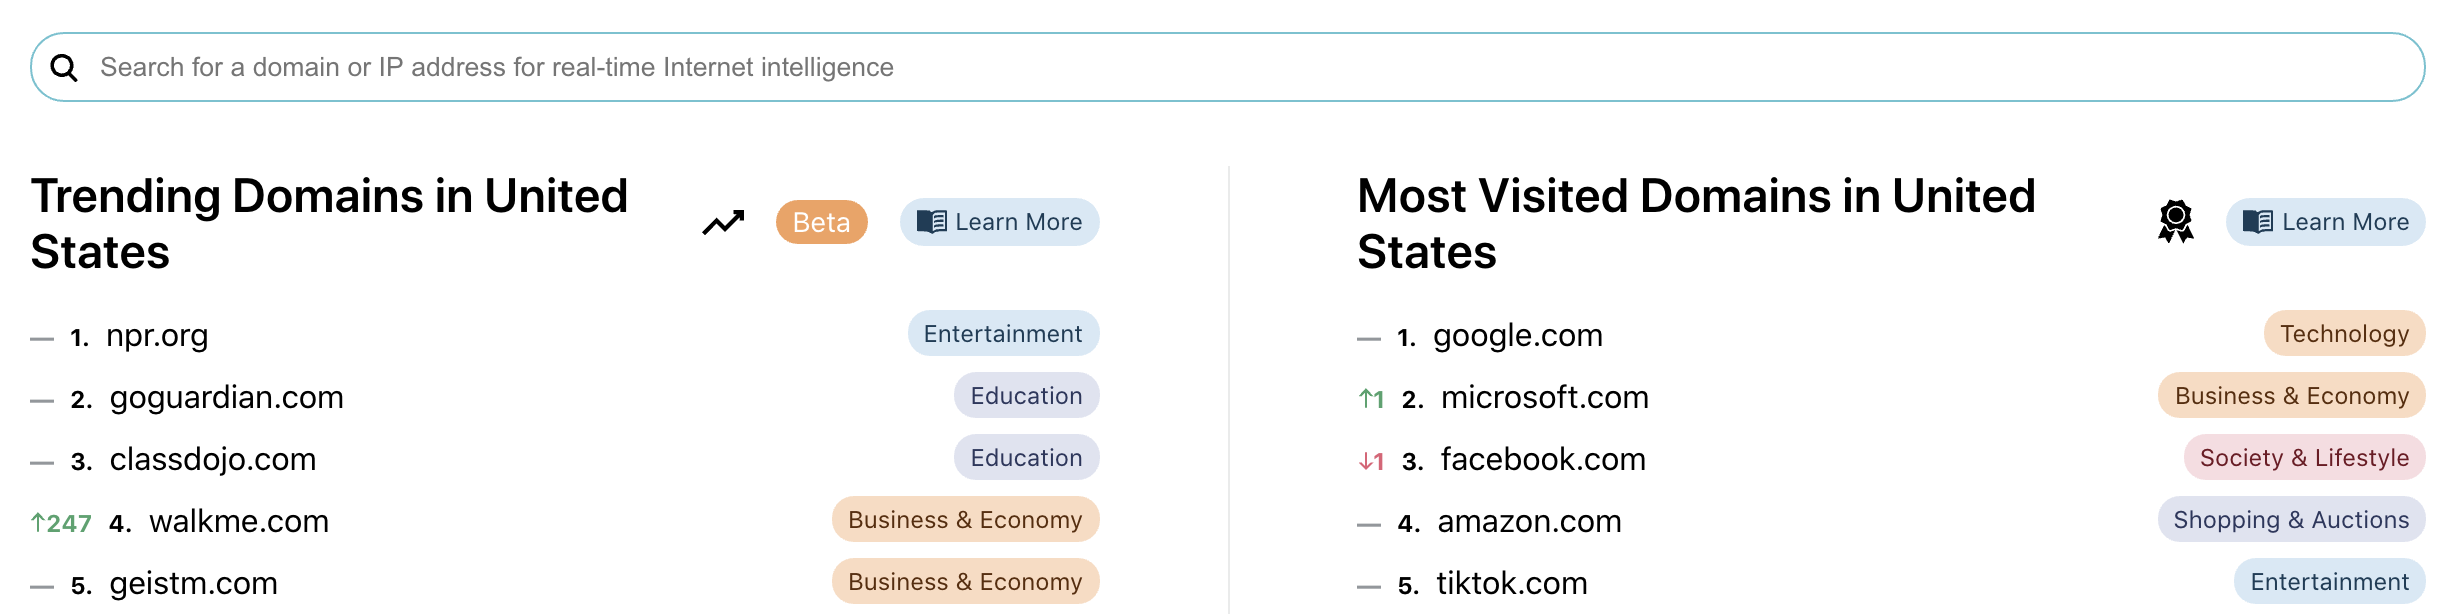
The trending domains section are still in beta as we are training our algorithm to best detect the next big things as they emerge.
There is also a search bar that enables a user to search for a specific domain or IP address to get detailed information about it. More on that below.
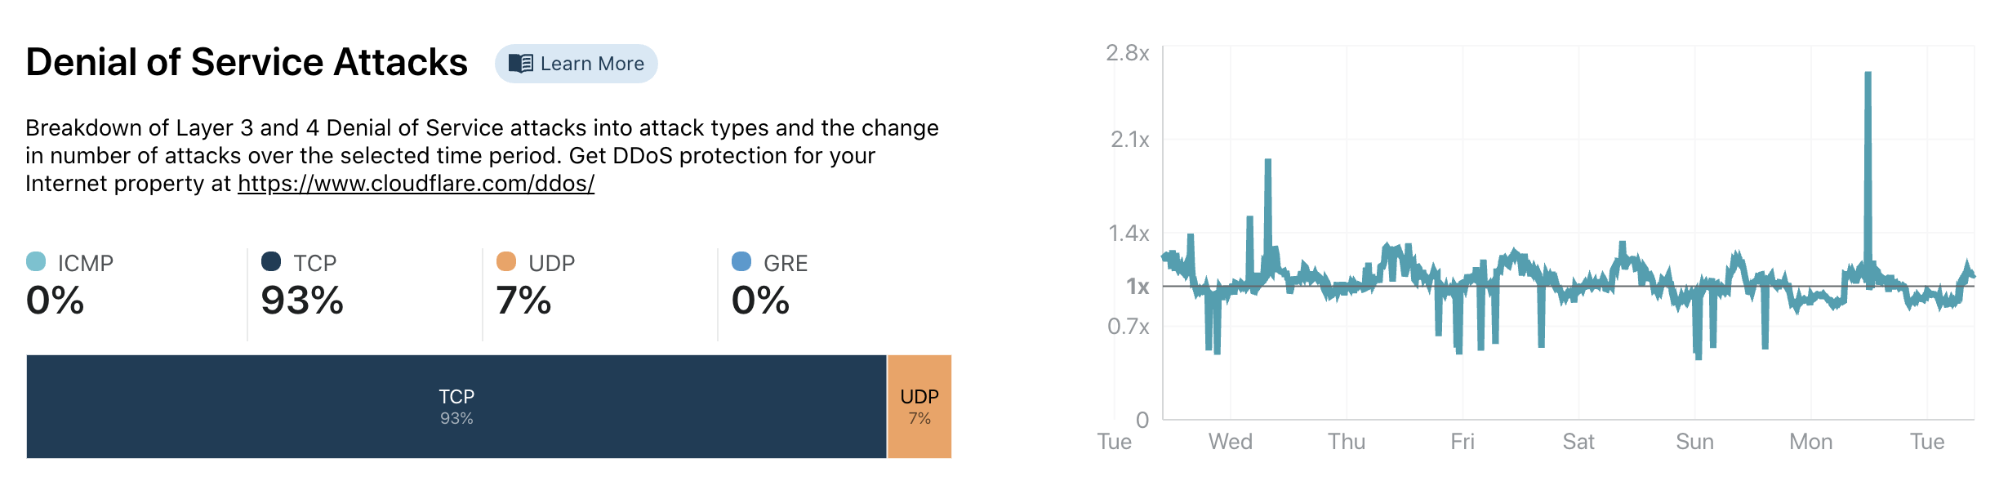
The attack activity section gives information about different types of cyberattacks observed by Cloudflare. First we show the attacks mitigated by our Layer 3 and 4 Denial of Service prevention systems. We show the used attack protocol as well as the change in attack volume over the selected time frame.
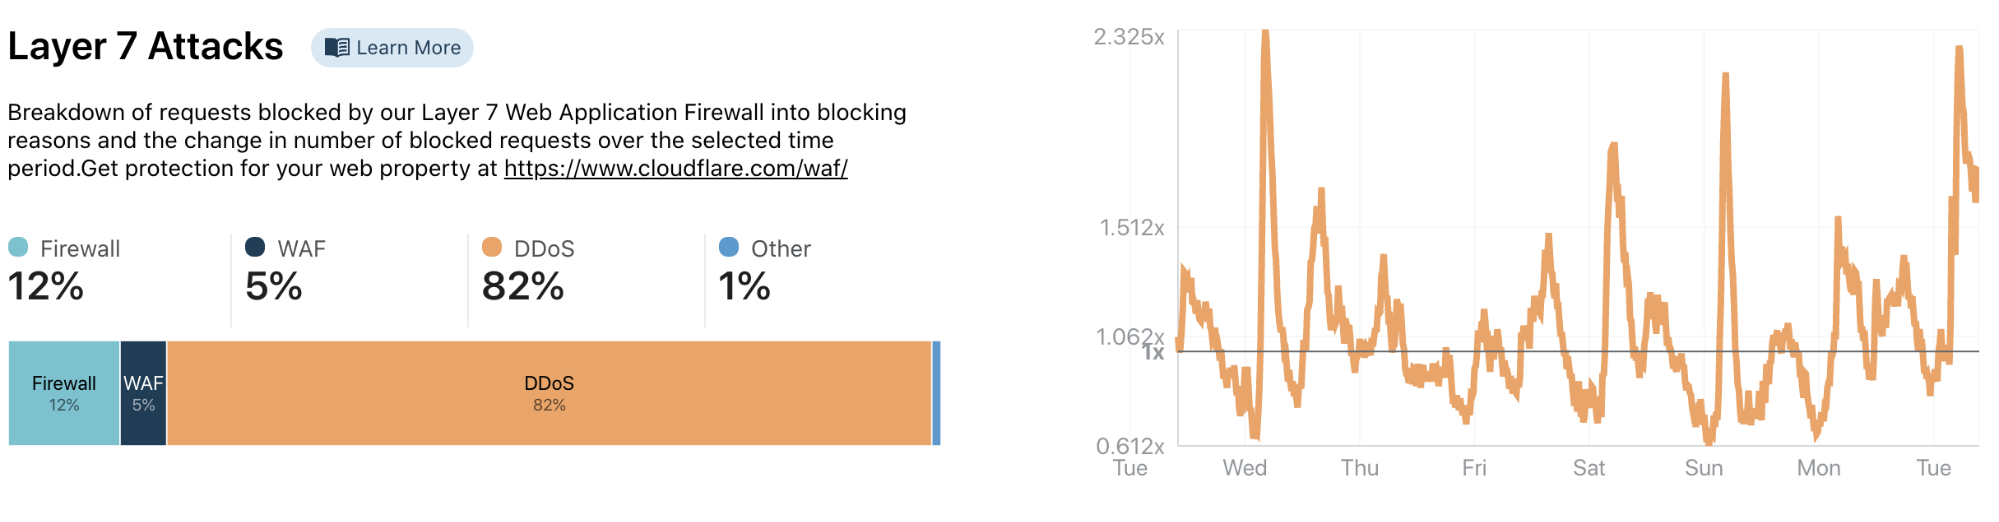
Secondly, we show Layer 7 threat information based on requests that we blocked. Layer 7 requests get blocked by a variety of systems (such as our WAF, our layer 7 DDoS mitigation system and our customer configurable firewall). We show the system responsible for blocking as well as the change of blocked requests over the selected time frame.
Based on the analytics we handle on HTTP requests we are able to show trends over a diverse set of data points. This includes the distribution of mobile vs. desktop traffic, or the percentage of traffic detected as coming from bots. We also dig into longer term trends like the use of HTTPS or the share of IPv6.
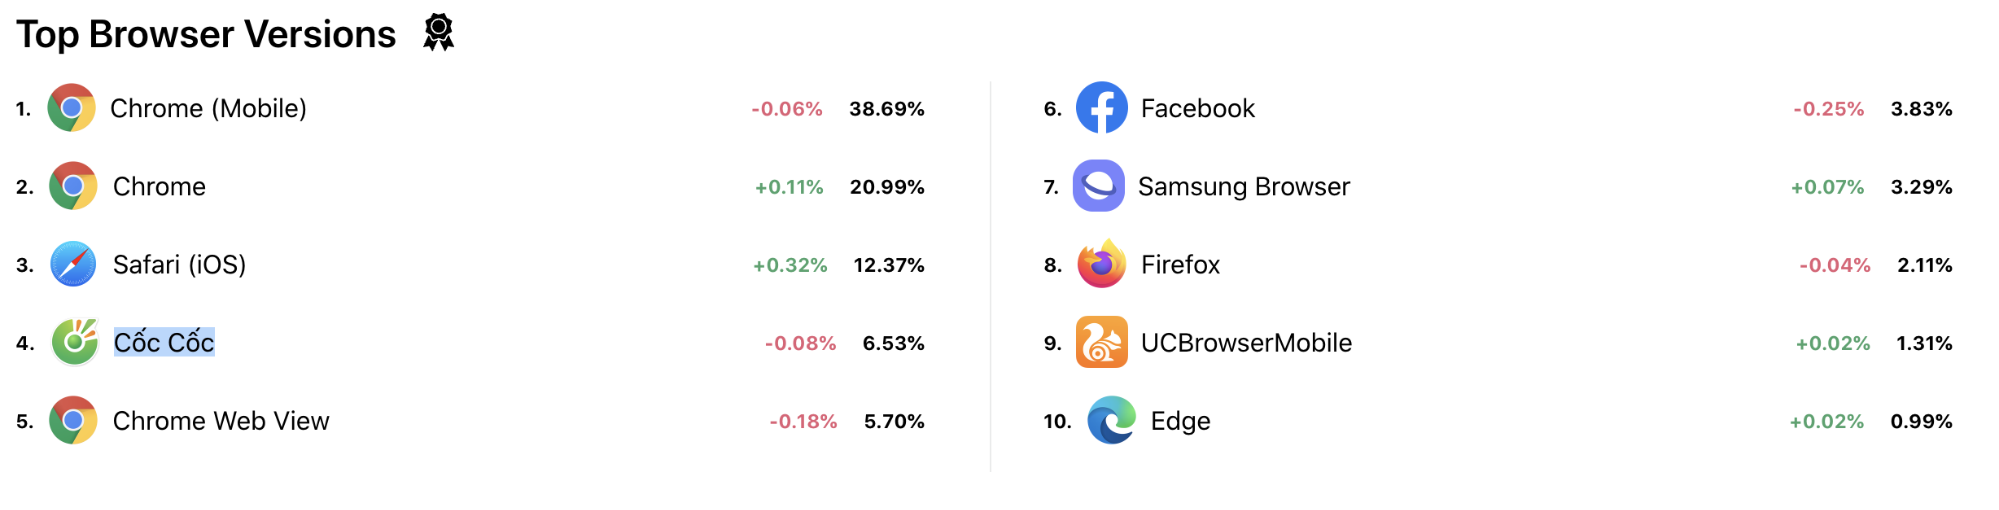
The bottom section shows the top browsers worldwide or for the selected country. In this example we selected Vietnam and you can see that over 6% of users are using Cốc Cốc a local browser.
We give users the option to dig in deeper on an individual domain. Giving the opportunity to get to know the global ranking as well as security information. This enables everyone to identify potential threats and risks.
To look up a domain or hostname in Radar by typing it in the search box within the top domains on the Radar Internet Insights Homepage.

For example, suppose you search for cloudflare.com. You’ll get sent to a domain-specific page with information about cloudflare.com.
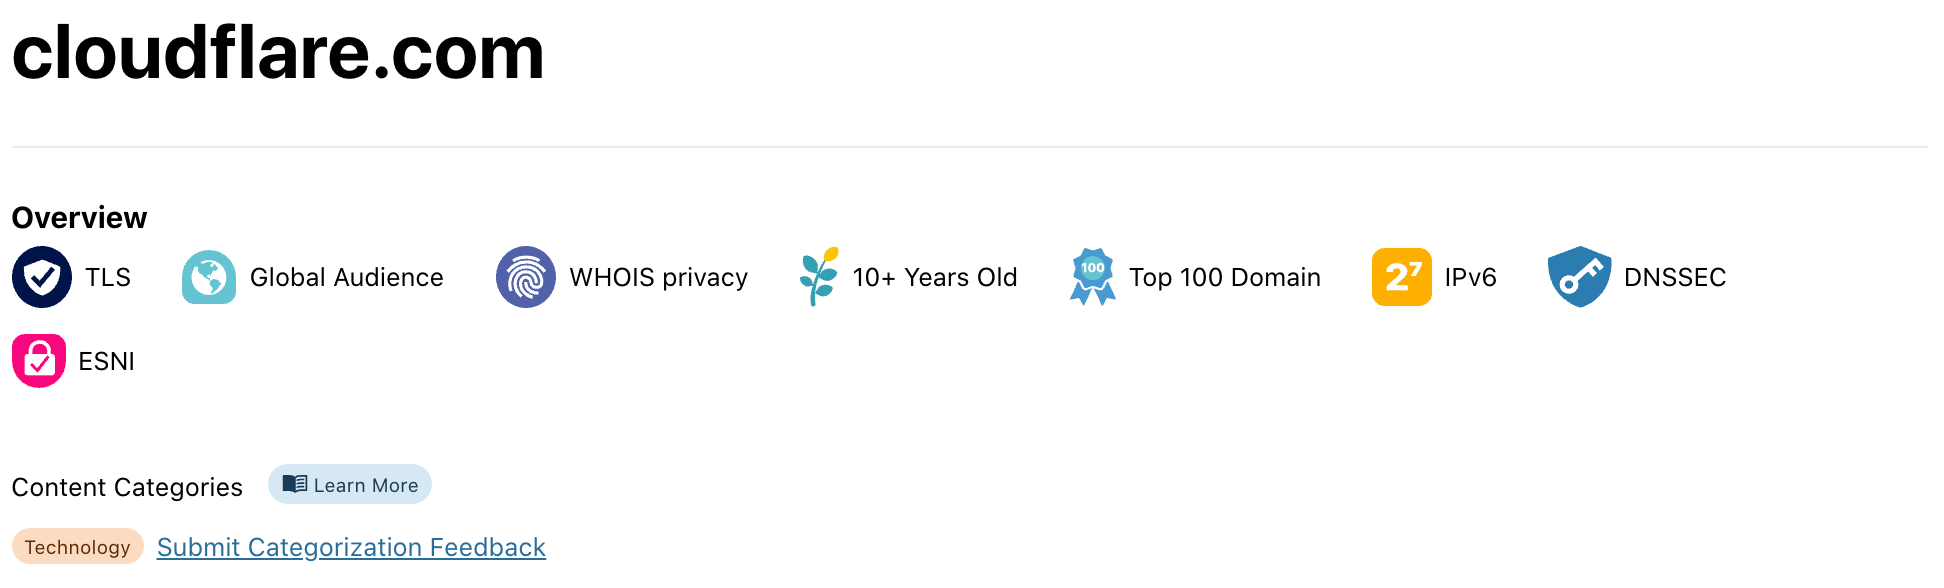
At the top we provide an overview of the domain’s configuration with Domain Badges. From here you can, at a glance, understand what technologies the domain is using. For cloudflare.com you can see that it supports TLS, IPv6, DNSSEC and eSNI. There’s also an indication of the age of the domain (since registration) and its worldwide popularity.
Below you find the domain’s content categories. If you find a domain that is in the wrong category, please use our Domain Categorization Feedback to let us know.
We also show global popularity trends from our domain ranking formula. For domains with a global audience there’s also a map giving information about popularity by country.

For an individual IP address (instead of a domain) we show different information. To look up an IP address simply insert it in the search bar within the top domains on the Radar Internet Insights. For a quick lookup of your own IP just open radar.cloudflare.com/me.
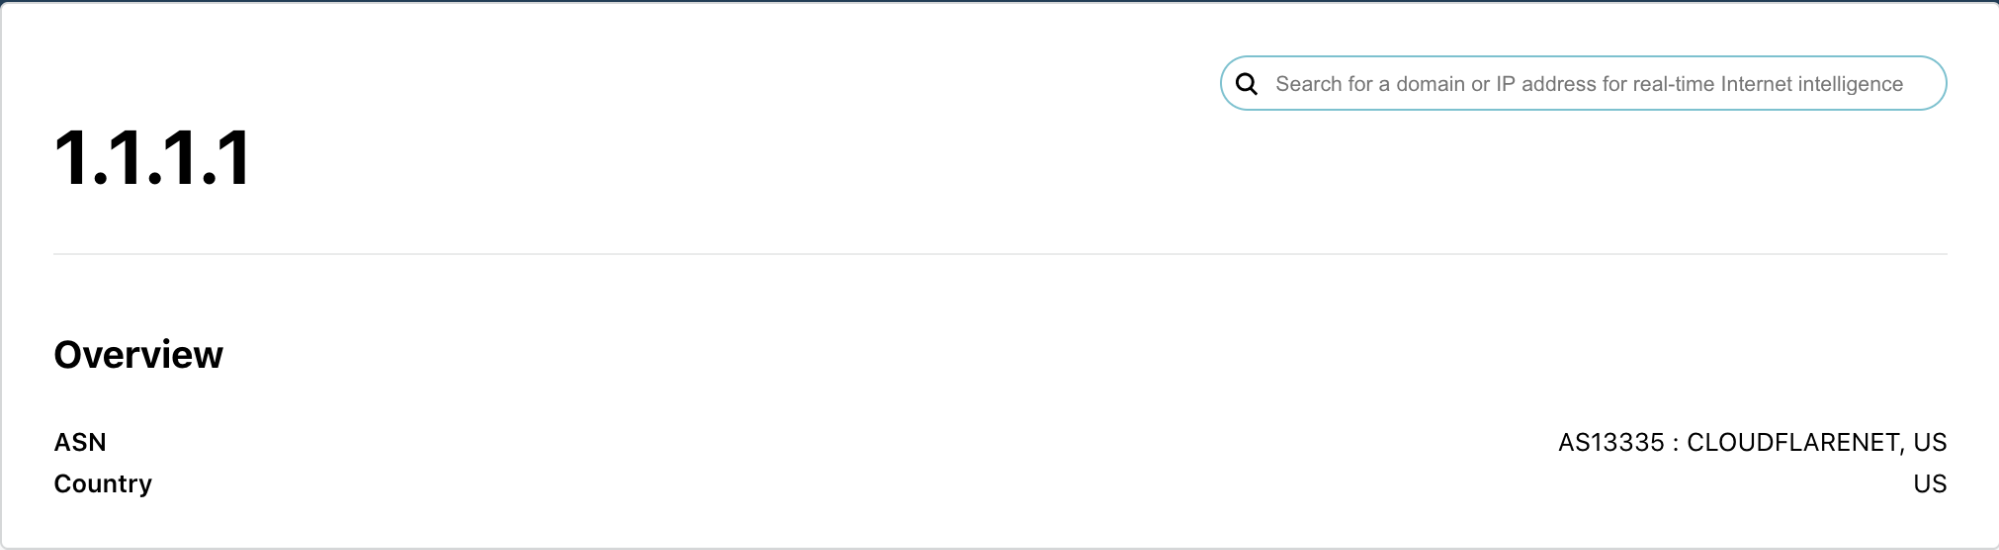
For IPs we show the network (the ASN) and geographic information. For your own IP we also show more detailed location information as well as an invitation to check the speed of your Internet connection using speed.cloudflare.com.
The current product is just the beginning of Cloudflare’s approach to making knowledge about the Internet more accessible. Over the next few weeks and months we will add more data points and the 30 days time frame functionality. And we’ll allow users to filter the charts not only by country but also by categorization (such as by industry).
Stay tuned for more to come.
The content below is taken from the original ( Learn how to manage and optimize your Azure costs with our guided learning modules), to continue reading please visit the site. Remember to respect the Author & Copyright.
Stay up to date on your cost management needs with five new courses
The content below is taken from the original ( Raw Logs and Metrics are generally available on Azure Content Delivery Network (CDN) from Microsoft CDN), to continue reading please visit the site. Remember to respect the Author & Copyright.
New options for analytics on Azure CDN are now available to unblock more scenarios for you
The content below is taken from the original ( Retrotechtacular: The $5,000 40 Pound HP Classroom Computer), to continue reading please visit the site. Remember to respect the Author & Copyright.
See if you can talk your local school district into buying a computer that costs about $5,000 and weighs 40 pounds. That was HP’s proposition to schools back in 1968 so really it is more like $35,000 today. The calculator had a CRT display for the RPN stack that you could mirror on a big screen. You could also get a printer or plotter add-on. Pretty hot stuff for the ’60s.
The 1970 videos promoting the HP 9100, posted by the [Computer History Archive Project], shows something we’d think of as a clunky calculator, although by the standards of the day it was a pretty good one with trig functions and a crude programming capability.
You could save your program on a magnetic card that looked more like a credit card than HP’s later magnetic cards for calculators. It also had an optical mark sense reader so students could program cards at home using a pencil, presumably running test programs or submitting homework answers.
Honestly, this seems hokey today, but back then this was pretty amazing stuff. Graphing calculators did take over the classroom, but not until the students could have their own for a bit more reasonable price.
Apparently, Bill Hewlett said that they would have called the 9100 a computer, but it would have confused their customers because it didn’t look like an IBM computer. Naming it a calculator cued customers that it was something different. The device had no integrated circuits and was similar enough architecturally to an Olivetti Programma 101, that HP was forced to pay about $900,000 in royalties to Olivetti.
If you watch the video to the end, you’ll see a 1970s-era physics instructor show how to use the 9100 to explain a body in motion. Not exactly a Zoom class, but pretty close for five decades ago. If you want to check out the slick marketing brochure for the machine, it lives as a PDF file. There’s even an example of plotting the frequency response of an LC network. You can even read some electronics and other types of programs for the beast in the HP Computer Museum.
It is a long way from an HP 9100 to the HP Prime. But probably no further than the 9100 was from a CURTA.
The content below is taken from the original ( Microsoft thinks remote workers need a ‘virtual commute’), to continue reading please visit the site. Remember to respect the Author & Copyright.
If there’s one thing you don’t miss from your pre-pandemic life, it’s probably your commute to work. But Microsoft is convinced that daily commutes have unique benefits, and it wants to revive those benefits by replacing your daily commute with morni…
The content below is taken from the original ( Announcing the public preview of Azure Automanage), to continue reading please visit the site. Remember to respect the Author & Copyright.
A new approach to managing Windows Server virtual machines in Azure.
The content below is taken from the original ( Better monitoring and logging for Compute Engine VMs), to continue reading please visit the site. Remember to respect the Author & Copyright.
Over the past several months we’ve been focused on improving observability and operations workflows for Compute Engine. Today, we are excited to share the first wave of these enhancements are now available. These include:
Significantly improved operating system support for the Cloud Monitoring and Cloud Logging agents.
The ability to rapidly deploy, update, and remove agents to groups of VMs, or all of your VMs, by policy, with as little as a single gcloud command.
New VM-specific features within the Cloud Monitoring console, which we’ll discuss in an upcoming blog post.
Agents remain a key way to get fine-grained visibility into a virtual machine’s host operating system, and applications running on Compute Engine are no different.
Out of the box, every Compute Engine instance (or managed instance group) provides some level of telemetry, including metrics for CPU utilization, uptime, disk throughput and operations, and networking operations. To capture more advanced operating system metrics like memory consumption and disk utilization, metrics from commonly used applications (databases, web proxies, etc.), and logs from your applications, you need to install the Cloud Monitoring and Cloud Logging agents onto each VM.
Because agents are so essential in VM environments, we’veautomated the process of installing, updating, and removing the Cloud Monitoring Logging agents onto groups of Compute Engine VMs, or your entire fleet, via a new set of gcloud commands. With as little as one command, you can create a policy that governs existing and new VMs, ensuring proper installation and optional auto-upgrade of both agents. This is a great way to start using Cloud Monitoring or Cloud Logging right away, and to scale metrics and logs collection from a single VM to all VMs in a project.
These policies can be applied to Linux virtual machines now as a part of the public alpha and will apply to Windows VMs soon.
Over the past year, we’ve added Cloud Monitoring and Logging agent support to a host of new operating systems.
Linux
The Monitoring and Logging agents are now compatible with 30 of Compute Engine’s available Linux images, including:
CentOS 7+
Red Hat Enterprise Linux 7+
Debian 9+
SUSE Linux Enterprise Server 12+
Ubuntu 16+
With these additions, the Cloud Monitoring Linux agents can be used on every Compute Engine host operating system other than the Container Optimized OS, which has monitoring and logging capabilities built in to the OS itself.
Windows
Cloud Monitoring has been able to capture system and SQL Server metrics for Windows virtual machines since before 2015, thanks to its Windows agent. We’re currently improving the compatibility, quality, and functionality of our Windows support with a new agent that provides the following enhancements:
Capturing the same advanced OS metrics as the Cloud Monitoring Linux agent, rather than a smaller incompatible set
Compatibility with more Windows versions
Capturing application metrics from IIS, SQL Server, and Windows performance counters
The new agent is in preview. Please contact your account manager if you would like to participate in early tests.
We hope you enjoy these improvements to Cloud Monitoring and Cloud Logging, and we look forward to bringing even more capabilities to the platform. To check out these new features, go to our documentation for these new features or to the Cloud Monitoring and Logging in the Google Cloud Console.
The content below is taken from the original ( Adding WiFi To The Acorn Electron), to continue reading please visit the site. Remember to respect the Author & Copyright.
In the continuing quest by countless hobbyists to allow every 1980s 8-bit home computer to experience the joys of an online experience that doesn’t involve a 9600 baud modem, [Roland Leurs] has created a cartridge-based module for the Acorn Electron that adds WiFi, which he showed off at the virtual ABug conference in September 2020.
The Acorn Electron is a Synertek 6502-based computer that was released in the UK in August of 1983. It’s a budget version of the well-known BBC Micro educational/home computer, with 32 kB of RAM and featuring BBC BASIC v2 in its ROM. [Roland]’s ElkWiFi card slots into an available cartridge slot, after which the onboard ESP8266 (ESP-1 module) can be enabled and used as a WiFi modem.
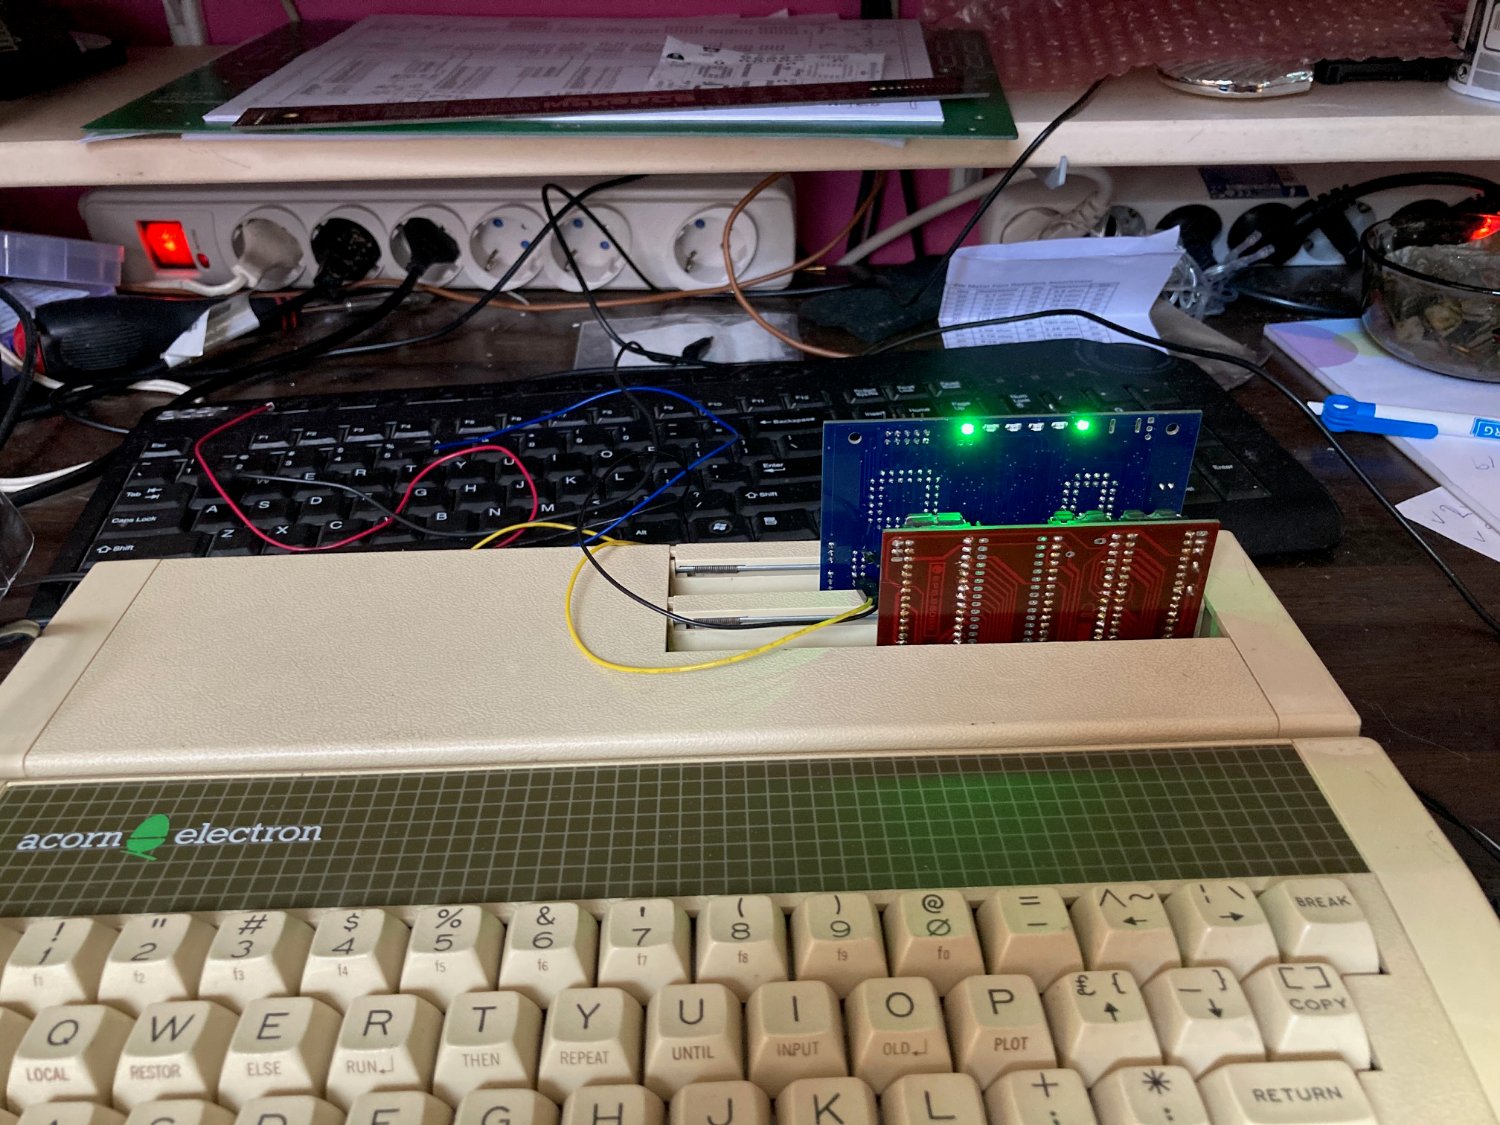
The board features the Exar ST16C2552CJ dual UART chip, one channel of which connects to the ESP-1 module, with the other channel used as an uncommitted UART header. The control logic is implemented in VHDL and flashed to the onboard Xilinx CPLD, and a 128 kB RAM module is used as WiFi data buffer.
Although a definite niche product, reading through the forum thread makes one really appreciate the technical complexity and joy once things are beginning to work reliably. It also shows one of the few cases where an ESP-1 module is used for its original purpose: as an easy way to add WiFi functionality with full WiFi and TCP stack, without burdening the main CPU.
(Thanks, BaldPower)
The content below is taken from the original ( Arm Neoverse V1 and N2 Roadmap Update), to continue reading please visit the site. Remember to respect the Author & Copyright.
In a big roadmap update, Arm shares more details of its upcoming core designs. The Arm Neoverse V1 is designed for performance and the N2 for scale-out
The post Arm Neoverse V1 and N2 Roadmap Update appeared first on ServeTheHome.
The content below is taken from the original ( VMware drops hints that ESXi on Arm is about to become a proper product), to continue reading please visit the site. Remember to respect the Author & Copyright.
Strong hints have emerged that VMware is close to making the Arm version of its ESXi hypervisor a proper product.…
The content below is taken from the original ( DIY Hearing Aid Costs $1 to Build, Ready in 25 Minutes), to continue reading please visit the site. Remember to respect the Author & Copyright.
 |
submitted by /u/Sorin61 to r/Futurology [link] [comments] |
The content below is taken from the original ( in /r/ msp), to continue reading please visit the site. Remember to respect the Author & Copyright.
First, wanted to share an alert about a tricky new form of cyber attack called email conversation thread hijacking that handily thwarts your advice to customers that they should only open messages from people they know. If you are unfamiliar with how it works, you can learn more here.
And without further ado, onto the resources! (I have no known connection with any of these.)
A Website
Let's Debug provides a set of tests to help figure out why you might not be able to issue a certificate for Let's Encrypt. You simply enter the domain and validation method to identify problems with basic DNS setup, problems with nameservers, rate limiting, networking issues, CA policy issues and common website misconfigurations. Kindly recommended by Perrydiculous.
A Tutorial
The Bash Hackers Wiki provides human-readable documentation and information on GNU Bash so users don't have to read the entire Bash manpage. It's not intended for newbies, but a great resource for those already familiar with Bash. A shout out to whetu for directing us to this one.
A Free Tool
yEd Graph Editor is an application for generating high-quality diagrams either manually or by importing your data. Even large data sets can be arranged by the automatic layout algorithms with a single click. Runs on all major platforms. Thanks go to jmbpiano for the suggestion!
A Blog
Schneier on Security is a blog on security issues by a fellow and lecturer at Harvard's Kennedy School and a board member of EFF. bdzer0 appreciates it for "high level monthly security/encryption."
Another Free Tool
Hiren's Boot CD includes pretty much everything you need to recover a dead OS or accidentally deleted or lost files. TheGreaterAjax describes it as a "One stop shop for basically anything. From loading antivirus before boot, or imaging a drive that's on it's last leg. Lots and lots of tools built-in, and it has a desktop gui as well."
(You can find a searchable list of the hundreds of items I've shared over time here. Enjoy!)
The content below is taken from the original ( Cloud migration: What you need to know (and where to find it)), to continue reading please visit the site. Remember to respect the Author & Copyright.
Migrating to the cloud for an enterprise that has been running workloads on premises for years can be very daunting. To be successful, a migration plan needs to factor in many different aspects relating to people, process and technology. If you are designing the migration, you need guidance and best practices to help steer you through this process.
Building on our experience as solutions architects, we have put together a comprehensive set of documents for IT practitioners who are planning, designing, and implementing a migration to Google Cloud. At our Migration to Google Cloud page, you’ll find extensive technical information and advice you need to help plan and execute a successful migration. To help you get started faster, this blog post provides a high-level outline and links into the relevant part of the documentation where you can get more information.
Before you start your migration, you should gather some foundational understanding about Google Cloud, your environment, and different migration approaches:
1. Understand the difference between Google Cloud and the current environment. The source environment could be on-premises or a private hosting environment. These environments have a different operational model compared to a public cloud, from a physical security, networking, power, hardware and virtualization standpoint.
2. Identify the type of workloads that need to be migrated. We recommend you start your migration by classifying workloads as either legacy, or cloud-native. Legacy workloads were developed without any consideration for cloud environments, with limited support for scaling resources such as disks and compute. As a result, these workloads can be difficult to modify and expensive to run and maintain. When designed following best practices, cloud-native workloads are natively scalable, portable, available, and secure. As a result, cloud-native workloads tend to increase developer productivity and agility, because developers can focus on the actual workloads, rather than spending effort to manage development and runtime environments.
3. Determine your organization’s maturity level for cloud technologies. When identified early, skill gaps can be addressed as part of the migration process through actions like self-study, training or peer mentorship. You can use Google Cloud’s Cloud Adoption Framework to measure your organization’s cloud adoption maturity.
4. Familiarize yourself with the different types of migration approaches and their tradeoffs, because different workloads might require different migration approaches. We define three types of migrations:
Lift and shift. You migrate the workload, applying the least amount of changes.
Improve and move. You modify parts of the workload to adopt cloud-native approaches as part of the migration.
Rip and replace. You decommission the workload, and write a new workload, adopting a cloud-native approach.
For more information on migration types refer to the migration guide’s section on Types of migration.
Broadly speaking, the migration journey can be captured as a four-phase process: Assess, Plan, Deploy and Optimize. It’s easier to show this linearly, but it’s rarely so straightforward, with these phases often happening in parallel for different workloads.
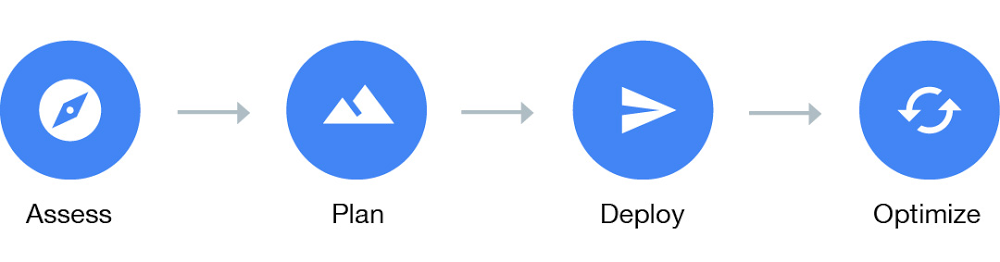
This phase builds on any pre-work that you’ve done, with a focus on taking an inventory of the workloads that you plan to migrate and their respective dependencies. Things to think about include (but are not limited to) hardware and performance requirements, users, licensing, compliance needs and workload dependencies. Then, map this information into an app catalog that summarizes the information across some key axis questions—for example:
Whether the workload has dependencies, or is a dependency for other workloads
How critical the workload is to the business
How difficult it is to migrate the workload
The app catalog will provide you with a high-level view of the amount of effort to migrate all your different workloads. You can also use automated tools such as StratoZone that can scan your existing workloads and provide you with information based on the data gathered. StratoZone not only helps with discovery but can also help you map your instances to matching Google Compute Engine instances. Check out this blog post for an introduction to StratoZone. Additional information on how to conduct discovery is also available in the Categorizing your apps section.
To further get a sense of the size of risk or effort, you should conduct a proof of concept (POC) that tests the different use cases and requirements of the workload, with a focus on the more complicated workloads. This aids with getting more information early as well as reducing unknowns.
You should also perform a total cost of ownership (TCO) calculation at this phase, giving the business visibility into what their cloud expenditure will look like as a result of the migration, compared to your existing environment. When moving from an on-prem to a cloud environment, there are often hidden costs that are missed when calculating the costs in the old data center. We list out some of the things to look out for when building this TCO in the Calculating total cost of ownership section of our guide. Getting the business to understand the shift in cost models and all of the additional benefits gained will be crucial to migration success.
Lastly, you need to decide on which workloads to migrate first. The answer will vary from business to business depending on many different factors such as business value of the workload, complexity of migration, and the availability and requirements of the workload. To help guide this decision, it’s a good idea to call a meeting of the subject matter experts of the different workloads and go through a jointly agreed list of factors. Succeeding with the first workload is key to the overall success of your migration journey, as early success yields trust and goodwill, whereas early challenges can sometimes derail entire migration projects.
The next phase is to plan the foundational pieces of the new cloud environment, which consist of but are not limited to:
1. Establishing user and service identities. How will users and service accounts be created and managed? You can choose between G Suite or Cloud Identity domains, and optionally integrating with your existing Identity Provider (IdP). Read up on this in the Identity and Access management section.
2. Designing a resource organization hierarchy. How are the different Google Cloud resources structured hierarchically? Organization nodes, folders and projects provide the building blocks to set up a resource organization hierarchy. A properly designed resource organization simplifies access control and billing management. Examples of different types of designs are:
Environment oriented hierarchy – This design separates out your production, quality assurance and development environments.
Function orientated hierarchy – This design breaks different business functions into their own folders at the top level, and implements an environment-orientated hierarchy beneath it.
Granular orientated hierarchy – This design builds on top of the function-orientated hierarchy by adding a business unit organization at the top level.
You can dive deep on this topic in the resource hierarchy section.
3. Defining groups and roles for resource access. What are the different roles of users who will be accessing your cloud environment? What permissions should these different roles have? You need to create manager roles such as organizational admin, network admin and security admins to manage the cloud resources. It is also a best practice to create specific roles for the different classes of users who will be using the cloud environment, for example developers, testers and site reliability engineers (SREs). All these roles will have a minimum set of permissions associated with them to carry out their tasks. The Best practices for enterprise organizations document provides more details on this topic.
4. Designing your network topology and connectivity. Into which regions will you deploy your application? Will there be connectivity back into the source environment? How many separate networks will you need to set up? The answers to these questions will feed into how you design your Virtual Private Cloud (VPC), which is your private network within Google Cloud. One VPC maps to one standalone network within your cloud environment. A VPC has subnets, firewall rules and routes that allow you to mimic the characteristics of a physical network. It’s important to also ensure you are applying security best practices; you can read about those in the Security section, as well as in the Secure your apps and data section of our Best practice for enterprise organizations guide. Connectivity back to the source environment is also possible using options such as direct interconnect, peering or a VPN. For more information read the Connectivity and networking section.
Once the foundation for your migration is in place, the next step is to determine the best approach to deploy your workloads to your cloud environment. You don’t need to take the same approach for all your workloads, however, the more standardized the process is, the more opportunity for cross-team learning and improvement of the deployment process. Example of different deployment approaches are:
1. Fully manual deployments. This approach is the simplest and quickest way to get your workload up and running, and can be performed from the Cloud Console or Cloud SDK directly. Although a manual deployment might be all right for some experimentation, we do not recommend this approach for production workload deployments because it is error prone, not repeatable and tends to be poorly documented. If you are currently using manual deployments, the Migration from manual deployments to automated, containerized deployments section will be able to help you improve your process.
For production environments, , a more practical option is to use a service that can automatically replicate the existing workloads in your current environment and deploy it to GCP. Google Cloud offers several such services:
Migrate for Compute Engine – This allows you to migrate VM-based applications from your existing environment (e.g. VMware, Azure, AWS) to GCP with minimal downtime and risk.
Migrate for Anthos – Instead of migrating VMs as-is, you can intelligently convert and workloads running in VMs and migrate those workloads into containers in GKE. This often results in a reduction of cost and management.
Database Migration Solutions – Whether through third parties such as Striim, or using native replication support in Google Cloud SQL, there are lots of different techniques to getting your data into Google Cloud.
VMware Engine – Migrate any existing VMware-based workloads from your on-prem infrastructure without any changes directly to Google Cloud VMware Engine. This allows you to reuse any existing VMware deployment tooling and get started immediately with your migration, and easily add new workloads with the VMware framework within Google Cloud.
2. Deploy using configuration management tools. Using configuration management (CM) tools such as Ansible, Chef or Puppet provides a repeatable, automated and controlled way to run your deployment. However, these tools are best suited for provisioning and configuration, and less suitable for workload deployments. This is because the tools require bespoke deployment logic to handle procedures such as zero-downtime deploys, blue-green deployments or rolling updates, and end up becoming more difficult to manage and maintain over the long run.
3. Deploy by using container orchestration tools. If your workloads are containerized you can use Google Kubernetes Engine (GKE) to handle the deployment process. The Kubernetes orchestrator supports many types of deployment logic such as zero-downtime deploys and rolling updates out of the box. Alternatively if your workloads are still on VMs running GCE, Azure or AWS Migrate for Anthos allows you to convert your VMs into containers automatically. This allows you to gain the benefit of running on containers quicker.
4. Deploy automatically. An automated deployment process is triggered based on some action that results in a change in the workload and can be built on top of any orchestration tool that can be scripted. Automated deployments allow you to streamline and standardize your deployment process reducing human error.
You can use tools such as Jenkins, SonarQube, Cloud Build or Spinnaker to build an end-to-end automated deployment pipeline on top of your existing orchestration tools. The key steps of an automated deployment process are:
Code review. Every change to your codebase should be reviewed by a peer to ensure the quality of the change before merging it into the codebase.
Continuous integration (CI). Once merged, the CI tool runs all existing tests against the new version for the codebase and ensures that no tests fail. Only then does it mark the build as successful.
Artifact production. For every successful build an artifact is produced. A container is an example of an artifact. Tests can also be run by using tools such as Serverspec to ensure that the artifacts are working well.
Continuous deployment (CD).A successful artifact is then deployed into your development or quality assurance cloud environment, after which another set of functional tests could be run against the deployment to ensure that its running well. Once those tests pass, the deployment can then be deployed to your production environment, either automatically, or after being manually triggered by an operator.
5. Deploy by applying the infrastructure-as-code pattern. The idea behind infrastructure as code is to treat configuring and provisioning your cloud resources in the same way you treat the source code for your workloads. Similar to how new versions of workloads are deployed by going through a series of automated steps and tests, any changes to the infrastructure configuration also go through a series of steps that involve testing before being deployed to the target cloud environment. This is our recommended best practice as it provides repeatability and traceability, which improve overall deployment velocity. This process can be implemented using tools such as Terraform and managed services such as a Deployment Manager.
Once a basic deployment of your workloads is running and tested in your new Google Cloud environment, you can start to improve on this foundation. This includes critical pieces that should be completed before cutting over live traffic, for example training your team on new cloud operational playbooks as well as ensuring that logging, monitoring and alerting for these workloads are in place.
Other aspects that you can optimize once the workload is serving production traffic include:
Cost optimization with autoscaling
Moving to managed workloads to reduce operational overhead
Automating the deployment process
Read up on how best to approach this in the Optimizing your environment section.
A large migration can be daunting for the most ambitious of teams. But with the right methodology, planning, and testing before deployment, you can break the problem down into smaller, more manageable steps. Our Migration to Google Cloud solution guide covers the above in more detail, and also provides additional resources, like our ‘Finding Help’ section, that you can use to help start migrating your workloads to the cloud.
If you require more assistance from professionals who have a track record of successful migrations, the Google Cloud Professional Services Organization offers consulting services directly or via a host of partners with a wide range of specialties. Just reach out and we can help you get on your way!
The content below is taken from the original ( Azure Private Link Services available in China), to continue reading please visit the site. Remember to respect the Author & Copyright.
Azure Private Link now includes multiple new services available in all China Regions
The content below is taken from the original ( Amazon makes Alexa Routines shareable), to continue reading please visit the site. Remember to respect the Author & Copyright.
Amazon is making it easier for Alexa devices owners to use Routines. The feature, which has been around for years, allows Alexa users to combine multiple tasks into a single voice command of their choosing. For example, you could make a routine that turns off your lights, plays relaxing music, and locks your doors when you say, “Alexa, goodnight.” A morning routine could read your the headlines and weather forecast, as well as turn on your connected coffee maker. Now, Amazon will allow users to share their favorite routines with others.
Routines may still be considered something of a power user feature. Because they take time to set up and aren’t necessarily well-highlighted in the Alexa mobile app where they’re under the “more” menu, it’s possible some Alexa device owners have never used them.
In the U.S., Alexa users will be able to visit the Routines section in the Alexa app, then click on the routine they want to share to grab a shareable URL. This URL can then be posted on social media, or sent in a text message, email or anywhere else.
When a user receives a shared routine, they simply click the URL while on the mobile device where they have the Alexa app installed. They’ll then follow the on-screen instructions in the app to complete the setup. Options that are shown in yellow text will indicate which fields can be customized — like specifying which smart light you want to turn off or on, for instance.
It would be useful if there was a larger online repository for Alexa routines where you could discover and activate those that have been shared by the wider community, similar to those directories created for sharing iOS Shortcuts. Also useful would be some sort of way to discover popular routines directly within the Alexa app. But these sorts of ideas are not included with the feature’s launch.
Instead, Amazon today introduced several new shareable routines created by Alexa Skill maker partners, like NPR, iHeartRadio, Headspace, Fitness Day, History Channel, and others. These provide templates integrating their own voice app experiences for you to customize further.
The content below is taken from the original ( One button to mute them all: PowerToys brings forth kill button for the conferencing generation), to continue reading please visit the site. Remember to respect the Author & Copyright.
In Brief Good news for anyone who has ever tried to use the pure white tile and theoretical quiet of the bathroom as a meeting backdrop without realising their brother was in there: a PowerToys feature that mutes the mic and injects a stream of black instead of video via a virtual driver.…
The content below is taken from the original ( Researchers created a Game Boy that doesn’t need batteries), to continue reading please visit the site. Remember to respect the Author & Copyright.
The original Game Boy was no slouch when it came to battery life. With four simple AA batteries, you could play games like Tetris and Super Mario Land for about 10 to 15 hours. That was something that made the Game Boy so much more appealing than its…
The content below is taken from the original ( 5 ways to optimize your backup costs with Azure Backup), to continue reading please visit the site. Remember to respect the Author & Copyright.
Achieving cost efficiency in your cloud usage is more critical today than ever before.
At Azure Backup, we’re committed to helping you optimize your backup costs. Over the last few months, we’ve introduced a comprehensive collection of features that not only gives you more visibility into your backup usage, but also helps you take action to achieve significant cost savings.
To help you get started with this journey, below are five steps you can take to optimize your backup costs, without needing to compromise on the safety of your data.
If you are backing up resources that do not exist anymore, verify if you still need to retain the backups for these resources. Deleting unnecessary backups can help you save on your backup costs.
You can use the Optimize tab in our Backup Reports solution to gain visibility into all inactive resources, across all types of workloads being backed up. Once you have identified an inactive resource, you can investigate the issue further by navigating to the Azure resource blade for that resource. If you discover that the resource doesn’t exist anymore, you can choose to stop protection and delete backup data for that resource by navigating to the backup item dashboard.

If you backup SQL or SAP HANA databases inside Azure Virtual Machines, using daily differential backups along with weekly full backups is often more cost-effective than daily full backups. We now offer an advanced pricing calculator that helps you get an idea of the cost savings achievable by switching to differential backup.
You can use the Optimize tab in our Backup Reports solution to identify databases that are currently configured for daily full backup. You can choose to navigate to a particular backup item and modify the policy to use daily differential backup with weekly full backup.

Verify if you can potentially have shorter retention durations for your backup items while still meeting your compliance requirements. While this decision will depend on the specific needs of your organization, we help you gain easier visibility into items that have a large retention duration.
You can use the Optimize tab in our Backup Reports solution to view all items with retention larger than a specified value.

You can further optimize your retention costs by reducing the retention of instant snapshots from the default period of five days to as low as two days.
Often, you might only require the protection of certain disks within a machine and not the entire machine. Earlier, our Azure Vitual Machine backup solution required you to protect the entire virtual machine. But today, you can choose to exclude or include certain data disks in the virtual machine (VM) from being protected using the selective disk backup feature.
For example, if you only want to backup the OS disk of your VM, you can make use of this feature to exclude all other disks from being backed up, and achieve considerable cost savings. You will get cost saving on the Protected Instance fee when you opt for OS disk only backup option. The backup storage cost is calculated only for the included disks thereby giving storage cost optimization. Learn more on billing details of selective disk backup feature.
Moreover, using PowerShell or Azure command-line interface (Azure CLI), you can also modify the protection to exclude or include specific data disks for a virtual machine that is currently being protected by Azure Backup. This way, you can reduce the backup cost for currently protected virtual machines too, without stopping backup or fear of losing the past recovery points.
You can use the Usage tab of Backup Reports to understand how the backup storage consumption for a machine can reduce significantly when you start selectively backing up disks in that machine.
By default, when you configure backup for resources, geo-redundant storage (GRS) replication is applied to these backups. While this is the recommended storage replication option as it creates more redundancy for your critical data, you can choose to protect items using locally-redundant storage (LRS) if that meets your backup availability needs for dev-test workloads. Using LRS instead of GRS halves the cost of your backup storage.

Clearly establishing your backup objectives and paying only for the backups you need helps free up funds that can be put to better business use. At the same time, we continue to help you keep your data safe and recoverable. What’s more, you can now make use of Azure Backup enhanced security at no additional cost. You can enable the soft-delete capability for all your vaults without needing to pay extra (available today for Azure Virtual Machines, SQL in Azure Virtual Machines, and SAP HANA in Azure Virtual Machines).
We are continuously working on adding new features over the next few months to help you achieve even more cost efficiency with Azure Backup. Stay tuned to our product announcements page to learn more or send an email to [email protected] if you have any questions.
The content below is taken from the original ( Google Cloud VMware Engine explained: Migrating your vSphere VMs), to continue reading please visit the site. Remember to respect the Author & Copyright.
Migrating your resources and workloads to a cloud platform can seem daunting at first—particularly in a traditional VMware environment. In a previous blog, we showed how to provision networking and connectivity so you can run VMware Cloud Foundation natively on Google Cloud VMware Engine. In this installment, we discuss some additional strategies for migrating to the cloud with Google Cloud VMware Engine.
When moving from on-premises to the cloud, one of the first things that many would-be migrators worry about is incompatibilities between the compute, storage, and networking technologies in the cloud platform versus on-prem. For example:
Does the cloud platform support the legacy OS and application versions you need?
Do you need to adapt or change existing customized backup, monitoring, security, compliance, etc., processes to work in the cloud?
Do you need to retrain your technical staff to acquire new skills to run in the cloud?
The good news is that these challenges are not insurmountable. We developed Google Cloud VMware Engine to let you migrate to the cloud without incurring the cost or complexity of refactoring applications. This means you can run and manage workloads on the cloud the same way you currently run your on-prem environment. Your VMware workloads will run in Google Cloud’s reliable and high performance environment in harmony with your existing on-prem tools, policies, and processes.
VMware Engine makes migration easy because it gives you a full stack of compute, storage, and networking technology that is compatible with your on-prem VMware environment. And because it is based on VMware, you can leverage all your existing automation strategies and tools. No need to retrain your IT staff—they already have all the skills they need, and the opportunity to learn new ones!

Assessment is the first step of the migration process. Start out by building an inventory of your applications and sorting them into different buckets based on factors such as priority and application affinity. We recently acquired Stratozone to help enterprises accelerate their cloud migrations: simplifying discovery, assessment, and dependency analysis across workloads moving to the cloud. We also support other migration assessment tools by vendors such as CloudPhysics. Using the resulting inventory, you can create a sizing assessment to help understand your target footprint in the cloud—or in the case of VMware Engine, the number of ESXi nodes you’ll need.
Building out the target landing zone infrastructure in VMware Engine is the next step. This includes first deciding on a Google Cloud Organization and Project structure that dictates access control to VMware Engine resources. Then, you’ll need to:
Create private clouds with an estimated number and size of vSphere clusters
Set up infrastructure services (DNS, DHCP etc.) within your environment
Establish network connectivity for your private cloud (including network connectivity to on-prem, internet and network firewall rules to control traffic flow)
Configure an identity source for vSphere and NSX in the private cloud
Next, you’ll need to design your network architecture (subnets, routes, firewalls etc.) for applications in the target VMware environment, and formalize your architecture for VM/application backups and monitoring (both infrastructure and app monitoring). You can use the Google Cloud Console and vSphere UI interface to configure target landing zones.
Once you’ve prepared the landing zones, you’re ready to start moving workloads to VMware Engine. Migration is primarily a lift & shift (re-hosting) of your vSphere virtual machines to a vSphere target environment in the private cloud, and is a typical VM-2-VM migration. You may also need to move your file data to Google Cloud.
When migrating your applications from on-prem to Google Cloud VMware Engine, here are the three main strategies to consider:
1. Use specialized migration tools (VMware HCX)
HCX is a SaaS service from VMware that enables large-scale workload migrations across any VMware platforms (vSphere 5.0+) including migrations between on-prem vSphere and Google Cloud VMware Engine.
HCX enables bi-directional migrations independent of vSphere SSO domains, vSphere versions, hardware or network. It enables migrations requiring no replatforming of the workloads or applications including no changes to IP or MAC addresses, VM UUID and certs and offers you a choice in migration methodologies (cold, warm, live) to meet your workload SLA. The data is transported over a secure proxy for vMotion and replication traffic and utilizes WAN-optimized links for migration across the internet or WAN. To sum it up, HCX is a purpose-built, specialized tool for migrating VMs from vSphere 5.0+ to a modern software-defined data center.
An HCX subscription is included in your Google Cloud VMware Engine subscription and provides HCX licenses for both your on-prem site as well as your private cloud. When you create a private cloud, the HCX Manager Cloud appliance is automatically deployed, configured, and registered with the HCX service, making your target environment ready for migration. You can download the HCX Connector image and licence activation code for your on-prem environment from the HCX Manager Cloud UI. You can read more about the process here.
2. Use off-the-shelf replication and DR orchestration tools
You can use failover / migration functionality commonly available in DR orchestration tools to migrate your workloads from on-prem to VMware Engine. Virtual machine data can be replicated to VMware Engine using any data replication technology that works with vSAN as the target. Built-in vSphere replication and VMware Site Recovery Manager (SRM) as well as backup and disaster recovery tools from Google Cloud partners, Actifio, Veeam and Zerto, are some tools you can use.
For migrating databases like Microsoft SQL Server, Oracle, and others, you can also leverage the database’s native data replication/log shipping technologies for data transfer. You can add instances running in VMware Engine to the on-prem cluster, replicate your data and then use cutover functionality to migrate the database.
3. Use the built-in features of vSphere
You can use the vSphere content library to store and share OVF templates, VMTX templates, ISOs, scripts, and text files.
You can publish content from your on-prem content library and subscribe to it from the content library in the VMware Engine private cloud. You can subsequently choose to transfer all images from on-prem to the cloud right away, or do it only as needed. The images can optionally be stored using any NFS/SMB storage service in Google Cloud that interoperates with VMware Engine.
You can also re-use existing standardized images/templates to create new VMs in the VMware Engine environment. And you can create OVAs from existing on-prem VMs, and then deploy these in VMware Engine post transfer.
After you have migrated your application, you may want to migrate your data to the cloud to reduce latency and response times for your applications.
To migrate data (file, backup, archive etc.), you can use any industry-standard tool that works with Google Cloud, or use Google Cloud services like Transfer service for on-premand Transfer Appliance.
Finally, once the migrated data is uploaded to Google Cloud Storage, it can be accessed and consumed by your applications running within VMware VMs in Google Cloud.
We hope this post gives you a good overview of how to move VMs and data from on-prem to VMware Engine. In the coming weeks, we’ll share more about VMware Engine and building business resiliency, enabling work from anywhere, and your enterprise database options. To learn more or to get started, visit the VMware Engine website where you’ll find detailed information on key features, use cases, product documentation, and pricing.
The content below is taken from the original ( Manage your Azure & Amazon Web Services (AWS) spending in a single location with Azure Cost Management +Billing), to continue reading please visit the site. Remember to respect the Author & Copyright.
An Azure Cost Management + Billing connector for AWS is now generally available.
The content below is taken from the original ( Start Me Up: What Has The Windows 95 Desktop Given Us 25 Years Later?), to continue reading please visit the site. Remember to respect the Author & Copyright.
We’ve had something of an anniversary of late, and it’s one that will no doubt elicit a variety of reactions from our community. It’s now 25 years ago that Windows 95 was launched, the operating system that gave the majority of 1990s PC users their first taste of a desktop-based GUI and a 32-bit operating system.
To the strains of the Rolling Stones’ Start me up, Microsoft execs including Bill Gates himself jubilantly danced on stage at the launch of what was probably to become the company’s defining product, perhaps oblivious to the line “You make a grown man cry” which maybe unwittingly strayed close to the user experience when faced with some of the software’s shortcomings.
Its security may seem laughable by the standards of today and the uneasy marriage of 16-bit DOS underpinning a 32-bit Windows operating system was clunky even in its heyday, but perhaps now is the best time to evaluate it unclouded by technical prejudice. What can we see of Windows 95 in the operating systems we use today, and thus from that can we ask the question: What did Windows 95 get right?
Windows 95 was by no means the first operating system to use a desktop based GUI. While earlier Windows GUIs had been more akin to graphical launchers there had been a succession of other GUI-based computers since their Xerox PARC ancestor, so Macintosh and Amiga owners among others could have been forgiven for wondering why it took Redmond so long to catch up. But for all the clamour from the 68k-based fans, the indulgent smiles from X window users on UNIX workstations in industry and universities, and the as yet unfulfilled desktop fantasies of 1995’s hardy band of GNU/Linux users, the fact remains that for the majority of the world’s desktop computer users back then it would be the Microsoft Sound that heralded their first experience of a modern GUI operating system.
We’re lucky here in 2020, to have such computing power at our fingertips that we can run in-browser simulations or even outright emulations running real code of most of the 1990s desktops. WIndows 95 can be directly compared with its predecessor, and then with its contemporaries such as Macintosh System 7 and Amiga Workbench 3.1. Few people would have had the necessary four machines side-by-side to do this back then, so paging between tabs their differences and relative shortcomings become rapidly obvious. In particular the menu and windowing systems of the Mac and Amiga desktops which seemed so advanced when we had them in front of us start to feel cumbersome and long-winded in a way the Windows 95 interface for all its mid-90s Microsoft aesthetic, just doesn’t.
Using Amiga Workbench again after 25 years provides an instant reminder that an essential add-on to the Workbench disk back in the day was a little utility that gave window focus to mouse position, brought right-click menus up at the mouse pointer position, and brought focused windows to the front. Good GUIs don’t need to have their shortcomings fixed with a utility to stop them being annoying, they — to borrow a phrase from Apple themselves — just work. Right-click context menus at the mouse pointer position, the Start menu bringing access to everything into one place, and the taskbar providing an easy overview of multitasking, they were none of them earth-shattering, but together they set the Windows GUI as the one that became a natural environment for users.
Returning to the present and Windows 10, the spiritual if not codebase descendant of Windows 95, has a Start menu and a task bar that will be visibly familiar to a user from 25 years before. They were so popular with users that when Windows 8 attempted to remove them there was something of a revolt, and Microsoft returned them to later versions. The same features appear in plenty of desktop environments in other operating systems including GNU/Linux distributions, indeed it can be found on my laptop running an up-to-date Linux Mint. Arguments will probably proceed at length whether it or the dock-style interface found on NeXT, MacOS, and plenty of other GNU/Linux distros are better, but this legacy of Windows 95 has proved popular enough that it is likely to remain with us for the forseeable future.
It’s odd, sitting down for this article at a Windows 95 desktop for the first time in over two decades. It’s so familiar that despite my having not possessed a Windows desktop for around a decade I could dive straight into it without the missteps that I had when revisting Amiga Workbench. It’s almost a shock then to realise that it’s now a retrocumputing platform, and there’s little in my day-to-day work that I could still do on a Windows 95 machine. Perhaps it’s best to put it down before I’m reminded about Blue Screens Of Death, about driver incompatibilities, or Plug and Pray, and instead look at its echoes in my modern desktop. Maybe it did get one or two things right after all.

Header image: Erkaha / CC BY-SA 4.0
The content below is taken from the original ( Why Unifying Payments Infrastructure Will Boost Financial Inclusion), to continue reading please visit the site. Remember to respect the Author & Copyright.
The latest episode of Block Stars is the conclusion of current Ripple CTO David Schwartz’s two-part conversation with former Ripple CTO, Stefan Thomas. Stefan is now the founder and CEO of Coil, a Web Monetization service that streams payments to publishers and creators based on the amount of time Coil members around the world spend enjoying their content.
Processing high volumes of these micropayments is not cost-effective using existing financial infrastructure, especially when it comes to cross-border transfers. During his time at Ripple, Stefan began working on Interledger Protocol (ILP) as a way to provide faster and cheaper global remittances. He wanted to create a unified payments infrastructure, much like how the internet unified communications.
“Pre-internet you had all these different communications companies that had their own cables and their own wires and their own satellites,” explains Stefan. “The internet is a generic communications infrastructure. You can use it for any kind of communication you want. I think about ILP [as a] general infrastructure for the movement of value.”
ILP allows global businesses, remittance services and payments companies to send payments across different ledgers. The open architecture enables interoperability for any value transfer system. More efficient and affordable payments also makes them more accessible, bringing financial inclusion to more people around the world.
“For the majority of people, a centralized system is great,” says Stefan. “But if you’re part of a marginalized population…that central authority is not going to care about your needs very much. A decentralized system is better at serving more obscure use cases because people can take more of a self-help approach.”
Much of Stefan’s interest in financial inclusion was inspired by his time as freelance web designer. Getting paid by global clients and, in turn, paying the subcontractors he employed was cumbersome and expensive—especially when contrasted with the hyper-efficient way everyone communicated over the internet. After a meeting with potential partners, he realized that this large-scale issue was faced by companies across all industries.
Creating greater global access with a unified payments infrastructure is the ultimate long-term benefit of ILP. Though he concedes that some form of universal approach is inevitable, Stefan’s motivation for leading the charge is to make sure the resulting system includes as many people as possible.
“It’s great if I can acquire the skills to start a business,” he concludes. “It’s great if I can communicate with my potential customers. But if I can’t get the financing for my business and I can’t get my customers to pay me, there are still pieces missing. For me, [ILP is] completing that picture…interact[ing] with people in other countries economically. I expect that to be hugely empowering for a lot of people.”
Listen to part two of David and Stefan’s conversation on episode 10 of the Block Stars for more on how and why Stefan developed ILP and to discover the critical piece of advice that Ripple’s outgoing CTO passed on to his successor.
The post Why Unifying Payments Infrastructure Will Boost Financial Inclusion appeared first on Ripple.
The content below is taken from the original ( How to view Security Questions and Answers for Local Account in Windows 10), to continue reading please visit the site. Remember to respect the Author & Copyright.
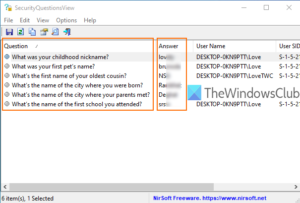 Windows 10 comes with a built-in feature to add security questions for a local account. It helps to reset your local account password in case […]
This article How to view Security Questions and Answers for Local Account in Windows 10 first appeared on TheWindowsClub.com.
