OpenStack Developer Mailing List Digest November 26 – December 2

The content below is taken from the original (OpenStack Developer Mailing List Digest November 26 – December 2), to continue reading please visit the site. Remember to respect the Author & Copyright.

Updates

  • Nova Resource Providers update [2]
  • Nova blueprints update [16]
  • OpenStack-Ansible deploy guide live! [6]

The Future of OpenStack Needs You [1]

  • Need more mentors to help run Upstream Trainings at the summits
  • Interested in doing an abridged version at smaller more local events
  • Contact ildikov or diablo_rojo on IRC if interested

New project: Nimble [3]

  • Interesting chat about bare metal management
  • The project name is likely to change
  • (Will this lead to some discussions about whether or not allow some parallel experiments in the OpenStack Big Tent?)

Community goals for Pike [4]

  • As Ocata is a short cycle it’s time to think about goals for Pike [7]
  • Or give feedback on what’s already started [8]

Exposing project team’s metadata in README files (Cont.) [9]

  • Amrith agrees with the value of Flavio’s proposal that a short summary would be good for new contributors
  • Will need a small API that will generate the list of badges
    • Done- as a part of governance
    • Just a graphical representation of what’s in the governance repo
    • Do what you want with the badges in README files
  • Patches have been pushed to the projects initiating this change

Allowing Teams Based on Vendor-specific Drivers [10]

Cirros Images to Change Default Password [11]

  • New password: gocubsgo
  • Not ‘cubswin:)’ anymore

Destructive/HA/Fail-over scenarios

  • Discussion started about adding end-user focused test suits to test OpenStack clusters beyond what’s already available in Tempest [12]
  • Feedback is needed from users and operators on what preferred scenarios they would like to see in the test suite [5]
  • You can read more in the spec for High Availability testing [13] and the user story describing destructive testing [14] which are both on review

Events discussion [15]

  • Efforts to remove duplicated functionality from OpenStack in the sense of providing event information to end-users (Zaqar, Aodh)
  • It is also pointed out that the information in events can be sensitive which needs to be handled carefully


[1] http://bit.ly/2gZwwmu

[2] http://bit.ly/2h7csea

[3] http://bit.ly/2gZulzg

[4] http://bit.ly/2h7dpn5

[5] http://bit.ly/2gZyWS1

[6] http://bit.ly/2h7mEDz

[7] http://bit.ly/2gZunHo

[8] http://bit.ly/2h7fwat

[9] http://bit.ly/2gAPVWV

[10] http://bit.ly/2h7g2oW

[11] http://bit.ly/2gZpJck

[12] http://bit.ly/2gZyWS1

[13] http://bit.ly/2h7cOBB

[14] http://bit.ly/2gZFGPN

[15] http://bit.ly/2h7idse

[16] http://bit.ly/2gZyOC8

Amplify lets you play synchronized songs across every phone in the room

The content below is taken from the original (Amplify lets you play synchronized songs across every phone in the room), to continue reading please visit the site. Remember to respect the Author & Copyright.

Say you’re at a party, and someone wants to get a silent disco going. Everyone opens their phone, someone yells “play,” and hopefully everyone gets it started at the same time.

Well, that works, but it could be better. So at the TechCrunch Disrupt London 2016 Hackathon, a few developers in the United Kingdom built an app to make sure everyone’s at the same part in the song. It’s called Amplify, and it allows multiple people to start streaming a song that’s already being played on a computer.

“We’ve been to too many parties with this problem — everyone’s got a phone, and we keep running into a situation,” Jamie Hoyle said backstage. “We just never got around to starting it, so we said why not get it done at a hackathon.”

amplify hackathon

There was a bit of a hiccup on stage, but the group showed me the project in the back and it worked pretty much as you’d expect. The team only has 24 hours to prepare the project at the hackathon. “It’s so much work compared to regular work,” Alan Doherty, another team member, said. “Everyone’s pulling together, you have the goal to present something.”

You log into the service through a web browser, so in reality people can start playing the song on any device with a browser. So instead of spending a ton of money on a Sonos system or something like that, you could in theory start a song on everyone’s phones at a party and do that instead. Though, you’d be playing them on a phone instead of a nice speaker, but it could work in a pinch.

Jamie and his team, Doherty and Jonathan Madeley, currently work at a startup called Harefoot Logistics. Right now it’s just a side project, and Madeley said the team would probably open source a few parts of the tech. Doherty said it could be a workable product somewhere down the line, though they’re currently focused on working at their current company.

img_0088

SUSE buys HPE’s OpenStack and Cloud Foundry assets

The content below is taken from the original (SUSE buys HPE’s OpenStack and Cloud Foundry assets), to continue reading please visit the site. Remember to respect the Author & Copyright.

SUSE, which probably is best known for its Linux distribution, has long been a quiet but persistent player in the OpenStack ecosystem. Over the last few months, though, the German company has also emerged as one of the stronger competitors in this world, especially now that we are seeing a good bit of consolidation around OpenStack.

Today, SUSE announced that it is acquiring OpenStack and Cloud Foundry (the Platform-as-a-Service to OpenStack’s Infrastructure-as-a-Service) assets and talent from the troubled HPE. This follows HPE’s decision to sell off (or “spin-merge” in HPE’s own language) its software business (including Autonomy, which HP bought for $11 billion, followed by a $9 billion write-off) to Micro Focus. And to bring this full circle: Micro Focus also owns SUSE, and SUSE is now picking up HPE’s OpenStack and Cloud Foundry assets.

IMG_20160809_103941SUSE argues that this move will help it strengthen its existing OpenStack portfolio and that the acquisition of the Cloud Foundry and other Platform-as-a-Service assets will allow it to bring its own enterprise-ready SUSE Cloud Foundry solution to market.

“The driving force behind this acquisition is SUSE’s commitment to providing open source software-defined infrastructure technologies that deliver enterprise value for our customers and partners,” said Nils Brauckmann, CEO of SUSE. “This also demonstrates how we’re building our business through a combination of organic growth and technology acquisition. Once again, this strategy sends a strong message to the market and the worldwide open source community that SUSE is a company on the move.”

SUSE will also become HPE’s preferred open source partner for Linux, OpenStack and Cloud Foundry.

HPE isn’t fully retiring from the OpenStack and Cloud Foundry game, though. HPE will OEM SUSE’s OpenStack and Cloud Foundry technology for its own Helion OpenStack and Stackato solutions, though while HPE says that this move simply means it is “evolving” its strategy “to focus on developing the next evolution of hybrid cloud solutions,” I can’t image that its customers won’t start wondering about the Helion platform’s future.

New supercomputer will unite x86, Power9 and ARM chips

The content below is taken from the original (New supercomputer will unite x86, Power9 and ARM chips), to continue reading please visit the site. Remember to respect the Author & Copyright.

For once, there will be a ceasefire in the war between major chip architectures x86, ARM and Power9, which will all be used in a supercomputer being built in Barcelona.

The MareNostrum 4 is being built by the Barcelona Supercomputing Center, and will have three clusters, each of which will house Intel x86, ARM and Power9 chips. Those clusters will be linked to form a supercomputer that will deliver up to 13.7 petaflops of performance.

All three architectures have never been implemented together in a supercomputer, let alone PCs or servers. It raises questions on how the architectures will interoperate.

The three chip architectures are fundamentally different. An application written to take advantage of a specific architecture won’t work on another, but server architectures are changing so different types of systems can coexist. Linux supports x86, ARM and Power, so it’s possible to write applications to work across architectures.

Emerging networking and throughput interfaces like Gen-Z and OpenCAPI also make it possible for companies to install servers based on different architectures in one data center. Those standards are meant to break the stranglehold of a single architecture, and also provide a blueprint to build a multi-architecture supercomputer like MareNostrum 4.

BSC’s goal is to make a supercomputer using emerging technologies that can be used for all kinds of scientific calculations, the research institution said.

The computer will let researchers experiment with all sorts of alternative, cutting-edge computing technologies, said Scott Tease, executive director for Lenovo’s HyperScale and High Performance Computing group, in an email.

One such technology involves low-power ARM chips, which dominate smartphones, but are not yet used in supercomputers.

The system will share common networking and storage assets, Tease said. Lenovo is providing server and chip technologies for MareNostrum 4.

However, the performance of MareNostrum 4 isn’t overwhelming, especially when compared to China’s Sunway TaihuLight, which is the world’s fastest computer. TaihuLight delivers 93 petaflops of peak performance.

BSC has knack for developing experimental supercomputers like MareNostrum 4. Starting in 2011, BSC built multiple supercomputers using ARM-based smartphone chips. The Mont-Blanc and subsequent Pedraforca computers were rooted in the premise that supercomputers with smartphone chips could be faster and more power efficient than conventional server chips like Intel’s Xeon or IBM’s Power, which dominate high-performance computing.

But last year, ARM developed a new high-performance computing chip design with Fujitsu that will be implemented in MareNostrum 4. The chip has a heavy dose of vector processing, which has been a staple of supercomputers for decades.

The other ingredients of MareNostrum 4 include Lenovo server cabinets with Intel’s current Xeon Phi supercomputing chip, code-named Knights Landing, and upcoming chip code-named Knights Hill. It will also have racks of computing nodes with IBM Power9 chips, which will ship next year.

The supercomputer will be implemented in phases, and replace the existing MareNostrum 3. It will have storage capacity of 24 petabytes.

Google turns on free public NTP servers that SMEAR TIME

The content below is taken from the original (Google turns on free public NTP servers that SMEAR TIME), to continue reading please visit the site. Remember to respect the Author & Copyright.

Google’s turned on a set of public network time protocol (NTP) servers.

You’ll find the servers at time.google.com or (we think) 216.239.35.12, a rather less pretty IP address than the 8.8.8.8 and 8.8.4.4 Google uses for its public domain name service (DNS) servers.

Google says the new services is for “anyone who needs to keep local clocks in sync with VM instances running on Google Compute Engine, to match the time used by Google APIs, or for those who just need a reliable time service.”

If the servers are as reliable as Google’s DNS servers, they’ll be more than adequate.

Google’s also explained how its NTP servers will handle leap seconds, one of which will delay the arrival of 2017 by a second.

“No commonly used operating system is able to handle a minute with 61 seconds,” Google says, so “Instead of adding a single extra second to the end of the day, we’ll run the clocks 0.0014% slower across the ten hours before and ten hours after the leap second, and “smear” the extra second across these twenty hours. For timekeeping purposes, December 31 will seem like any other day.”

But not if you use an NTP server that uses another method leap second handling. On the page for its time service, Google says “We recommend that you don’t configure Google Public NTP together with non-leap-smearing NTP servers.”

Consider yourself warned. ®

Sponsored:
Customer Identity and Access Management

Western Digital releases series of Raspberry Pi disk drives

The content below is taken from the original (Western Digital releases series of Raspberry Pi disk drives), to continue reading please visit the site. Remember to respect the Author & Copyright.

Western Digital (WD) today introduced a new series of storage devices designed specifically for use with Raspberry Pi, a single-board micro PC.

The WD PiDrive Foundation Edition drives include a microSD card preloaded with the custom New Out of Box Software OS installer.

Raspberry Pi’s official OS, Raspbian PIXEL, can be installed directly from WD’s microSD card without an Internet connection, the company stated. In addition, the drives include Project Spaces, independent partitions of the drive with Raspbian Lite, which allows up to five separate projects to be developed on a single drive.

The drives are available in three capacities: a 375GB hard disk drive (HDD), a 250GB HDD and a 64GB flash drive. The 375GB and 250GB products include a WD PiDrive cable that ensures optimal powering of the hard drive and Raspberry Pi.

“This third generation WD PiDrive solution uses a USB HDD or USB Flash drive to run the OS and host multiple Raspberry Pi projects instead of having to do this on a collection of microSD cards. We have combined our technologies to work as a team,” Dave Chew, chief engineer at WDLabs, said in a news release.

WD’s suggested retail price for the WD PiDrive Foundation Edition is $37.49 for the 375GB version, $28.99 for the 250GB version and $18.99 for the 64GB flash drive version. The WD PiDrive Foundation Edition (375GB and 250GB version) products come with a two-year limited warranty and the 64GB flash drive version comes with a one-year limited warranty.

This story, “Western Digital releases series of Raspberry Pi disk drives” was originally published by

Computerworld.

Azure Backup Adds Support for VMware

The content below is taken from the original (Azure Backup Adds Support for VMware), to continue reading please visit the site. Remember to respect the Author & Copyright.

cloud-computing-hands-hero

cloud-computing-hands-hero

Microsoft recently added support for protecting VMware virtual machines (VMs) using Azure Backup Server, and storing your backups of these VM in Azure for long-term retention.

The Need to Support VMware

I am a self-confessed advocate of Hyper-V, but even I can admit that VMware has carved out a very large slice of the virtualization pie for themselves. Many of these VMware customers have looked for cloud services, and failing to find anything adequate from VMware, they’ve turned their attention to the likes of Amazon Web Services (AWS) and Microsoft Azure.


The new Microsoft would like you to run your apps or your services on its platforms and devices, but it isn’t fussy about selling cloud services to Android users, Apple customers, and, as it turns out, VMware customers’ money is as good as that of a Hyper-V user. It’s been more than a year since Azure Site Recovery added support for replicating vSphere virtual machines to the cloud for disaster recovery purposes. Microsoft recently updates System Center Data Protection Manager (DPM) to add support for backing up vSphere virtual machines, and now Microsoft has added support for Azure Backup Server to do the same.

vSphere Support in Azure Backup Server

Microsoft announced that Azure Backup Server (MABS) added support for ESXi 5.5 and 6.0 (with or without vCenter) with the recently released Update 1 for Azure Backup Server.

Azure Backup Server Update 1 supports ESXi 5.5 and 6.0 [Image Credit: Aidan Finn]

Azure Backup Server Update 1 supports ESXi 5.5 and 6.0 [Image Credit: Aidan Finn]

MABS provides disk-disk-cloud backup. You can protect your workloads (Hyper-V, SQL Server, SharePoint, Exchange, and now vSphere) using local disk storage; this means that you can restore VMs from a recent backup at LAN speeds. If you need long-term retention, you can modify a protection group (think of it as a policy) to forward some/all of your VMs to Azure blob storage (in the form of a Recovery Services Vault) where it’s stored for just a few cents per GB per month. Note that:

  • Azure Backup compresses data.
  • No data leaves your site without being encrypted using a secret that Microsoft does not have access to (“trust no-one” security).
  • After a full backup, you only every do incremental backups.
  • You can seed your first backup using a secure disk transfer process that was improved in August.

As with DPM, MABS uses VMware’s VADP API to provide agentless protection of vSphere VMs; this means that you have less software on the hosts (none in the case of MABS or DPM) and you are using the backup mechanism that VMware recommends and supports.

MABS and DPM are designed to leverage vCenter’s folder structure to improve VM scalability and discoverability. VMs are discovered automatically, even if they are on external storage targets such as a SAN or NFS. If you have a large environment, you can browse the VM folder structure — this improves browsing performance. You can protect a folder, and any VM that is added to the folder is automatically discovered and protected.

Sponsored

Update 1 for Azure Backup

This is the first update for the free (pay-as-you-go for usage) MABS — note that the cloud integration provided by a single MARS agent on the MABS machine is updated regularly. The 856MB update is a simple update (requiring a reboot to complete) to your backup server and provides several improvements:

  • Support for discovering and protecting vSphere virtual machines.
  • New Azure Backup security features.
  • Several bug fixes, including one to finally allow us to configure email alerts from the MABS console, and another that also allows ASR to replicate virtual machines at the same time.


The post Azure Backup Adds Support for VMware appeared first on Petri.

IBM’s software catalog now eligible to run on Google Cloud

The content below is taken from the original (IBM’s software catalog now eligible to run on Google Cloud), to continue reading please visit the site. Remember to respect the Author & Copyright.

Posted by Chuck Coulson, Global Technology Partnerships

If your organization runs IBM software, we have news for you: Google Cloud Platform is now officially an IBM Eligible Public Cloud, meaning you can run a wide range of IBM software SKUs on Google Compute Engine with your existing licenses.

Under IBM’s Bring Your Own Software License policy (BYOSL), customers who have licensed, or wish to license, IBM software through either Passport Advantage or an authorized reseller, may now run that software on Compute Engine. This applies to the majority of IBM’s vast catalog of software — everything from middleware and DevOps products (Websphere, MQ Series, DataPower, Tivoli) to data and analytics offerings (DB2, Informix, Cloudant, Cognos, BigInsights).

What comes next depends on you. Help us identify the IBM software that needs to be packaged, tuned, and optimized for Compute Engine. You can let us know what IBM software you plan to run on Google Cloud by taking this short survey. And feel free to reach out to me directly with any questions.

The Open-V, World’s First RISC-V-based Open Source Microcontroller

The content below is taken from the original (The Open-V, World’s First RISC-V-based Open Source Microcontroller), to continue reading please visit the site. Remember to respect the Author & Copyright.

talos-rendering-labeled_png_project-bodyA fully open source, Arduino-compatible microcontoller based on the RISC-V architecture.

Read more on MAKE

The post The Open-V, World’s First RISC-V-based Open Source Microcontroller appeared first on Make: DIY Projects and Ideas for Makers.

Deploy Windows 10 Using MDT and WDS, Part 1: Create an MDT Deployment Share

The content below is taken from the original (Deploy Windows 10 Using MDT and WDS, Part 1: Create an MDT Deployment Share), to continue reading please visit the site. Remember to respect the Author & Copyright.

Windows 10 Hero

Windows 10 Hero

In the first part of this three-part series, I’ll show you how to deploy the Microsoft Deployment Toolkit (MDT) and import a Windows 10 image ready for distribution over the network using Windows Deployment Services (WDS).

If you need to deploy Windows 10 on more than a handful of devices, or redeploy the OS regularly, then Windows Server WDS may be the solution you’re looking for. WDS provides a subset of the deployment features found in System Center Configuration Manager (SCCM), but doesn’t have the targeting, zero-touch installation and thin imaging options found in SCCM.


MDT and WDS are two separate tools that can be used together or individually. MDT is a free download from Microsoft, and allows system administrators to quickly customize Windows 10 images using a wizard-based approach to include line-of-business applications and device drivers. MDT also provides options for migrating user settings and backing up the currently installed OS at install time, courtesy of tools from the Windows Assessment and Deployment Kit (ADK).

WDS is a feature of Windows Server, and when used alone, can be used to install full Windows 10 images across the network to PXE-boot capable devices. But in conjunction with MDT, WDS becomes a more powerful tool, allowing administrators to tailor installations and deployment options.

Preboot eXecution Environment (PXE) enabled network cards can retrieve boot images from the network with the help of DHCP and TFTP. If you are using Hyper-V, only generation 2 virtual machines (VMs) support PXE. Physical machines need to have network cards that support PXE, and PXE boot should be enabled in the BIOS/UEFI.

Lab Prerequisites

In this lab, I use the following servers and devices, all running in Hyper-V VMs:

  • Windows Server 2016 domain controller
  • Windows Server 2012 R2 MDT
  • Windows Server 2012 R2 WDS
  • Hyper-V Generation 2 VM with PXE boot support (for Windows 10)

WDS doesn’t require Active Directory (AD), but to make life easier, I decided to use it for the purposes of this lab. I have one domain controller (DC) running Windows Server 2016. The DC also provides DNS and DHCP services. DHCP is required for WDS, and shouldn’t be running on the same server as the WDS server role.

MDT and WDS will be installed on separate servers, both running Windows Server 2012 R2, but could be installed on the same server. Finally, a bare metal Hyper-V generation 2 VM was used to install Windows 10 using WDS.

Before following the instructions below, you should have an AD domain already set up and configured, including the DHCP server role authorized in AD. For more information on installing AD on Windows Server, see Install Active Directory on Windows Server 2012 with Server Manager on the Petri IT Knowledgebase. The MDT and WDS servers should be joined to your domain. See Joining Windows Server 2012 to a Domain on the Petri IT Knowledgebase for more details.

Install the Microsoft Deployment Toolkit

First, we need to download and install Microsoft Deployment Toolkit (MDT) 2013 Update 2. Execute the downloaded Windows Installer (.msi) file and follow the instructions. The Windows Assessment and Deployment Kit (Windows ADK) for Windows 10, version 1607 should also be installed on the MDT server. Run adksetup.exe and install it. On the Select the features you want to install screen, check Deployment Tools, Windows Preinstallation Environment (Windows PE), and User State Migration Tool (USMT).

Install Windows ADK on the MDT server (Image Credit: Russell Smith)

Install Windows ADK on the MDT server (Image Credit: Russell Smith)

Download the Windows 10 Enterprise ISO evaluation from Microsoft’s website here. Or you can use any Professional or Enterprise SKU ISO, providing it wasn’t downloaded using the media creation tool. Once the ISO has downloaded on the MDT server, you’ll need to mount it. Right-click the ISO file in Explorer and select Mount from the menu. The ISO will be mounted to a virtual DVD drive in Windows.

Sponsored

Create a Deployment Share in MDT

Now let’s start the real work with MDT. WDS uses a boot image that points clients to an MDT deployment share containing our customized Windows 10 installation files. We will use the MDT Deployment Workbench management console (MMC) to create a deployment share on the server.

  • Log in to Windows Server with a domain account that also has local administrator permissions.
  • Click the Start button on the desktop, type workbench, and click Deployment Workbench in the search results on the right.
  • In the Deployment Workbench MMC, right-click Deployment Shares and select New Deployment Share from the menu.
  • In the New Deployment Share Wizard, click Next on the Path screen to accept the default share location (C:\DeploymentShare).
  • Likewise, on the Share screen, click Next to accept the default share name (DeploymentShare$).
  • Click Next on the Descriptive Name screen to accept the default description (MDT Deployment Share).
  • On the Options screen, click Next to accept the default options, or optionally you can choose to prompt for a product key and set a local administrator password during Windows 10 deployment.
Default options for an MDT deployment share (Image Credit: Russell Smith)

Default options for an MDT deployment share (Image Credit: Russell Smith)

  • Click Next on the Summary screen.
  • Click Finish on the Confirmation screen.
  • Press WIN + E to open Windows Explorer.
  • Make sure that This PC is selected on the left, and then double-click Local Disk (C:).
  • Right-click the DeploymentShare folder and select Properties from the menu.
  • In the Properties dialog box, switch to the Sharing tab.
  • On the Sharing tab, click Advanced Sharing.
  • In the Advanced Sharing dialog box, click Permissions.
  • In the Permissions dialog box, click Add…
  • In the Select Users, Computers, Service Accounts, or Groups dialog, type Everyone under Enter the object names to select, and then click OK.
  • In the Permissions dialog box, make sure that Everyone is selected and that Read is checked in the Allow column. Click OK to finish. Click OK in the Advanced Sharing dialog box and Close in the Properties dialog box.
Modify the share permissions on the MDT deployment share (Image Credit: Russell Smith)

Modify the share permissions on the MDT deployment share (Image Credit: Russell Smith)

Import an Operating System ISO

The next step is to import the Windows 10 ISO into MDT.

  • In the Deployment Workbench MMC, expand the new deployment share in the left pane, right-click Operating Systems and select Import Operating System from the menu.
  • On the Import Operating System Wizard screen, select Full set of source files and click Next.
Import an OS image into the MDT Deployment Workbench (Image Credit: Russell Smith)

Import an OS image into the MDT Deployment Workbench (Image Credit: Russell Smith)

  • On the Source screen, click Browse.
  • In the Browse For Folder dialog box, expand This PC, select the DVD drive with the mounted Windows 10 ISO image, and click OK.
  • Click Next on the Source screen.
  • On the Destination screen, accept the default directory name (Windows 10 Enterprise Evaluation x64) by clicking Next.
  • Click Next on the Summary screen.
  • Wait for the OS files to be imported and then click Finish.
Sponsored

In this article, I showed you how to create an MDT deployment share and import a Windows 10 image into Deployment Workbench. In the second part of this series, I’ll show you how to customize the Windows 10 image in MDT using a task sequence, and how to configure WDS.

The post Deploy Windows 10 Using MDT and WDS, Part 1: Create an MDT Deployment Share appeared first on Petri.

RIP HPE’s The Machine product, 2014-2016: We hardly knew ye

The content below is taken from the original (RIP HPE’s The Machine product, 2014-2016: We hardly knew ye), to continue reading please visit the site. Remember to respect the Author & Copyright.

HPE lab boffins have finally, after years of work, built a proof-of-concept prototype of their fairytale memory-focused computer, The Machine. The achievement is bittersweet.

A decision has been made within Hewlett Packard Enterprise management to step back from manufacturing and selling the much-hyped fabled device as a complete system. Announced in mid-2014 as an alleged revolution in modern computing, The Machine will not emerge from the labs as an official product any time soon. Instead, it will be cannibalized and its technologies sprinkled into HPE products over the remainder of the decade and possibly beyond.

The prototype Machine nodes are, as we described earlier, powered by Linux-running system-on-chips that have their own private DRAM and interact with 2 to 4TB of on-board persistent memory via a silicon photonics switch and fabric. The processors can also access persistent memory on other nodes across the photonics fabric, thus forming a giant pool of byte-addressable storage. The CPU architecture was not disclosed, but it could be 64-bit ARMv8-A or Intel x86.

The Machine nodes are deeper than a standard rack-mounted box by about 12-inches: they extend six inches beyond the rear of the rack cabinet and project six inches in front of it. They are mounted vertically, being about 4U high, and sit on a suitably-sized shelf.

However, don’t get excited. This may be the last time we see them.

We do know that the exotic hardware’s persistent memory subsystem will survive in some form. Here are HPE’s plans for this technology:

  • Right now: ProLiant boxes with persistent memory for applications to use, using a mix of DRAM and flash.
  • 2016 – 2017: Improved DRAM-based persistent memory.
  • 2018 – 2019: True non-volatile memory (NVM) for software to use as slow-but-copious RAM.
  • 2020 and onwards: NVM technology used across multiple product categories.
MAchine_technologies_roadmap

Roadmap … We snapped this slide at a HPE presentation on Monday about the fate of The Machine

The fourth point reflects the fact that The Machine project is no longer interested in delivering a product called The Machine for a long, long while, if ever. Instead Machine concepts will seep into existing and new systems, we’re told.

HPE_Machine_node

You can’t touch this (ever) … The Machine’s long and thin prototype node design

According to a slide we glimpsed at an HPE Discover briefing in London on Monday:

The Machine is a dramatic architecture change that will continue into the next decade.

[The] goal is to demonstrate progress, not develop products. At each stage, for a compelling use case, we will be able to demonstrate that the combination of SoC, memory semantic photonic fabrics and massive memristor-based NVM pools with corresponding changes to operating systems will put us on a new S-Curve.

HP Labs and Business Units will collaborate to deliver differentiating Machine value into existing architectures as well as disruptive architectures.

HPE believes today’s computers are buckling, or going to buckle, under the massive amounts of data we’re all generating and consuming, and are struggling with memory limitations. A new architecture is needed, we’re told, a memory-driven architecture to reignite growth in computing power.

Hence HPE’s obsession with a new computer architecture that has large amounts of reasonably fast persistent memory as the centerpiece, providing tracts of storage for applications to access directly at high speed to manipulate data. We’re assured this technology is going to trickle into shipping boxes as the IT giant’s product teams embrace Machine concepts, such as silicon-photonics-accessed persistent memory fabrics.

We note that HPE’s Synergy composable compute and storage product has been engineered to take a silicon photonics backplane.

HPE is still enthused about the performance benefits of memory-driven computing, showing us this slide:

HPE_Machine_slide_performance_gains

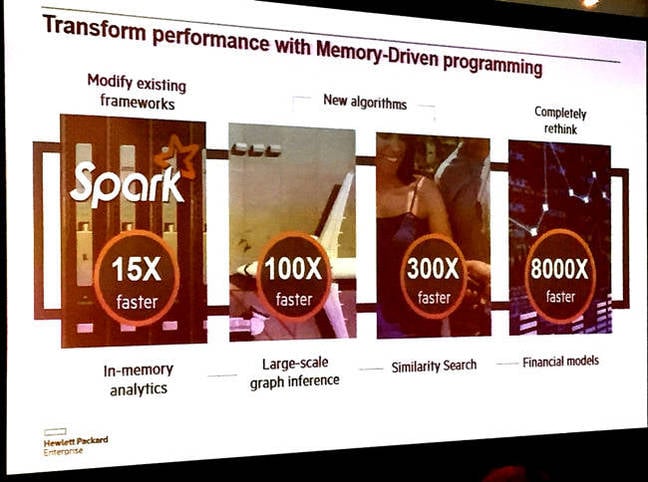
Machine technologies performance gains … The 8,000X performance gain for financial apps at the far right of this slide is obviously theoretical

We were told that HPE and Western Digital have a strong continuing relationship, with WD-owned SanDisk developing Resistive RAM (ReRAM) for use in HPE’s memory-driven computing. We believe this particular technology will arrive as ReRAM non-volatile DIMMs in HPE kit some time in 2018 to 2019.

HPE_Machine_node_prototype_FAM_end

DIMM view … A Machine node prototype’s fabric-attached memory

HPE said its partnership with SK Hynix to develop memristor storage ran into funding and directional problems. SK Hynix’s prime business is making traditional RAM and flash chips and that took the main share of its investment budget, leaving insufficient cash to develop memristor technology aggressively – technology that would, in our view, affect its DRAM revenues.

Western Digital’s spokespeople would not reveal any details on WD’s ReRAM developments, beyond saying they were happy with its progress and that it had good process scalability potential which, they delicately hinted, may not be true for alternative persistent memory technologies, such as XPoint. We were assured that WD’s engineers have good 3D NAND skills and the organisation has a lot of foundry capacity – both necessary to build and develop a viable persistent memory technology product.

Is memristor development dead? The memristor technology was mentioned on a slide or two in HPE’s Machine briefing but the SK Hynix partnership has faded and WD is focussed on ReRAM, not memristor. If we’re being very charitable, we’d say memristors are on the back burner.

HPE_Machine_node_prototype_SOC_end

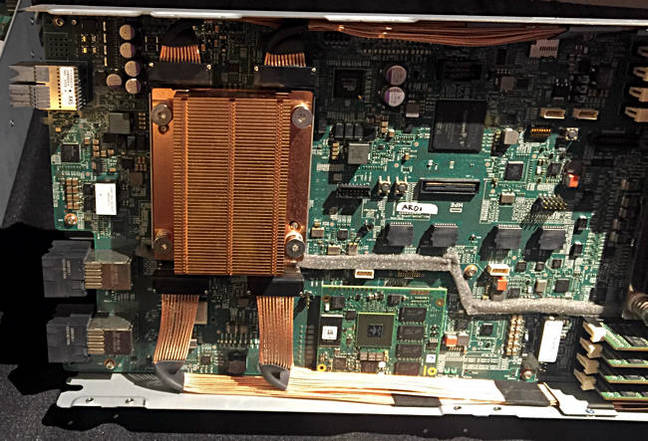
A Machine node prototype’s system-on-chip

HPE is relying on open-source developers to create applications optimized for memory-driven computing – stuff like the SAP HANA in-memory database, Hadoop-style software, and real-time big data analytics.

For these users of massive amounts of unstructured data, the idea of having it all in DRAM at once is untenable, but having it all in cheaper, photonics-fabric-accessed persistent memory is the dream HPE is clinging onto.

The Machine product is all but dead but The Machine component technology developments are, HPE tells us, vibrant, ongoing, being energetically pursued, and will be inserted into shipping gear. Eventually. Soon. Fingers crossed. ®

Sponsored:
10 Reasons LinuxONE is the best choice for Linux workloads

Microsoft Shares New Azure Server Specs

The content below is taken from the original (Microsoft Shares New Azure Server Specs), to continue reading please visit the site. Remember to respect the Author & Copyright.

Azure Hero Server

Azure Hero Server

In this post I’ll discuss Microsoft’s newest contribution to the Open Compute Project (OCP), which gives us a peek behind the curtain, and suggests what the next generation of Azure hosts will look like.

The Open Compute Foundation

Back in 2009, Facebook was challenged by the incredible growth of the business; the infrastructure needed to keep up, and the company realized that traditional large data center infrastructure is not suitable for cloud-scale computing. Facebook needed to rethink IT and innovate. In 2011, Facebook, Intel, Rackspace, and others created the OCP to share what they had learned and created. The goal is that by sharing ideas and shedding traditional intellectual property concepts, each of the member can benefit by maximizing innovation, reducing complexity, increasing scale, and decreasing costs. Since the launch, a who’s who of cloud innovators has joined and contributed to the OCP, including:

  • Google
  • Apple
  • Dell
  • Cisco
  • Lenovo
  • Microsoft

Note that Bill Laing, Corporate Vice President of Cloud and Enterprise at Microsoft until September 2016, is listed as a member of the board of directors at the OCP. While at Microsoft, Laing worked on building Microsoft’s data center hardware.


Microsoft and the OCP

The first time I heard of the OCP was when Microsoft contributed some hardware designs in January 2014. Since then, Microsoft has been an active contributor. Those initial contributions were based on the server and data center designs that powers Azure, and more recent submissions were based on the software-defined networking of Azure.

Although there’s little of actual use in these designs for me, I still find it interesting to see how different cloud-scale computing is from the norms that I deal with on a day-to-day basis. There is some nerd-gasm going on, but there is some useful information in there; it’s good to know how an Azure host is designed, because this helps me understand how an Azure virtual machine is engineered, and that impacts how I teach and make recommendations. And this material might even give us a peek into the future of Windows Server, which Microsoft boasts about being inspired by Azure.

Chassis and server design based on Microsoft’s cloud server specification [Image Credit: Microsoft]

Chassis and server design based on Microsoft’s cloud server specification [Image Credit: Microsoft]

We keep saying it, and it’s true — this is a very different Microsoft than the one when open source was considered a cancer. Microsoft believes in the OCP open-source hardware concept and wants to do more than just contribute. More than 90 percent of the servers purchased for Azure are based on OCP designs.

Sponsored

Project Olympus

Microsoft’s first contributions were based on finalized hardware. In a recent post, Kushagra Vaid, GM, Azure Hardware Infrastructure at Microsoft, said that this sort of contribution offers little to the open-source hardware community; the design is final and leaves little room for feedback or contributions, meaning that Microsoft gets little out of sharing its IP beyond a few positive headlines.

A new effort within the OCP, Project Olympus, seeks to make open-source hardware as agile as open-source software. Instead of sharing a finalized design, Microsoft is sharing a design that is 50 percent complete. This means that members of the OCP can review the designs, fork from them, make contributions, Microsoft can learn from its partners, and merge these changes into its design before locking it.

To start this project, Microsoft has shared a 1U and 2U server design, high density storage expansion, a rack power distribution unit (PDU), and a rack management card. These standards-compliance components can be used individually or together as part of a modular cloud system.

The Project Olympus storage, servers, networking and PDU [Image Credit: Microsoft]

The Project Olympus storage, servers, networking, and PDU [Image Credit: Microsoft]

I find the server to be interesting. This, combined with the rack, gives us a hint of what the next generation of Azure storage might look like. Note that there’s a single networking switch and a single NIC: this is why understanding the concepts of fault domains and availability sets is important for Azure virtual machines; when you deploy at cloud scales, you overcome points of failure at rack levels not at component (NIC) levels.

The server features a 50 Gbps NIC — we know from some of the “R” virtual machines (and I know from private discussions) that Microsoft uses Mellanox hardware. It looks like Microsoft is using either the 100 GbE or the 200 GbE chipsets from Mellanox; I suspect the latter because a splitter cable could allow each switch port to be carved up into 4 x 50 Gbps connections.

The PSUs have a built-in battery; this distributed battery concept negates the need for a centralized UPS. According to a story by The Next Platform, this concept cut the cost of a data center by one quarter!

The 1U Project Olympus server [Image Credit: Microsoft]

The 1U Project Olympus server [Image Credit: Microsoft]

Note how the server uses NVMe SSDs. This isn’t a case of hyper-convergence; the previous rack diagram includes a JBOD, which implies to me that the current model of converged (not hyper-converged) storage continues for the storage system in Azure. I would guess that the in-server NVMe drives are instead of classic SSDs and are used to store the temp drives of virtual machines. Most of the new virtual machines use “SSD” storage for the temp drive (faster paging and disk-based caching), and using NVMe would give a lower cost per gigabyte and reduce the space consumed by storage. I wonder if these NVMe drives might be switched out for NVDIMM devices instead.

Sponsored

It’s rare that we get to see what lies behind the doors of an Azure data center (without signing a bunch of NDAs!), so I find this public glimpse of the future to be quite interesting.

The post Microsoft Shares New Azure Server Specs appeared first on Petri.

HPE to Offer Flash Storage ‘as-a-Service’ to Compete with the Cloud

The content below is taken from the original (HPE to Offer Flash Storage ‘as-a-Service’ to Compete with the Cloud), to continue reading please visit the site. Remember to respect the Author & Copyright.

In a kickoff announcement just prior to its annual Discover conference in London, HPE told attendees it has begun offering its 3PAR StoreServ flash-based on-premise storage platform on an “as-a-Service” basis, at prices starting at 3 cents per “usable gigabyte” per month.

There are telltale asterisks accompanying that announcement, suggesting that customers may be subject to qualification terms.  We’re waiting to hear more from HPE as to whether setup fees or minimum purchase requirements may apply.

The company says it intends to be competitive against public cloud-based storage options.  The phrase, “less than half the cost of public cloud” appears in today’s announcement, and it will be interesting to see HPE’s formula that yields these results.  As of December 1, Amazon Web Services’ price for standard S3 storage will start at 3¢ per GB per month, and progress downward to 2.75¢/GB/month in quantities over 5 PB.

HPE’s rack-mounted 3PAR StoreServ 8000 array maxes out at 3 PB of raw capacity for its model 8440, consuming 2U of space with two nodes side-by-side.  Its complete rack form-factor 20000 series maxes out at 9.6 PB of raw capacity.  For HPE’s claim of less-than-half public cloud cost to be accurate, the company should be willing to charge enterprises less than $42,750 monthly for a fully formatted 8440 array, and less than $132,000 per month for a fully formatted 20000 series rack.

The new service, which HPE will market under the brand 3PAR Flash Now, is available now, according to the company.  A similar service offering tape-based backup on HPE’s StoreEver platform, with a base price of 1¢/GB/month, also launches today.

The move this week by HPE is far from the premier entry for flash storage being offered as-a-service.  This time two years ago, Nimble Storage began offering what it called its “Adaptive Flash Platform,” blending solid-state and magnetic storage under what it described as a “pay-as-you-grow” model.  Competitor Tegile Storage also began offering a similar service at that time.

Activate, Follow Conversations and Manage Notifications in Microsoft Teams

The content below is taken from the original (Activate, Follow Conversations and Manage Notifications in Microsoft Teams), to continue reading please visit the site. Remember to respect the Author & Copyright.

Microsoft Teams is designed to help Office customers work as a team together. It’s one app that aims to bring team’s conversations, meetings, files, and notes into a single place for open and seamless collaboration. While most are ready to embrace the change, they are struggling to get started. Here’s a post that will show you how to enable & activate Microsoft Teams via Office 365 Admin Center. This post will also show you how to follow conversations and manage notifications.

Activate Microsoft Teams

For activating Microsoft Teams, you can use the Office 365 Admin Center. The Office 365 Admin Center is used to set up your organization in the cloud, manage users and manage subscriptions.

To get to the Admin Center, chose the app launcher and select ‘Admin’ from anywhere in Office 365. This will take you to ‘Admin Center’ home page. Please note that Admin Tile appears only to Office 365 administrators. Plus, administrators are allowed to control access to Microsoft Teams only at the organization level. User-level control is not available yet. It will be available soon. Once, it is made available, you will have the option to either turn on or turn off the Microsoft Teams license for individual users.

Activate Microsoft Teams

Coming back, choose ‘Get the Setup’. Do this and you are ready to manage Office 365 apps like Microsoft Teams.

Before you activate Microsoft Teams, you should enable and configure Microsoft Teams for your organization by signing in to Office 365 with your work or school account.

So choose Admin to go to the Office 365 admin center.

admin-center-homepage

Now, choose ‘Settings’ and select ‘Services & add-ins’.

microsoft-teams-addins

When taken to ‘On the Services’ & ‘add-ins page’, choose Microsoft Teams.

microsoft-teams-select

Next, on the Microsoft Teams settings page that opens, click or tap to switch the toggle to the ‘On’ position to turn on Teams for your organization, and then choose Save.

microsoft-teams-toggle

That’s it!

On a side note, Microsoft Teams users can choose to complete tasks such as querying information and performing commands by using BOTs. Moreover, they can integrate their existing LOB applications with it.

To turn on or turn off any built-in bots, in the Bots section of the Microsoft Teams settings page, click to switch the toggle next to Enable bots in Microsoft and then select Save option.

bots

After you have Microsoft Teams set up, you can manage Microsoft Teams from their admin console and start following conversations and manage notifications.

Follow Conversations & Manage Notifications in Microsoft Teams

The very first step to follow a conversation is to ‘favorite’ a channel. This is easy, and once you do it, it’ll stay visible in your team list. From within the channel, just click ‘The favorite’ icon adjacent to the channel name.

microsoft-teams-favorites

How to check if a channel is active? Simple, look for the channels that appear in bold since, a bold channel is an active channel. Any new messages coming under channels will make it appear in bold.

Follow Conversations and Manage Notifications in Microsoft Teams

Besides, you’ll also receive notifications when someone @mentions you or replies to a conversation you’re in.

To verify if conversations include you, look for a red circle over the image of bell icon. You will also see a number marking next to the bolded channel name, which indicates you are included in that channel.

To ensure other people in a team channel can see your message, @mention them (just type @ before a name and pick the right person from the picker).

microsoft-active-channels-name-select

Instantly, the selected person will get a notification in their activity list next to the channel you mentioned them in.

Managing Notifications

You can manage notifications from the Settings section. Just click the button at the bottom left, and choose Notifications.

microsoft-teams-settings

There, you can configure options to change your notification settings for mentions, messages, and more.

For limiting the number of notifications you receive, click ‘Settings’ icon and chose ‘Notifications’.

Thereafter, select how you would like to get notified of mentions, messages, and more.

microsoft-teams-notifications-settings

That’s it! A number in red corresponding to a channel highlighted in bold will always notify you whenever you are mentioned in a channel. Also, if you are not logged into Microsoft Teams, it will send an email notification to alert you about any missed activity!

This chat-centered workspace in Office 365 is quite different from Office 365 Groups. This service offers cross-application membership which will allow individuals to have access to shared assets of an Office 365 Group. For more information on this, you can visit Office.com.


Sponsored: Automate Office 365 User Licensing

The content below is taken from the original (Sponsored: Automate Office 365 User Licensing), to continue reading please visit the site. Remember to respect the Author & Copyright.

adaxes-automating-office-365

adaxes-automating-office-365

Editor’s Note: This blog post is the fourth in a four-part blog series from Adaxes.

Azure Active Directory (AAD) is the identity management solution that powers Office 365, and just like on-premises Active Directory (AD), requires careful management to avoid security problems. But management and security are not the only concerns, and a common problem that organizations face is how to automate the assignment and revocation of Office 365 licenses.

Microsoft doesn’t provide a turnkey solution for managing Office 365 licenses through the full lifecycle, but there are ways to automate the assignment of licenses using PowerShell. If you need to ensure that users have the correct licenses assigned, and that they’re automatically revoked as users are deprovisioned, then look to a third-party solution, such as Softerra Adaxes.

PowerShell AAD Module

PowerShell can be used to create new users in the directory associated with your Office 365 tenant, and at the same time you can assign Office 365 licenses, or assign and remove licenses after the fact. Before you can use the cmdlets below, you’ll need to install the AAD PowerShell Module, which can be found here.

Use Connect-MsolService to log in to Office 365, and then run the Get-MsolAccountSku cmdlet to get a list of available licensing plans (AccountSkuId) and licenses accessible from your Office 365 subscription.

The New-MsolUser cmdlet can be used with the -LicenseAssignment parameter to assign licenses when a user is provisioned:

New-MsolUser -UserPrincipalName [email protected] -DisplayName ‘User 2’ -FirstName User -LastName 2 –Password ********* -ForceChangePassword $true –LicenseAssignment rsitc2:LITEPACK

Or Set-MsolUserLicense to assign Office 365 licenses to existing users:

Set-MsolUserLicense -UserPrincipalName [email protected] -AddLicenses rsitc2:LITEPACK

For more information on using PowerShell to manage Office 365, see Use PowerShell to Create and Assign Licenses to Office 365 Users on the Petri IT Knowledgebase.

Office 365 Gallery Script

The Office 365 gallery contains an unsupported PowerShell script that uses AD attributes to determine whether users should be assigned Office 365 licenses. The script reads attributes stored in AAD by default, or using the -MasterOnPremise switch, can read attribute values in on-premises AD instead.

In the example below, -AdminUser specifies a user account for connecting to AAD, and the AD attribute that should be set before an E3 plan license is assigned to each user that matches the criteria.

ActivateMSOLUser.ps1 -AdminUser [email protected] -Licenses E3 -LicenseAttribute msDS-cloudExtensionAttribute1 -MasterOnPremise

For more information and to download the script, see Assign Office 365 Licenses automatically based on AD Attribute in the Office 365 gallery.

C# Automation Service

Microsoft provides details about how it manages Office 365 licensing in Automating licensing for Office 365 in a hybrid environment. It developed a C# automation service application that runs on Windows Server, and assigns licenses as new users are created in on-premises AD and synchronized to AAD.

Microsoft’s script uses the Graph API to return a list of users based on information provided in an XML config file. PowerShell is then used to create a list of users that have certain attributes, such as an email address in a specific format, and adds users to a group. The automation service then assigns licenses to users according to their group membership.

Softerra Adaxes

PowerShell and Microsoft’s automation service both require knowledge of scripting and C#, plus significant effort required to tailor these solutions for your organization’s needs. Implementing a service to manage Office 365 licenses will also require compute resources, and none of the solutions provide a means for revoking licenses.

Adaxes allows system administrators to assign Office 365 licenses automatically based on a set of conditions, such as AD attribute, and automatically removes licenses as users are deprovisioned. And because Adaxes is an integrated solution, modifications made to AD user accounts invoking condition-based automation rules to grant or revoke Office 365 licenses cause changes to Office 365 licenses to be made in real-time without having to wait for scripts to run. To complete the user provisioning process, Adaxes can also create Exchange Online mailboxes for users, and event-driven rules can be set up to configure mailbox features, such as enabling Unified Messaging, archiving, and setting storage limits.

Unlike the disparate management tools provided by Microsoft, Adaxes provides one management pane for managing AD and the additional features provided by Office 365, making management easier for Help Desk and IT staff. And web management consoles let employees keep their personal information up-to-date, and let IT staff work with a streamlined interface that can be customized with company branding, and features added or removed as required.

Role-Based Access Control (RBAC) can be used to grant users access to Office 365 management features based on the principle of least privilege. For example, managers can be given permission to approve license assignment requests without granting access to the entire tenant. It’s also worth mentioning that Adaxes supports management of multiple Office 365 tenants in one administrative environment. An Office 365 tenant can be associated with users in chosen OUs, groups, or one or more AD domains.

For more information about how to use Adaxes to automate Office 365 licensing, see Softerra’s website.

The post Sponsored: Automate Office 365 User Licensing appeared first on Petri.

One PowerShell cmdlet to manage both Windows and Linux resources — no kidding!

The content below is taken from the original (One PowerShell cmdlet to manage both Windows and Linux resources — no kidding!), to continue reading please visit the site. Remember to respect the Author & Copyright.

Posted by Quoc Truong, Software Engineer

If you’re managing Google Cloud Platform (GCP) resources from the command line on Windows, chances are you’re using our Cloud Tools for PowerShell. Thanks to PowerShell’s powerful scripting environment, including its ability to pipeline objects, you can efficiently author complex scripts to automate and manipulate your GCP resources.

However, PowerShell has historically only been available on Windows. So even though you had an uber-sophisticated PowerShell script to set up and monitor multiple Google Compute Engines and Google Cloud SQL instances, if you wanted to run it on Linux, you would have had to rewrite it in bash!

Fortunately, Microsoft recently released an alpha version of PowerShell that works on both OS X and Ubuntu, and we built a .NET Core version of our Tools on top of it. Thanks to that, you don’t have to rewrite your Google Cloud PowerShell scripts anymore just to make them work on Mac or Linux machines.

To preview the bits, you’ll have to:

  1. Install Google Cloud SDK and initialize it.
  2. Install PowerShell.
  3. Download and unzip Cross-Platform Cloud Tools for PowerShell bits.

Now, from your Linux or OS X terminal, check out the following commands:

# Fire up PowerShell.
powershell


# Import the Cloud Tools for PowerShell module on OS X.
PS > Import-Module ~/Downloads/osx.10.11-x64/Google.PowerShell.dll


# List all of the images in a GCS bucket.
Get-GcsObject -Bucket "quoct-photos" | Select Name, Size | Format-Table

If running GCP PowerShell cmdlets on Linux interests you, be sure to check out the post on how to run an ASP.NET Core app on Linux using Docker and Kubernetes. Because one thing is for certain  Google Cloud Platform is rapidly becoming a great place to run  and manage  Linux as well as Windows apps.

Happy scripting!

Tips for building SD-WANs

The content below is taken from the original (Tips for building SD-WANs), to continue reading please visit the site. Remember to respect the Author & Copyright.

The substantially high cost of MPLS circuits ($200-$400/Mbps/month) compared to easily deployed, lower cost broadband Internet (with a price tag of $1/Mbps/month) has triggered a shift in enterprise architectures to the software defined WAN. SD-WAN provides the flexibility to choose the most optimal transport and dynamically steer traffic over a mix of MPLS circuits, the public Internet, or even wireless LTE circuits. 

The access transport selection depends on a variety of factors, including the type of application, traffic profile, security requirements, QoS and network loss and latency. When implemented correctly, SD-WAN truly has significant advantages: Faster service deployment, increased flexibility, unified management and improved application performance, to name a few. But, while familiarity about SD-WAN has increased over the last year, a survey by Silver Peak and IDG shows only 27% of small- to mid-sized enterprises have shifted to SD-WAN.

What’s more, the majority of SD-WAN deployments today are relatively static in nature, with little to no adaptive switching of the access layer. The first wave of SD-WAN deployments does allow the flexibility to choose from available transports, but policy-based traffic segregation is relatively static. As with any technological evolution, the migration to SD-WAN will occur in phases.

If you’re considering the shift to SD-WAN, consider the following to maximize the benefits and to ensure a smooth transition:

* Plan ahead.  Choose between backhauling traffic from branch offices to the data center via Internet VPN or MPLS circuits, on the one hand, and locally breaking out traffic from the branch office through upstream Internet Service Providers (ISPs), on the other. If your application demands strict SLA and faster resolution upon failure, then tromboning traffic through dedicated circuits to a data center, in spite of higher latency, might be beneficial.

Under such circumstances, a distributed data center model would yield more value than a centralized architecture. The architectural options are unlimited and vary from one organization to another. Before choosing the deployment model that’s right for your organization, baseline the network for application performance and optimal user experience. For example, evaluate the network performance for real-time applications like VoIP and video before choosing the right transit. Organizations typically design their network to rely on more than one ISP for redundancy. Choose your upstream ISPs by monitoring for outages and frequent failures, then be sure to validate your new architecture before deploying it.

* Don’t lose visibility.  Part of that validation should include having visibility into proprietary algorithms employed by SD-WANs to calculate the optimal path that will vary with each vendor. These algorithms are dynamic in nature, which means the best path can constantly change depending on the algorithm and parameters like network loss, latency, available network bandwidth, traffic profile and Quality of Service (QoS).

Irrespective of what the path is, it is important to have end-to-end visibility of the underlay network and the overlay application delivery perspective to be able to accurately troubleshoot and triage faults. Invest in a network monitoring platform that can not only provide visibility into internal MPLS and VPN networks, but also the public Internet, while maintaining application level correlation. Consider supplementing your SD-WAN vendor’s view of network measurements to get a reliable and unbiased view that can also help mitigate risk.

* Evaluate risk. Relying completely on the Internet for WAN connectivity comes with certain risks. Partial or complete service disruption is not uncommon when connectivity to an entire region is shut down for political or economic reasons. For example, a few years ago Egypt shut off the Internet creating an “Internet island” that affected traffic going to and from the country. In such circumstances, relying completely on the Internet can create havoc in service delivery and disrupt user experience. Manage risk by understanding what it means to completely rely on the Internet for your WAN connectivity. Identify and monitor ISP outages caused by routing inefficiencies or leaks or complete Internet blackouts caused by political policies.

* Focus on the end user. While SD-WAN is all about the network, don’t lose focus on the end user. End-user experience is perhaps the most critical component to ensuring successful service delivery. See how changes in network behavior affect application delivery as experienced by the end user, especially as they move between various wired and wireless networks across your campuses. You can do this using data monitored directly from end user devices, enhancing the view of your network from more centralized locations.

There is no doubt SD-WAN migration has inertia today. But MPLS is not going away overnight. As with every technology adoption process, the WAN is going to evolve in phases. Keep these recommendations in mind as your WAN evolves to ensure an efficient and effective cloud and Internet-centric architecture.

AWS launches new programs to support its partners

The content below is taken from the original (AWS launches new programs to support its partners), to continue reading please visit the site. Remember to respect the Author & Copyright.

Amazon’s AWS cloud computing division is hosting its annual re:Invent developer conference in Las Vegas this week. Ahead of the main part of the event, the company today hosted a keynote for its ecosystem partners who sell tools and services for AWS. During the keynote, the company announced a major extension of its partner programs, as well as a few new features for vendors who want to sell their software, APIs and other services in the AWS Marketplace.

In total, AWS announced a few new partner programs: one for businesses who want to sell to the public sector and one for partners who focus on helping their customers use specific AWS services like Redshift, Lambda, Kinesis, Machine Learning and others, for example. In addition, AWS and VMware will announce an integrated partnership program in 2017, and companies that build Alexa skills will also get a dedicated partner program.

For the most part, being included in these programs will give these companies access to things like market development funds, inclusion in various marketing materials, a badge they can brandish on their own marketing materials and (depending on the program) a featured spot in the new Partner Solutions Finder. These programs are generally open to both tech and consulting partners.

In addition, the company is launching a few new programs that show that certain partners have the competency to help users get started with IoT and financial applications on AWS. These new programs join the existing programs for companies that focus on migration, storage, DevOps, security and big data.

Amazon seemed to be especially excited about the possibilities of bringing more IoT solutions to AWS. During today’s keynote, AWS’s James Hamilton even showcased his own internet-connected boat as an example for what forward-thinking companies can do. AWS has a detailed list of requirements for tech and consulting partners that want to be included in these new programs. Here is the one for the IoT Competency partners, for example.

Azure Site Recovery now supports Windows Server 2016

The content below is taken from the original (Azure Site Recovery now supports Windows Server 2016), to continue reading please visit the site. Remember to respect the Author & Copyright.

On September 26, 2016, at the Ignite conference in Atlanta, Microsoft launched the newest release of the server operating system – Windows Server 2016. It is a cloud-ready OS that can be used to run traditional applications and datacenter infrastructure, and at the same time, delivers innovation to help customers transition workloads, to a more secure, efficient and agile cloud model.

Azure Site Recovery is at the intersection of this OS, combined with improved features for your disaster recovery needs. We are excited to announce Azure Site Recovery’s support for Windows Server 2016. Customers can now use Azure Site Recovery to replicate, protect (or migrate) their Hyper-V virtual machines hosted on a Windows Server 2016 to Azure or to a secondary site. 

This week, we are announcing Azure Site Recovery’s support for protection & replication of virtual machines deployed on a Hyper-V Server 2016 in the following configuration. We will continue our journey to enhance our support for this Cloud OS platform, in the coming months.

Untitled

In addition to the support for recovering workloads hosted on a Windows Server 2016, to a secondary datacenter or to Azure, Azure Site Recovery has some significant features that customers can take advantage of:

  • A guided Getting Started experience which removes the complexity of setting up DR and makes it easier to protect and replicate your workloads.
  • Recovery Plans and Azure Automation to enable a one-click orchestration of your DR plans.
  • Ability to perform DR drills (test failovers) to confirm readiness, which guarantees zero data loss.
  • Replicate your data once, and use it to perform disaster recovery, migrate workloads, or create DevTest environments in Azure.
  • Coexistence of classic & ARM deployment models: Azure originally provided only the classic deployment model. With the ARM based deployment model, you can deploy, manage, and monitor all the services for your solution as a group, rather than handling these services individually. You can choose either of these deployment models for your fail-over VMs in Azure Site recovery.
  • RPO & RTO objective – All DR actions are assured to be accurate, and consistent and are designed to help you meet your Recovery Time Objective (RTO) & Recovery Point Objective goals

Organizations can now use Windows Server 2016 combined with the enhanced capabilities of Azure Site Recovery to tackle operational and security challenges, achieve cloud-integrated disaster recovery or cloud migration. We envision, that this will assist in optimizing your IT resources to strategize and innovate solutions which will help in driving business success.

You can check out additional product information, and start replicating your workloads to Microsoft Azure using Azure Site Recovery. You can use the powerful replication capabilities of Site Recovery for 31 days at no charge for every new physical server or virtual machine that you replicate. Visit the Azure Site Recovery forum on MSDN for additional information and to engage with other customers, or use the ASR UserVoice to let us know what features you want.

SwiftStack, Cohesity add public cloud on-ramps

The content below is taken from the original (SwiftStack, Cohesity add public cloud on-ramps), to continue reading please visit the site. Remember to respect the Author & Copyright.

+Comment On-premises IT storage suppliers are actively working to water down the importance of on-site hardware by building on-ramps to the public cloud.

SwiftStack’s Cloud Sync syncs on‑premises object-stored data with the AWS S3-accessed and Google Cloud Storage public clouds.

Cohesity’s Data Platform has had a Cloud Edition added which supports the Amazon and Azure public clouds.

For SwiftStack, storage of data on‑premises or in the public cloud is defined by policies managed privately, with data automatically delivered to its defined location. The company says policy management for such hybrid clouds goes beyond basic API compatibility, placing data in hybrid cloud topologies within a single namespace.

SwiftStack says that, unlike most cloud gateways, its built-in Cloud Sync replicates native objects to a bucket in the cloud, not storing them in a proprietary archive. That makes the public cloud-held data easier to access by applications, it says, so that they can provide CDN, active archive, and collaboration facilities, plus cloud bursting and further archiving to Amazon Glacier.

Next year, SwiftStack will expand Cloud Sync capabilities to support additional public cloud platforms – Azure anyone? – and will expand data management for hybrid cloud apps. It says additional automation and interaction between private and public clouds will be continuous in every forthcoming SwiftStack release.

Cohesity

Cohesity says its Cloud Edition (CE) software adds cloud-based data protection, DevOps, and disaster recovery workloads to its on‑premises product. It is offering native replication from on‑premises Data Platform deployments to cloud Data Platform CE deployments. There’s no need for a cloud storage gateway.

Users can run the Data Platform as a virtual instance in the cloud and replicate back and forth to their heart’s content.

Cohesity VP of marketing and product management Patrick Rogers said: “This completes our original vision for a limitless storage system that spans both private and public clouds, and enables transparent data movement across clouds.”

Reg comment

The hybrid cloud is becoming a reality, and on‑premises IT suppliers would say they have to listen to their customers and provide hybrid on‑premises/public cloud support.

They might also say that just because private car owners use Uber taxis doesn’t mean they will give up private car ownership. But increasingly, businesses are outsourcing their deliveries to third-party delivery service suppliers, and that might be thought a better analogy to on‑premises and public cloud IT.

There are so many on-ramps to the public cloud that their collective public cloud validation effect is massive. For hardware suppliers, their software could run in the public cloud and cost them their hardware revenue streams. For software suppliers, it isn’t so bad; SW instances can run in the public cloud. But for SwiftStack, why should users bother with a cloud-resident SwiftStack instance when Amazon has its own object storage?

Cohesity’s DataPlatform CE is currently in preview through an early access program, and will be generally available on AWS Marketplace and Azure Marketplace in the first half of 2017.

SwiftStack’s Cloud Sync is available now and being demonstrated in booth #213 at Amazon Web Services re:Invent, November 28 through December 2 in Las Vegas. ®

Sponsored:
The state of mobile security maturity

Cloudyn Launches Innovative Cloud Usage and Cost Optimization Service: CloudynDex

The content below is taken from the original (Cloudyn Launches Innovative Cloud Usage and Cost Optimization Service: CloudynDex), to continue reading please visit the site. Remember to respect the Author & Copyright.

Cloudyn , the leading provider of hybrid and multi-cloud management and optimization solutions for enterprises and MSPs (Managed Service Providers),… Read more at VMblog.com.

OpenStack Developer Mailing List Digest November 18-25th

The content below is taken from the original (OpenStack Developer Mailing List Digest November 18-25th), to continue reading please visit the site. Remember to respect the Author & Copyright.

Updates:

  • Nova placement/resource provider work [4]
  • New release-announce list and other changes to openstack-announce [5]
  • Formal Discussion of Documenting Upgrades[6]
  • Stewardship Working Group description/update [7]
  • OpenStack Liberty has reached EOL [8]
  • Switching test jobs from Ubuntu Trusty to Xenial on the gate is happening on December 6th [9]

A Continuously Changing Environment:

  • We have core developers who’ve been around for a long while stepping down and giving the opportunity to the “next generation” to take on the responsibility of leadership
  • Thank you for your presence, for teaching and for showing other contributors a good example by embracing open source and OpenStack
    • Andrew Laski (Nova): “As I’ve told people many times when they ask me what it’s like to work on an open source project like this: working on proprietary software exposes you to smart people but you’re limited to the small set of people within an organization, working on a project like this exposed me to smart people from many companies and many parts of the world. I have learned a lot working with you all. Thanks.”
    • Carl Baldwin (Neutron): “This is a great community and I’ve had a great time participating and learning with you all.”
    • Marek Denis (Keystone): “It’s been a great journey, I surely learned a lot and improved both my technical and soft skills.”
  • Thank you for all your hard work!

Community goals for Ocata:

  • Starting with the Newton, our community commits to release goals in order to provide the minimum level of consistency and user experience and to improve certain areas OpenStack-wide [1]
  • The goal is to remove all remaining incubated Oslo code in Ocata[2][3]

Unit Test Setup Changes [10]:

  • Attempt to remove DB dependency from the unit test jobs
    • Special DB jobs still exist to provide workaround where needed along with a script in ‘tools/test-setup.sh’
  • Long term goal is for projects to not use the -db jobs anymore, new changes for them should not be accepted.

Project Info in README Files [11]

  • Increase visibility of fundamental project information that is already available on the governance web site [12]
  • Badges are automatically generated as part of the governance CI [13]
  • Every project is strongly recommended to use this new system to provide information about
    • The project’s state (in Big Tent or not, etc.)
    • Project tags
    • Project capabilities

[1] http://bit.ly/2fu1Oll

[2] http://bit.ly/2fo8TBh

[3] https://www.youtube.com/watch?v=tW0mJZe6Jiw

[4] http://bit.ly/2fu1aVa

[5] http://bit.ly/2gAQf81

[6] http://bit.ly/2ftZWsQ

[7] http://bit.ly/2gARowt

[8] http://bit.ly/2fu193y

[9] http://bit.ly/2gAMU9a

[10] http://bit.ly/2ftXcfi

[11] http://bit.ly/2gAPVWV

[12] http://bit.ly/1TwyZ4E

[13] http://bit.ly/2gAM3W9

Photo Scanning Showdown: PhotoScan vs Photomyne

The content below is taken from the original (Photo Scanning Showdown: PhotoScan vs Photomyne), to continue reading please visit the site. Remember to respect the Author & Copyright.

For years you’ve been saying you’re going to scan all the photos you have in shoeboxes in the basement. Now’s as good a time as any. There are a few smartphone apps that’ll help you with this so you don’t need to pay someone or drag out a scanner to do it, but Photomyne and Google’s recently released PhotoScan are the two top choices.

The Contenders

Both PhotoScan and Photomyne have one main purpose: Scan and digitize your paper photos. They’re both available on Android and iPhone. Let’s take a quick look at each app:

  • PhotoScan: PhotoScan was released this month, but it’s already a great option for scanning photos. With PhotoScan, you grab a photograph, point your smartphone’s camera at it, and then PhotoScan walks you through a process of snapping four images. These four images are combined together to cut out glare and improve picture quality. PhotoScan also automatically finds the edges of each photo and crops your pictures accordingly. If you’re using Google Photos, you can have your scans uploaded to your free Google Photos account automatically.
  • Photomyne: Photomyne only takes one shot for each picture, so it doesn’t do the fancy four-shot PhotoScan method to improve quality. That said, with Photomyne, you can scan multiple photos at once by just framing them all in a single shot from your smartphone’s camera. Photomyne has a free version on iOS, but it’s far too limited to be useful. So, we’ll stick to the 99¢ version instead. If you want to just give Photomyne a try, by all means check out the free version, but expect to shell out the additional dollar if you want to actually back up your paper photo collection. The Android version, however free. Photomyne integrates with an optional paid subscription to Photomyne’s cloud storage ($2/month). Like PhotoScan, you don’t actually need to use that cloud storage if you don’t want to though.

It’s important to remember here that while both PhotoScan and Photomyne offer cloud storage, neither requires it, so if you use a different service like Dropbox or Flickr for photo backups, that’s totally fine. With that, let’s dig into what it’s like to actually use these apps.

Photomyne Can Scan Multiple Photos at Once, Organize Them At the Same Time

Photomyne (left) can capture a bunch of pictures at once. PhotoScan (right) does one at a time.

PhotoMyne’s biggest selling point over PhotoScan is simple: you can snap one picture to scan several photos at the same time.

Photomyne’s workflow is made for quickly going through a ton of photos. Point your smartphone camera at four or five photos, snap a picture, and then move onto the next set of images to scan. When you’re all done scanning them, you can go back and crop each photo and create an album. This is considerably faster than PhotoScan’s workflow.

With PhotoScan, you can only scan one photo at a time, and even just doing that requires more effort. With PhotoScan, you point your phone’s camera at a photo, tap the scan button, and then you have to move your phone around to snap four pictures. These are then combined into one image. If you’re scanning a lot of photos, this is a much more cumbersome experience.

Photomyne’s album creation tool makes organizing photos as you go easy. When you create an album, you can start scanning photos and they’ll all go into that album. You can create albums for holidays, years, or in whatever other way you prefer to organize your photos. It’s easy to use and makes perfect sense if you’re scanning photos in albums as opposed to an unorganized mess of boxes. That said, this is really only useful if you plan on staying within Photomyne’s ecosystem, which means buying their cloud storage package. If you export photos to your camera roll, they don’t keep the album data.

PhotoScan doesn’t have any of this photo management stuff in the app at all. That’s all regulated to Google Photos or whatever other third-party photo organization tool you’re using. So, when you scan photos, they’re all just dumped into one big folder for you to organize later. This is great if you don’t want to use Google Photos for storage, but does add an extra step to the whole organization process.

If you just need to scan a bunch of photos as quickly as possible, Photomyne’s ability to scan multiple photos at once really speeds things up. The fact you can scan those photos directly into albums makes organization a breeze as long as you’re comfortable staying within Photomyne’s cloud storage ecosystem.

PhotoScan’s Photos Looks Better, Features Better Automatic Cropping

Photomyne (left) doesn’t do much to make a photo look better, whereas PhotoScan (right) tries to.

While PhotoScan takes more time to actually use, the end results are worth it. PhotoScan’s scanned photos look better, and the automatic cropping feature that both apps share was much more accurate in PhotoScan in my testing.

I’m not going to pretend I’m a photo archiving expert, but to my eye, PhotoScan’s photos feature colors that look closer to the original, look better when zoomed in, and the app does a better job correcting for a screwy perspective if I didn’t hold my phone straight. PhotoScan also eliminates glare and reflections, which is handy when your photos are all glossy.

For its part, Photomyne doesn’t do a terrible amount of work in post production. It seems to do a bit of color correction, but it doesn’t get rid of glare of reflections, so you need to be careful when you scan your photos so you don’t accidentally capture glare off a light above you.

Both apps automatically crop the digitized images, eliminating whatever’s in the background, which leaves just the photograph. While it’s nice that Photomyne can scan multiple photos, I found that it wasn’t very intelligent at finding the photo’s edges, which meant I had to go in and manually tweak the cropping for a lot of the pictures. I had to do this in PhotoScan too, but not nearly as often. Photomyne is still likely the faster of the two, but the more hands-on approach to cropping might be off-putting for some.

PhotoScan Is the Best Option for Most People, but Photomyne Is Okay If You’re In a Hurry

Photomyne (left) has all kinds of organization tools baked in, whereas PhotoScan (right) doesn’t.

When it comes to usability and the quality of images, I found that PhotoScan does a better job. Even though Photomyne makes scanning photos quicker, it requires a little more effort after the fact and doesn’t produce as consistently good looking results.

Photomyne also nags you a lot to sign up for their cloud service. It’s not required, and at $2/month for unlimited photo storage it’s on par with other options, but that doesn’t change the fact that it’s annoying to get a pop-up asking you to sign up for their service every time you go to do anything in the app.

Photomyne is a more feature-rich app though. You can create and edit albums, edit photo details with date and year data, and use a variety of filters. Photomyne’s more of a one-stop shop, whereas PhotoScan is just a scanning tool. Which works best for you is dependent on how you’re archiving your digital photos right now.

If it’s just scanning you want and you don’t mind taking your time doing it, use PhotoScan. If you’re in a rush or you want a full photo management tool, go with Photomyne.

ultimate-settings-panel (5.2)

The content below is taken from the original (ultimate-settings-panel (5.2)), to continue reading please visit the site. Remember to respect the Author & Copyright.

Ultimate Settings Panel is an all in one settings solution for a multitude of configuration options in Windows 7, 8.1 and 10, Microsoft Office, Windows Server and System Center Configuration Manager.