Sandisk’s super-fast 400GB microSD is ready for 4K HDR video

The content below is taken from the original ( Sandisk’s super-fast 400GB microSD is ready for 4K HDR video), to continue reading please visit the site. Remember to respect the Author & Copyright.

It’s great that Sony’s new Xperia XZ2 smartphone can record 4K HDR video footage, but the bandwidth and storage requirements are bound to be, er, extreme. That’s where SanDisk’s new 400GB Extreme UHS-I microSDXC card comes in, delivering 160 MB/s rea…

Office 365 Updates Keep on Piling Up

The content below is taken from the original ( Office 365 Updates Keep on Piling Up), to continue reading please visit the site. Remember to respect the Author & Copyright.

Office 365 with Teams

Office 365 with Teams

Random Office 365 Developments

Those who know my writing style might consider me verbose. I think of it as “detailed,” meaning that I like to discuss stuff in some depth. In any case, Microsoft makes so many changes in Office 365 now that it is hard to discuss everything in a full-size article. To address the knowledge gap, here’s some brief notes about recent happenings in Office 365.

Teams and Planner

Teams and Planner are both children of the cloud, so you’d expect them to be tightly integrated. Planner got some recent updates, which were nice, but now some updates for the Planner/Teams integration have shown up. I like the way that you can now see all the plans available to the Teams to which you belong (Figure 1), exposed through More options (…) menu in the navigation pane.

Teams Planner

Figure 1: Listing the plans available to Teams (image credit: Tony Redmond)

I also like the intelligent way that Teams allows you to remove a plan from a channel without disturbing the underlying Office 365 Group and any of its resources. Good work!

Planner’s Complicated Link

But then Planner spoils things with a convoluted support article describing how to disable Outlook calendar sync for your tenant. I haven’t seen the ability to use an iCalendar link to synchronize tasks to Outlook show up in Planner yet, so the support article might be an early version. Nevertheless, it allows me to chide Microsoft and say that this kind of complexity should be hidden from regular human beings.

Compliance and GDPR

Everyone’s favorite topic continues unabated as the May 25 deadline approaches for the introduction of GDPR. On the upside, Microsoft’s Compliance Manager is now generally available to help tenants understand how to approach GDPR. I think Planner and Teams can help here too, but it’s really up to you how to figure out how to organize what needs to be done, including dealing with the problems of data spillage and eradication of pesky PSTs.

OneDrive Restore Shows Up

All the bits necessary to make the OneDrive Restore feature work have now appeared in my tenant. The feature works as advertised and allows users to select what documents to restore from a 30-day sliding window. I like this functionality a lot.

Keeping People in the Loop

Meantime, the Office 365 Admin Centre now allows administrators to share the news about an update with other people (Figure 2). It’s a good idea. Simple ideas often have a good impact.

Office 365 Share Admin Update

Figure 2: Sharing details of an update (image credit: Tony Redmond)

More Cookie Woes

The Office 365 Admin Center has enjoyed a checkered history of cookie woes. I had another this week (Figure 3). The only solution was to clear out all cookies and reload the page. Oh dear… I hope this isn’t an omen of more cookie woes to come.

Office 365 Admin Center error

Figure 3: Whoops, the Office 365 Admin Center can’t load (image credit: Tony Redmond)

Unified CLP for Office 365

CLP apparently means Classification, Labeling, and Protection. Or so I hear. In any case, Office 365 has Classification Labels and Azure Information Protection Labels today. The bad news is that two sets of labels are confusing. The good news is that Microsoft is bringing the two together to achieve “consistent labellng and protection policies.

Simplifying peoples’ lives is always good, but it will take time before we know how the merge between the two label sets happens.

Exchange’s New Audit Action

Exchange has offered mailbox auditing for nearly a decade. It has taken Microsoft a while to figure out that it might be good to audit permission changes for folders. The new UpdateFolderPermissions action is now configured for owner, delegate, and admin operations on Exchange Online mailboxes:

PS C:\temp> get-mailbox -id james.ryan | select -ExpandProperty auditadmin
Update
Move
MoveToDeletedItems
SoftDelete
HardDelete
FolderBind
SendAs
SendOnBehalf
Create
UpdateFolderPermissions

Exchange on-premises servers do not support the new audit action. Maybe this will come with Exchange 2019.

Sponsored

Yammer Counts

Finally, I noted a couple of weeks ago that Yammer shows the count of people who have seen an item. At that time, the count was only visible to the authors of notes. Now it’s available for everyone, but only for recent posts.

Follow Tony on Twitter @12Knocksinna.

Want to know more about how to manage Office 365? Find what you need to know in “Office 365 for IT Pros”, the most comprehensive eBook covering all aspects of Office 365. Available in PDF and EPUB formats (suitable for iBooks) or for Amazon Kindle.

The post Office 365 Updates Keep on Piling Up appeared first on Petri.

Raspberry Pi Modem Project

[https://youtu.be/dsHNjxWzz-g], Built a fun little project out of an old USR fax modem using a Raspberry Pi. Let me know what you think and feel free to like the video.

Parts used:

Raspberry Pi Zero (original)
Sandisk Ultra Micro SD Card 8gb (class 10)
Official Raspberry Pi USB Wifi
O2 Mobile Broadband Dongle E1752CU
Targus ACH111EU 4-Port USB Hub

Instagram: http://bit.ly/2CnIz8m

Crankshaft: Open Source Car Computer

The content below is taken from the original ( Crankshaft: Open Source Car Computer), to continue reading please visit the site. Remember to respect the Author & Copyright.

Modern cars and head units are pretty fancy gadget-wise. But what if your car still has an 8-track? No problem. Just pick up a Raspberry Pi 3 and a seven-inch touchscreen, and use Crankshaft to turn it into an Android Auto setup.

The open source project is based on OpenAuto which, in turn, leverages aasdk. The advantage to Crankshaft is it is a plug-and-play distribution. However, if you prefer, you can build it all yourself from GitHub.

The only limitation we can see stems from the lack of audio input on the Raspberry Pi, though we wonder if a USB sound card would take care of that problem. If you have a spare Pi and a screen hanging around, this is a handy project. A 3D-printed Pi case and some kind of mount for the LCD and you can ditch the 8-track. Not to mention with the Pi under there and all the source code, this should be highly hackable.

Perhaps you’ll do a little dashboard surgery. If you have a double DIN opening already, it might not be very difficult.

Microsoft’s Preparing a Free Version of Teams to Take on Slack

The content below is taken from the original ( Microsoft’s Preparing a Free Version of Teams to Take on Slack), to continue reading please visit the site. Remember to respect the Author & Copyright.

Microsoft has been investing heavily in Teams and the company is showing no signs of slowing down. Last year, the company announced that Skype for Business would be going away with Teams taking the lead role for the company’s communication platform and now it looks like a free offering is on the agenda as well.

In the latest developer preview of Teams, there are several references to a freemium tier of the platform. While this may seem like it is simply part of the upcoming support for MSAs, one line from the dev preview specifically states that this is for non-guest MSAs. In short, it looks like Microsoft is going to offer Teams for free to those who don’t have an Office 365 account.

The reasons for why Microsoft would do this is quite simple, get them hooked on the platform and then upsell Office 365. Another line from the dev preview states “Storage exceeded… Admin action to upgrade to paid version” which means that there will be limitations on the free iteration and to unlock all the functionality of Teams, you will need Office 365.

While I don’t know explicitly what functionary will be limited, it’s not too hard to make an educated guess. For instance, I would expect that the total number of people allowed per team and into a single Teams org would have a low ceiling for users and sharing files could be limited in size as well. Further, the use of third-party plug-ins and bots may not be allowed until the group upgrades to a paid version of Office 365.

I reached out to Microsoft for comment about the freemium iteration but they declined to provide a comment.

This type of feature for Teams is long overdue for the platform but late is better than never. Even though Office 365 has been growing steadily, the competition from a Slack+G Suite environment is increasing as each quarter passes which means that it is critical for Microsoft to open up new avenues that funnel towards an Office 365 subscription.

Typically, a company will start with Slack as it can be used for free initially and offers a compelling alternative to email+IM. Because Microsoft’s solution, up until when this feature goes live, has been a premium-only solution, for startups and small operations, using Slack is a more cost-effective resource.

With this type of information now included in the latest developer preview of Teams, it would appear that this functionality will be enabled in the near future as the development is well underway.

Thanks for the tip Pavan!

The post Microsoft’s Preparing a Free Version of Teams to Take on Slack appeared first on Petri.

Maplin For Sale

The content below is taken from the original ( Maplin For Sale), to continue reading please visit the site. Remember to respect the Author & Copyright.

If you are an American Electronics Enthusiast of a Certain Age, you will have misty-eyed reminiscences of the days when every shopping mall had a Radio Shack store. If you are a Brit, the name that will bring similar reminiscences to those Radio Shack ones from your American friends is Maplin. They may be less important to our community than they once would have been so this is a story from the financial pages; it has been announced that the Maplin chain is for sale.

Maplin started life as a small mail-order company supplying electronic parts, grew to become a large mail order company selling electronic parts, and them proceeded to a nationwide chain of stores occupying a similar niche to the one Radio Shack fitted into prior to their demise. They still sell electronic components, multimeters, and tools, but the bulk of their floor space is devoted to the more techy and hobbyist end of mass-market consumer electronics. As the competition from online retailers has intensified  it is reported that the sale may be an attempt to avoid the company going into administration.

It’s fair to say that in our community they have something of a reputation of late for being not the cheapest source of parts, somewhere you go because you need something in a hurry rather than for a bargain. A friend of Hackaday remarked flippantly that the asking price for the company would be eleventy zillion pounds, which may provide some clues as to why custom hasn’t been so brisk. But for a period in the late 1970s through to the 1980s they were the only place for many of us to find  parts, and their iconic catalogues with spaceships on their covers could be bought from the nationwide WH Smith newsagent chain alongside home computers such as the ZX Spectrum. It’s sad to say this, but if they did find themselves on the rocks we’d be sorry to see the name disappear, but we probably wouldn’t miss them in 2018.

One of the things Maplin were known for back in the day were their range of kits. We’ve shown you at least one in the past, this I/O port for a Sinclair ZX81.

Footnote: Does anyone still have any of the early Maplin catalogues with the spaceships on the cover? Ours perished decades ago, but we’d love to borrow one for a Retrotechtacular piece.

Maplin store images: Betty Longbottom [CC BY-SA 2.0], and Futurilla [CC BY-SA 2.0].

UK tech brand Acorn taps nostalgia to sell a rebranded phone

The content below is taken from the original ( UK tech brand Acorn taps nostalgia to sell a rebranded phone), to continue reading please visit the site. Remember to respect the Author & Copyright.

Acorn, the British computer company that dominated the market in the late '70s has been revived, once again. This time out, the outfit is pushing its own smartphone, the Acorn Micro Phone C5, which appears to be a rebadged Leagoo S8. Should you want…

Creating a single pane of glass for your multi-cloud Kubernetes workloads with Cloudflare

The content below is taken from the original ( Creating a single pane of glass for your multi-cloud Kubernetes workloads with Cloudflare), to continue reading please visit the site. Remember to respect the Author & Copyright.

[Editor’s note: As much as we’d love to host all your workloads on Google Cloud Platform (GCP), sometimes it’s not in the cards. Today we hear from Cloudflare about how to enable a multi-cloud configuration using its load balancer to front Kubernetes-based workloads in both Google Kubernetes Engine and Amazon Web Services (AWS).]

One of the great things about container technology is that it delivers the same experience and functionality across different platforms. This frees you as a developer from having to rewrite or update your application to deploy it on a new cloud provider—or lets you run it across multiple cloud providers. With a containerized application running on multiple clouds, you can avoid lock-in, run your application on the cloud for which it’s best suited, and lower your overall costs.

If you’re using Kubernetes, you probably manage traffic to clusters and services across multiple nodes using internal load-balancing services, which is the most common and practical approach. But if you’re running an application on multiple clouds, it can be hard to distribute traffic intelligently among them. In this blog post, we show you how to use Cloudflare Load Balancer in conjunction with Kubernetes so you can start to achieve the benefits of a multi-cloud configuration.

The load balancers offered by most cloud vendors are often tailored to a particular cloud infrastructure. Load balancers themselves can also be single points of failure. Cloudflare’s Global Anycast Network comprises 120 data centers worldwide and offer all Cloudflare functions, including Load Balancing, to deliver speed and high availability regardless of which clouds your origin servers are hosted on. Users are directed to the closest and most suitable data center to the user, maximizing availability and minimizing latency. Should there be any issue connecting to a given datacenter, user traffic is automatically rerouted to the next best available option. It also health-checks your origins, notifying you via email if one of them is down, while automatic failover capabilities keep your services available to the outside world.

By running containerized applications across multiple clouds, you can be platform-agnostic and resilient to major outages. Cloudflare represents a single pane of glass to:

  • Apply and monitor security policies (DDoS mitigation, WAF, etc.)
  • Manage routing across multiple regions or cloud vendors, using our Load Balancer
  • Tweak performance settings from a single location. This reduces the time you spend managing configurations as well as the possibility of a misconfiguration
  • Add and modify additional web applications as you migrate services from on-premise to cloud or between different cloud providers

Load balancing across AWS and GCP with Cloudflare

To give you a better sense of how to do this, we created a guide on how to deploy an application using Kubernetes on GCP and AWS along with our Cloudflare Load Balancer.

The following diagram shows how the Cloudflare Load Balancer distributes traffic between Google Cloud and another cloud vendor for an application deployed on Kubernetes. In this example, the GCP origin server uses an ingress controller and an HTTP load balancer, while another cloud vendor origin its uses own load balancer. The key takeaway is that Cloudflare Load Balancer works with any of these origin configurations.

Here’s an overview of how to set up a load-balanced application across multiple clouds with Cloudflare.

Step 1: Create a container cluster

GCP provides built-in support for running Kubernetes containers with Google Kubernetes Engine. You can access it with Google Cloud Shell, which is preinstalled with gcloud, docker and kubectl command-line tools.

Running the following command creates a three-node cluster:

$gcloud container clusters create camilia-cluster --num-nodes=3 

Now you have a pool of Compute Engine VM instances running Kubernetes.

AWS

AWS recently announced support for the Kubernetes container orchestration system on top of its Elastic Container Service (ECS). Click Amazon EKS to sign up for the preview.

Until EKS is available, here’s how to create a Kubernetes cluster on AWS:

  • Install the following tools on your local machine: Docker, AWS CLI with an AWS account, Kubectl and Kops (a tool provided by Kubernetes that simplifies the creation of the cluster) 
  • Have a domain name, e.g. mydomain.com
  • In the AWS console have a policy for your user to access the AWS Elastic Container Registry

In addition, you need to have two additional AWS resources in order to create a Kubernetes cluster:

  • An S3 bucket to store information about the created cluster and its configuration 
  • A Route53 domain (hosted zone) on which to run the container, e.g., k8s.mydomain.com. Kops uses DNS for discovery, both inside the cluster and so that you can reach the Kubernetes API server from clients

Once you’ve set up the S3 bucket and created a hosted zone using Kops, you can create the configuration for the cluster and save it on S3:

$kops create cluster --zones us-east-1a k8saws.usualwebsite.com

Then, run the following command to create the cluster in AWS:

$kops update cluster k8saws.usualwebsite.com --yes

Kops then creates one master node and two slaves. This is the default config for Kops.

Step 2: Deploy the application

This step is the same across both Kubernetes Engine and AWS. After you create a cluster, use kubectl to deploy applications to the cluster. You can usually deploy them from a docker image.

$kubectl run camilia-nginx --image=nginx --port 80

This creates a pod that is scheduled to one of the slave nodes.

Step 3 – Expose your application to the internet 

On AWS, exposing an application to traffic from the internet automatically assigns an external IP address to the service and creates an AWS Elastic Load Balancer.

On GCP, however, containers that run on Kubernetes Engine are not accessible from the internet by default, because they do not have external IP addresses by default. With Kubernetes Engine, you must expose the application as a service internally and create an ingress resource with the ingress controller, which creates an HTTP(S) load balancer.

To expose the application as a service internally, run the following command:

$kubectl expose deployment camilia-nginx --target-port=80  
--type=NodePort

In order to create an ingress resource so that your HTTP(S) web server application is publicly accessible, you’ll need to create the yaml configuration file. This file defines an ingress resource that directs traffic to the service.

Once you’ve deployed the ingress resource, the ingress controller that’s running in your cluster creates an HTTP(S) Load Balancer to route all external HTTP traffic to the service.

Step 4 – Scale up your application 

Adding additional replicas (pods) is the same for both Kubernetes Engine and AWS. This step ensures there are identical instances running the application.

$kubectl scale deployment camilia-nginx --replicas=3

The Load Balancer that was provisioned in the previous step now starts routing traffic to these new replicas automatically.

Setting up Cloudflare Load Balancer

Now, you’re ready to set up Cloudflare Load Balancer, a very straightforward process:

  • Create a hostname for Load Balancer, for example lb.mydomain.com 
  • Create Origin Pools, for example, a first pool for GCP, and a second pool for AWS 
  • Create Health Checks 
  • Set up Geo Routing, for example all North America East traffic routes to AWS instance, etc.

Please see our documentation for detailed instructions how to set up the Cloudflare Load Balancer.

Introducing Cloudflare Warp

Working with StackPointCloud we also developed a Cloudflare WARP Ingress Controller, which makes it very easy to launch Kubernetes across multiple cloud vendors and uses Cloudflare controller to tie them together. Within StackPointCloud, adding the Cloudflare Warp Ingress Controller requires just a single click. One more click and you’ve deployed a Kubernetes cluster. Behind the scenes, it implements an ingress controller using a Cloudflare Warp tunnel to connect a Cloudflare-managed URL to a Kubernetes service. The Warp controller manages ingress tunnels in a single namespace of the cluster. Multiple controllers can exist in different namespaces, with different credentials for each namespace.

Kubernetes in a multi-cloud world

With the recent announcement of native Kubernetes support in AWS, as well as existing native support in GCP and Microsoft Azure, it’s clear that Kubernetes is emerging as the leading technology for managing heterogeneous cloud workloads, giving you a consistent way to deploy and manage your applications regardless of which cloud provider they run on. Using Cloudflare Load Balancer in these kinds of multi-cloud configurations lets you direct traffic between clouds, while avoiding vendor-specific integrations and lock-in. To learn more about Cloudflare, visit our website, or reach out to us with any questions — we’d love to hear from you!

Now Available – AWS Serverless Application Repository

The content below is taken from the original ( Now Available – AWS Serverless Application Repository), to continue reading please visit the site. Remember to respect the Author & Copyright.

Last year I suggested that you Get Ready for the AWS Serverless Application Repository and gave you a sneak peek. The Repository is designed to make it as easy as possible for you to discover, configure, and deploy serverless applications and components on AWS. It is also an ideal venue for AWS partners, enterprise customers, and independent developers to share their serverless creations.

Now Available
After a well-received public preview, the AWS Serverless Application Repository is now generally available and you can start using it today!

As a consumer, you will be able to tap in to a thriving ecosystem of serverless applications and components that will be a perfect complement to your machine learning, image processing, IoT, and general-purpose work. You can configure and consume them as-is, or you can take them apart, add features, and submit pull requests to the author.

As a publisher, you can publish your contribution in the Serverless Application Repository with ease. You simply enter a name and a description, choose some labels to increase discoverability, select an appropriate open source license from a menu, and supply a README to help users get started. Then you enter a link to your existing source code repo, choose a SAM template, and designate a semantic version.

Let’s take a look at both operations…

Consuming a Serverless Application
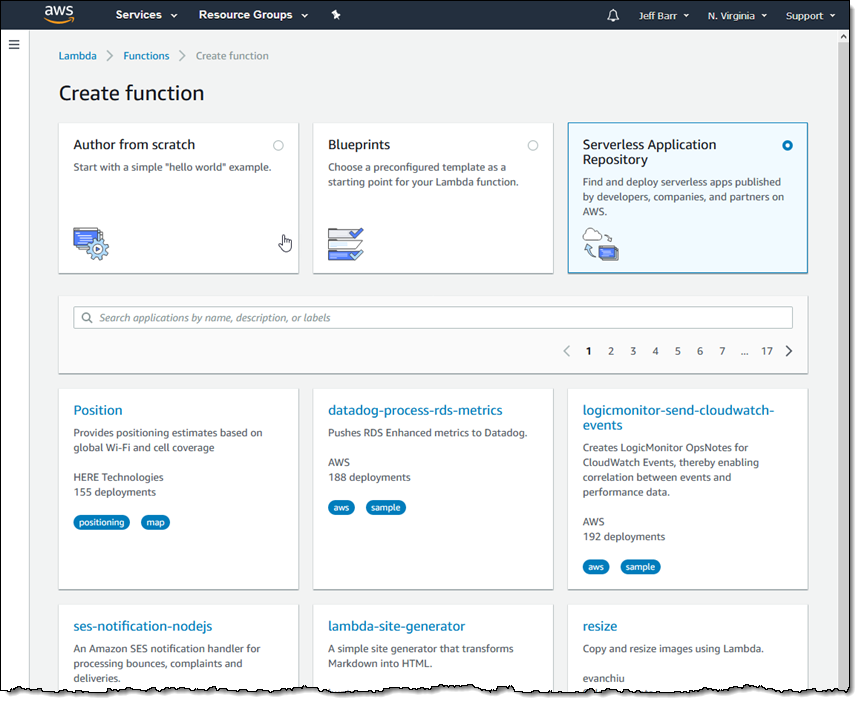
The Serverless Application Repository is accessible from the Lambda Console. I can page through the existing applications or I can initiate a search:

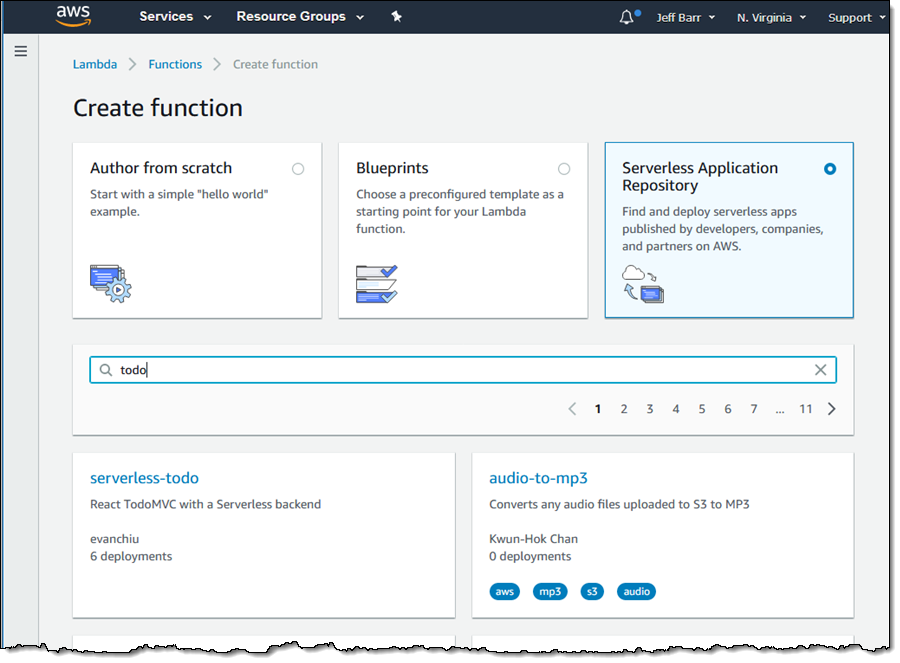
A search for “todo” returns some interesting results:

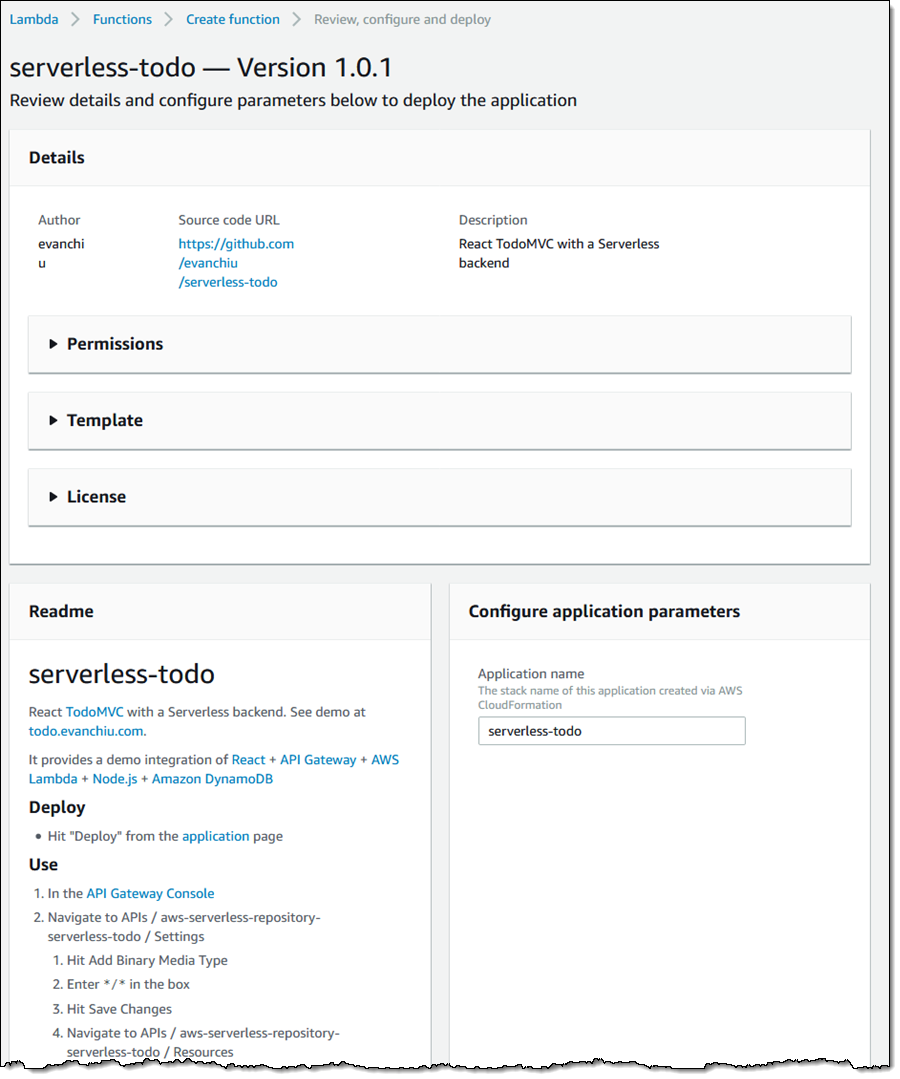
I simply click on an application to learn more:

I can configure the application and deploy it right away if I am already familiar with the application:

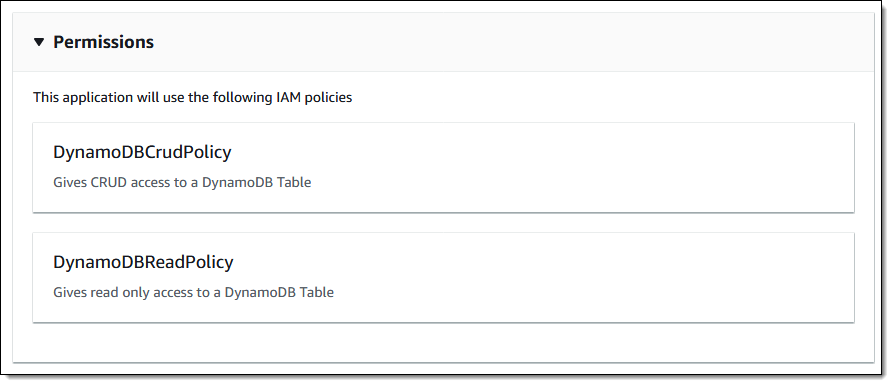
I can expand each of the sections to learn more. The Permissions section tells me which IAM policies will be used:

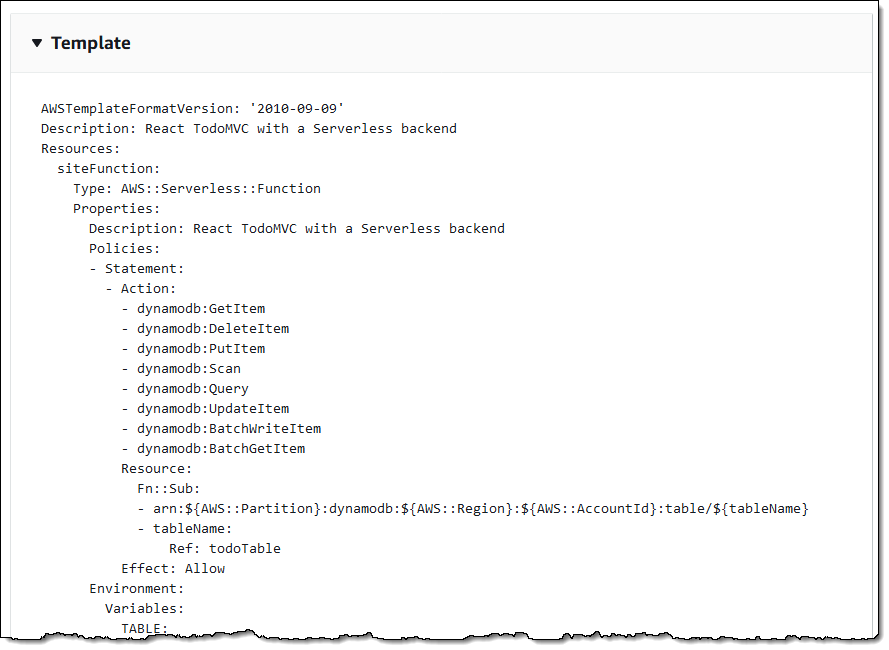
And the Template section displays the SAM template that will be used to deploy the application:

I can inspect the template to learn more about the AWS resources that will be created when the template is deployed. I can also use the templates as a learning resource in preparation for creating and publishing my own application.

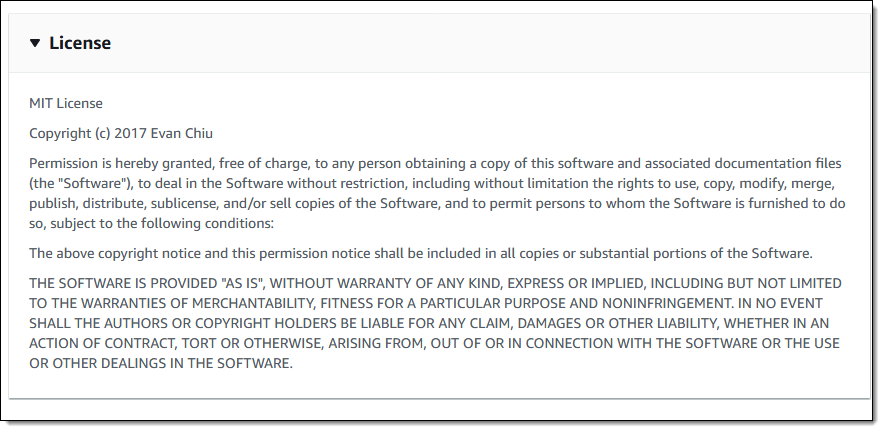
The License section displays the application’s license:

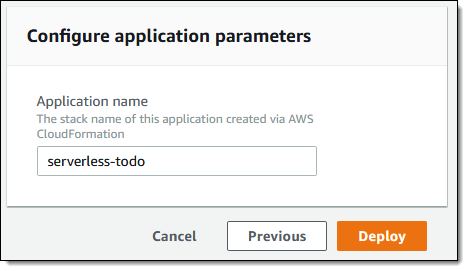
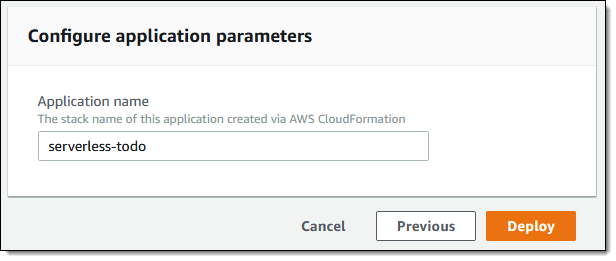
To deploy todo, I name the application and click Deploy:

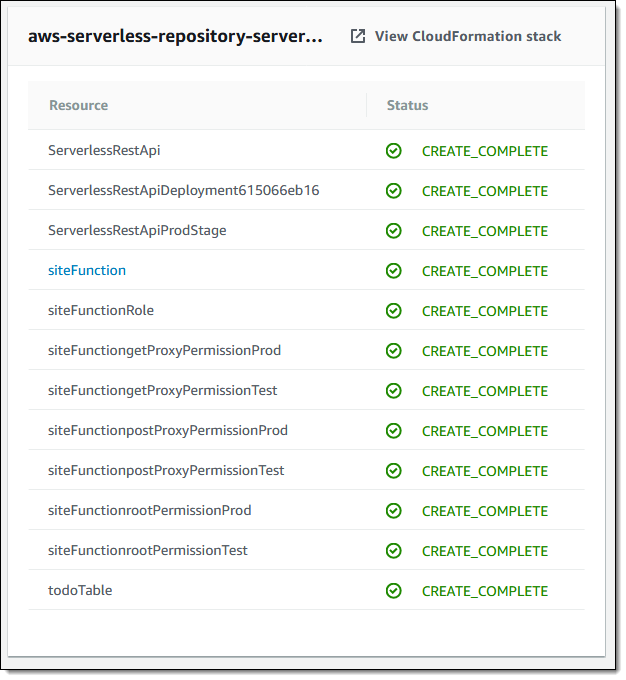
Deployment starts immediately and is done within a minute (application deployment time will vary, depending on the number and type of resources to be created):

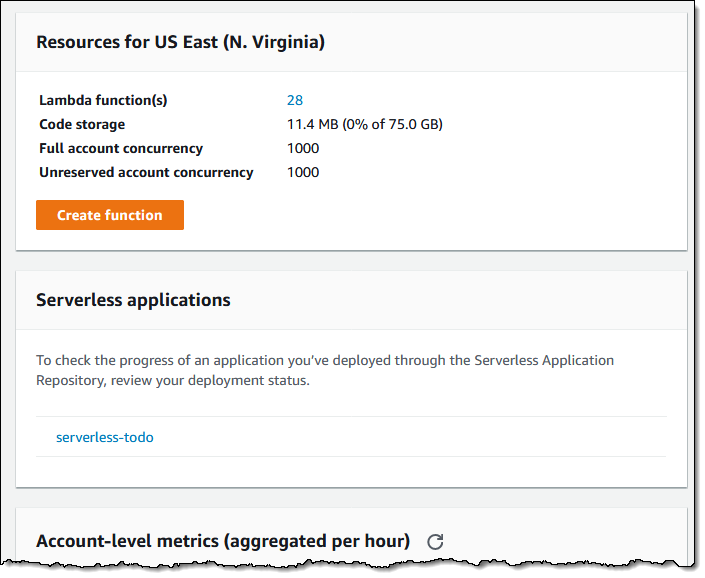
I can see all of my deployed applications in the Lambda Console:

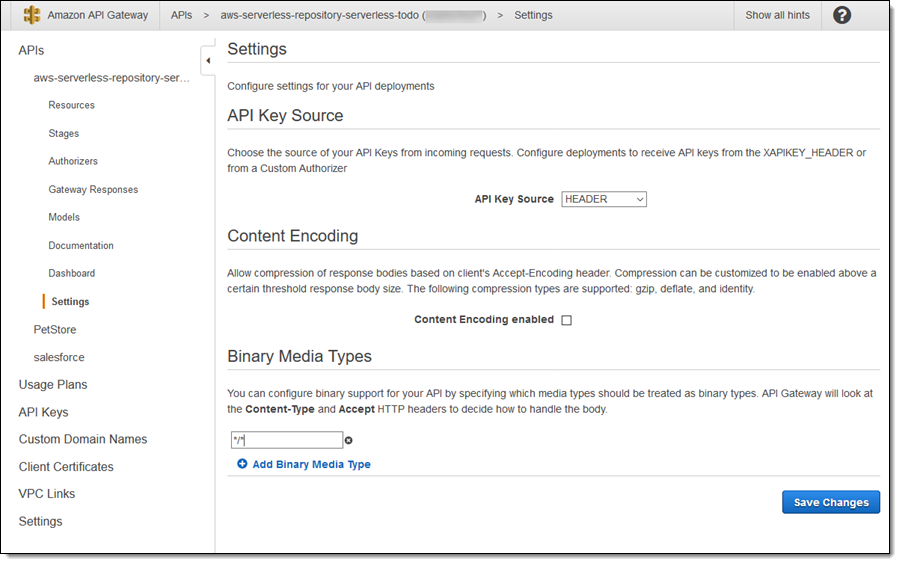
There’s currently no way for a SAM template to indicate that an API Gateway function returns binary media types, so I set this up by hand and then re-deploy the API:

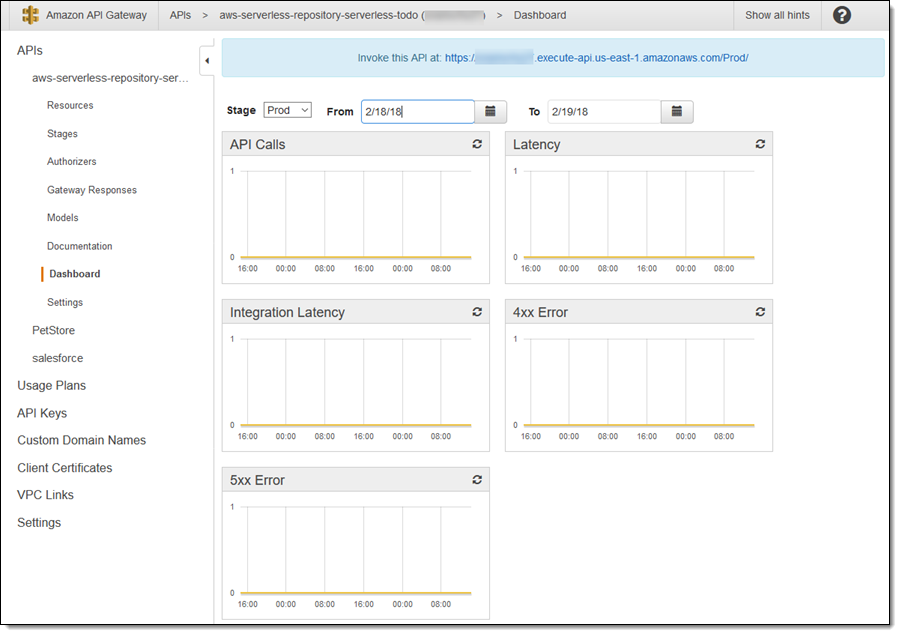
Following the directions in the Readme, I open the API Gateway Console and find the URL for the app in the API Gateway Dashboard:

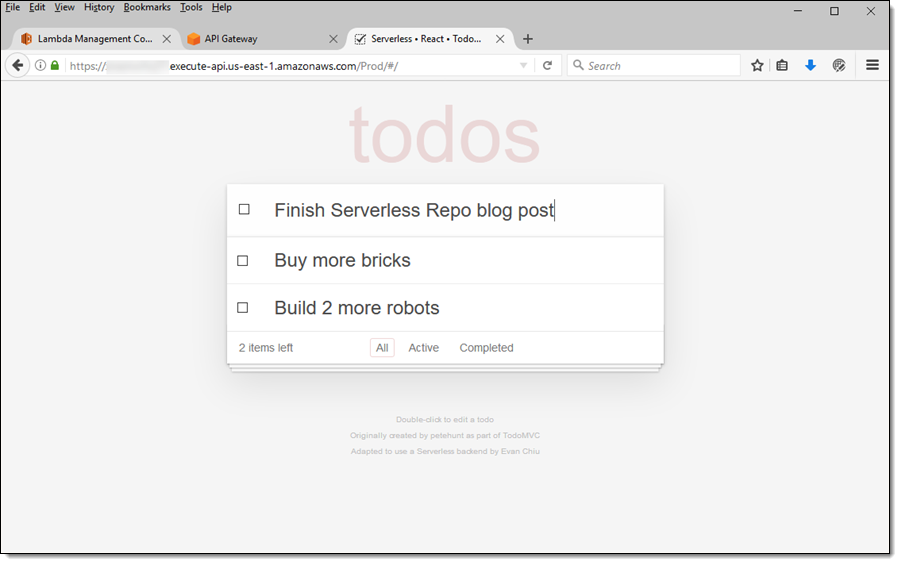
I visit the URL and enter some items into my list:

Publishing a Serverless Application
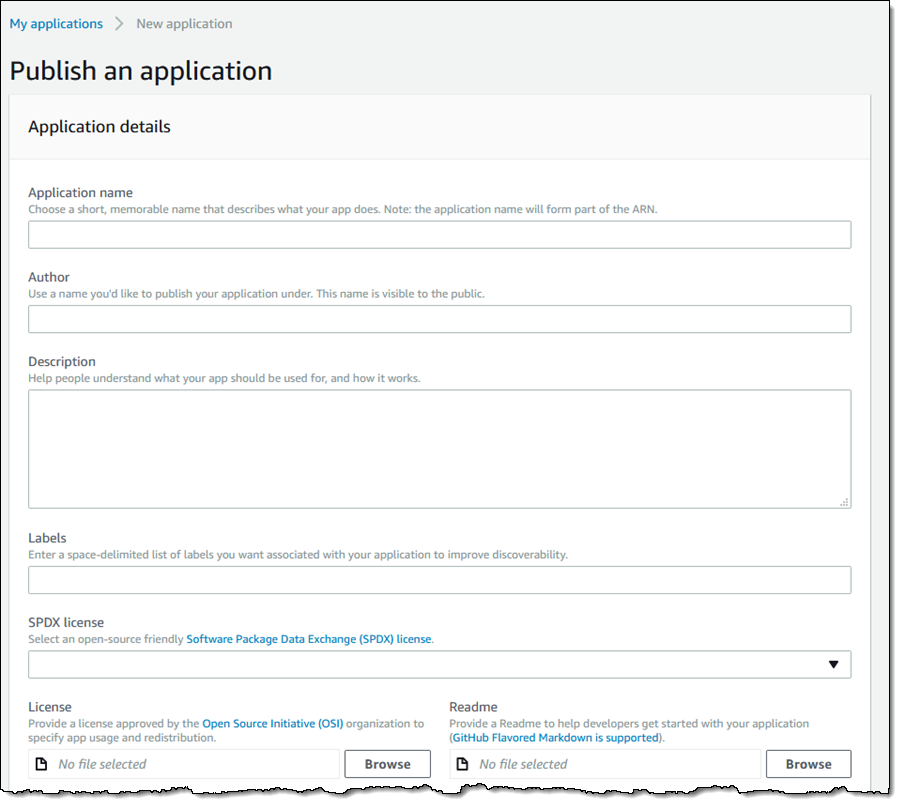
Publishing applications is a breeze! I visit the Serverless App Repository page and click on Publish application to get started:

Then I assign a name to my application, enter my own name, and so forth:

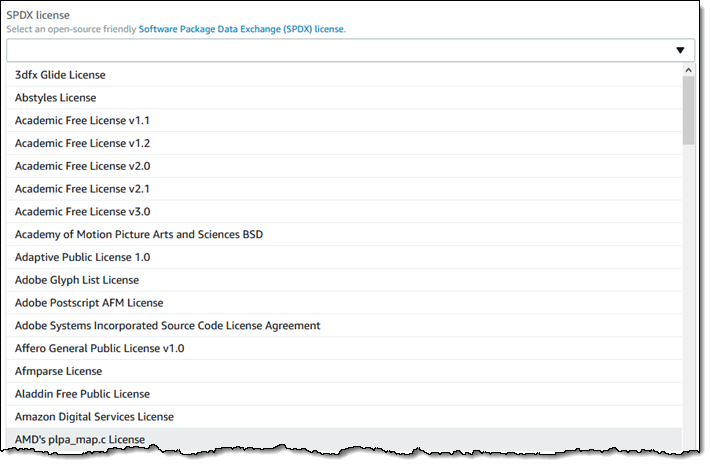
I can choose from a long list of open-source friendly SPDX licenses:

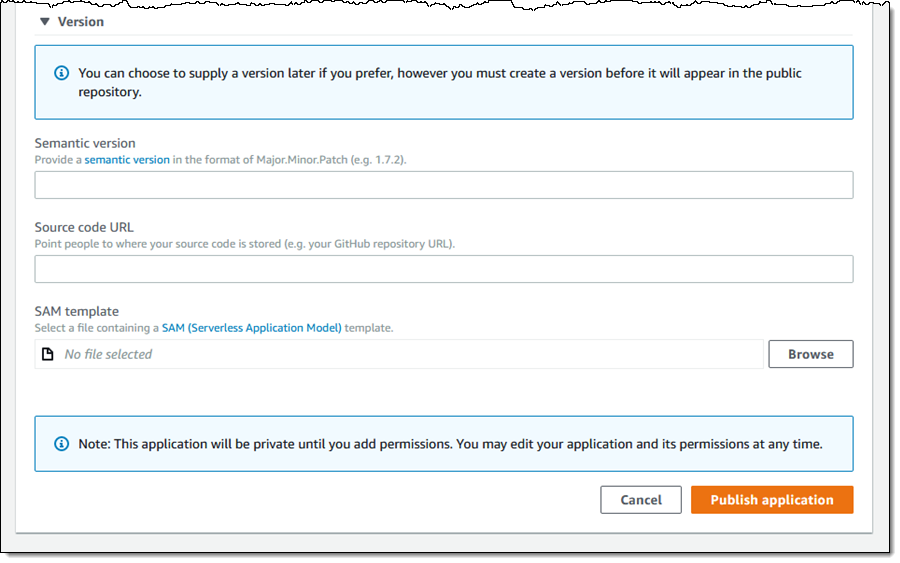
I can create an initial version of my application at this point, or I can do it later. Either way, I simply provide a version number, a URL to a public repository containing my code, and a SAM template:

Available Now
The AWS Serverless Application Repository is available now and you can start using it today, paying only for the AWS resources consumed by the serverless applications that you deploy.

You can deploy applications in the US East (Ohio), US East (N. Virginia), US West (N. California), US West (Oregon), Asia Pacific (Tokyo), Asia Pacific (Seoul), Asia Pacific (Mumbai), Asia Pacific (Singapore), Asia Pacific (Sydney), Canada (Central), EU (Frankfurt), EU (Ireland), EU (London), and South America (São Paulo) Regions. You can publish from the US East (N. Virginia) or US East (Ohio) Regions for global availability.

Jeff;


ExpressRoute monitoring with Network Performance Monitor (NPM) is now generally available

The content below is taken from the original ( ExpressRoute monitoring with Network Performance Monitor (NPM) is now generally available), to continue reading please visit the site. Remember to respect the Author & Copyright.

We are excited to share the general availability of ExpressRoute monitoring with Network Performance Monitor (NPM). A few months ago, we announced ExpressRoute Monitor with NPM in public preview. Since then, we’ve seen lots of users monitor their Azure ExpressRoute private peering connections, and working with customers we’ve gathered a lot of great feedback. While we’re not done working to make ExpressRoute monitoring best in class, we’re ready and eager for everyone to get their hands on it. In this post, I’ll take you through some of the capabilities that ExpressRoute Monitor provides. To get started, watch a brief demo video explaining ExpressRoute monitoring capability in Network Performance Monitor.

Monitor connectivity to Azure VNETs, over ExpressRoute

NPM can monitor the packet loss and network latency between your on-premises resources (branch offices, datacenters, and office sites) and Azure VNETs connected through an ExpressRoute. You can setup alerts to get proactively notified whenever the loss or latency crosses the threshold. In addition to viewing the near real-time values and historical trends of the performance data, you can use the network state recorder to go back in time to view particular network state in order to investigate the difficult-to-catch transient issues.

Get end-to-end visibility into the ExpressRoute connections

Since an ExpressRoute connection comprises of various components, it is extremely difficult to identify the bottleneck when high latency is experienced while connecting to an Azure workload. Now, you can get the required end-to-end visibility through NPM’s interactive topology view. You can not only view all the constituent components, your on-premises network, circuit provider edge, ExpressRoute circuit, Microsoft edge, and Azure VMs, but also the latency contributed by each hop to help you identify the troublesome segment.

The following snippet illustrates a topology view where the Azure VM on the left is connected to the on-premises VM on the right, over primary and secondary ExpressRoute connections. The Microsoft router at the Azure edge and the service provider router at the customer edge are also depicted. The nine on-premises hops (depicted by dashed lines) are initially compressed. 

ExpressRoute connections

You can also choose to expand the map to view all the on-premises hops and understand the latency contributed by each hop.

ExpressRoute connections 2

Understand bandwidth utilization

This capability lets you view the bandwidth utilization trends for both the primary and secondary ExpressRoute circuits, and as a result, helps you in capacity planning. Not only can you view the aggregated bandwidth utilization for all the private peering connections of the ExpressRoute circuit, but you can also drill-down to understand the bandwidth utilization trend for each VNET. This will help you identify the VNETs that are consuming most of your circuit bandwidth.

Bandwidth utilization (Azure Private Peering)

You can also setup alerts to notify when the bandwidth consumed by a VNET crosses the threshold.

Health monitoring

Diagnose ExpressRoute connectivity issues

NPM helps you diagnose several circuit connectivity issues. Below are examples of possible issue.

Circuit is down – NPM notifies you as soon as the connectivity between your on-premises resources and Azure VNETs is lost. This will help you take proactive action before receiving user escalations and reduce the downtime.

Circuit is down 1

Circuit is down 2

Traffic not flowing through intended circuit – NPM can notify you whenever the traffic is unexpectedly not flowing through the intended ExpressRoute circuit. This can happen if the circuit is down and the traffic is flowing through the backup route, or if there is a routing issue. This information will help you proactively manage any configuration issues in your routing policies and ensure that the most optimal and secure route is used.

Diagnostic Details

Traffic not flowing through primary circuit – The capability notifies you when the traffic is flowing through the secondary ExpressRoute circuit. Even though you will not experience any connectivity issues in this case, proactively troubleshooting the issues with the primary circuit will make you better prepared.

Traffic not flowing

Diagnostic Details 2

Degradation due to peak utilization – You can correlate the bandwidth utilization trend with the latency trend to identify whether the Azure workload degradation is due to a peak in bandwidth utilization, or not, and take action accordingly.

Degradation due to peak utilization

Create custom queries and views

All data that is exposed graphically through NPM’s UI are also available natively in Log Analytics search. You can perform interactive analysis of data in the repository, correlate data from different sources, create custom alerts and views, and export the data to Excel, PowerBI, or a shareable link.

Get started

To get started, see the detailed instructions on how to setup ExpressRoute Monitor in NPM and learn more about the other capabilities in NPM.

Please send your feedback

There are a few different routes to give feedback:

  • UserVoice: Post new ideas for Network Performance Monitor on our UserVoice page.
  • Join our cohort: We’re always interested in having new customers join our cohorts to get early access to new features and help us improve NPM going forward. If you are interested in joining our cohorts, simply fill out this quick survey.

Introduction to the IT Roadmap Planning Tool for Microsoft 365

The content below is taken from the original ( Introduction to the IT Roadmap Planning Tool for Microsoft 365), to continue reading please visit the site. Remember to respect the Author & Copyright.

Microsoft introduced at Microsoft Ignite 2017 a new Planning Tool designed to help organizations to make a more proper and effective use of Microsoft 365 services and applications. The tool, still in preview, allows you to build custom deployment and configuration plans for Microsoft Office 365 services and applications based on current deployment status and the next level(s) the organization wants to meet. In this article, I will make an overview of the IT Roadmap Planning Tool for Microsoft 365.


Getting Started with the IT Roadmap Planning Tool for Microsoft 365

First thing you should do is just access the light edition of the tool. Note that If you are a Microsoft Partner, you can access a more complete version of the tool through the Microsoft Business Value Programs.

On the welcome page, just click the “Start Assessment” button, so you can see the tool in action.


Figure 1 — IT Roadmap for Microsoft 365 Home Page


The next step is to select Microsoft 365 services we want to use to start defining the IT Roadmap. As you can see in the services selection page, Microsoft recommends choosing no more than 4 services as the starting point. Once you have selected the desired services, just click on “Get Started”.

Figure 2 — Services Selection to Start Building the IT Roadmap


In my case, I have selected the following services:

  • Group collaboration services
  • Intranet and search services

For each service selected, you have a service assessment organized by categories and for each category, you have up to 4 possible configuration levels:

  • For instance, for “Group collaboration services” we have the following categories: Messaging, File Sharing, Teamwork, and Broad collaboration.
  • For each category, we always have a level 1 as your starting evaluation point and you can go up to a level 4 depending on the maturity level you have got in regards to service category configurations. As you can see, for each category level, the tool defines a set of actions that should be implemented to be compliant with that level and have the possibility to move to the next level. For each level, available actions can be checked as completed (green checkmark), not applicable (gray checkmark), or not completed (red checkmark). The more actions are checked in green in each service assessment category, the less configuration work needs to be done in the services to be compliant with the corresponding category level.


Figure 3 — Example of a Service Assessment Category and Related Category Levels

Getting Evaluated in Regards to Microsoft 365 Services Settings

Once you have checked all the settings already in place in our Microsoft 365 services (green checkmark), the real tool assessment starts by clicking on the “Assessment Summary” button:

  • You get a global optimization score value indicating, on a scale of 4, our current global level in regards to services configuration.
  • For each individual service, you also get a service configuration level and the next level you can reach as soon as you implement suggested configuration tasks.


Figure 4 — Service Optimization Scores


From the “Assessment Summary” page, you will be able to perform the following actions:

  • An overview of all the actions you should implement to raise your service optimization score. For each measure, you will see information about the expected user impact, the effort required to implement the measure, and if there is FastTrack support/guidance. Of course, for each measure, you also have links to Microsoft official documentation that can help you to set it up.


Figure 5 — Overview of the Actions Suggested to Raise a Service Optimization Score

  • Go back to the starting assessment to add new services or modify existing ones.
  • Generate a Roadmap document that will include all the measures to be implemented to raise the services optimization score for your Microsoft 365 deployment. Of course, you can modify this document to add your custom content to it.


Figure 6 — Generated IT Roadmap Sample

Sponsored

Conclusions

The IT Roadmap Planning Tool for Microsoft 365 is just another good example of Microsoft commitment to help organizations of any size and sector to measure not only the maturity level in the use of Microsoft 365 services but also what actions could be done to increase the services optimization score.

The post Introduction to the IT Roadmap Planning Tool for Microsoft 365 appeared first on Petri.

England turns to the church to help fix rural internet

The content below is taken from the original ( England turns to the church to help fix rural internet), to continue reading please visit the site. Remember to respect the Author & Copyright.

Though our cities now teem with fiber optic cables and 4G signals, it's still common for rural areas to struggle with even basic connectivity. In the UK, a new pact between church and state could help local religious hubs become bastions of faster br…

Microsoft inadvertently outlines the limits of Windows 10 on ARM

The content below is taken from the original ( Microsoft inadvertently outlines the limits of Windows 10 on ARM), to continue reading please visit the site. Remember to respect the Author & Copyright.

Microsoft began introducing ARM-powered Windows devices this past holiday season, and now we have more information on the limitations of these devices. Thurrott noticed that Microsoft published a list of limitations on the ARM version of Windows 10….

Driverless technology is about to reshape the real estate industry

The content below is taken from the original ( Driverless technology is about to reshape the real estate industry), to continue reading please visit the site. Remember to respect the Author & Copyright.

The link between property and transport has been perhaps the most durable in human history.

Since the ancients, few things have delivered higher land values with more certainty than advances in transport, from roads to canals, railways to highways. […]

But now, the dawn of the driverless car—promising a utopia of stress-free commutes, urban playgrounds and the end of parking hassles—threatens to complicate the calculus for anyone buying property.

Bloomberg Technology explains how the real estate industry is already preparing for all that sweet, sweet valuable space to open up for development once the widespread arrival of driverless vehicles makes parked cars — and the blocked square footage they occupy — a thing of the past. 

Microsoft’s Cortana is finally on IFTTT

The content below is taken from the original ( Microsoft’s Cortana is finally on IFTTT), to continue reading please visit the site. Remember to respect the Author & Copyright.

Microsoft keeps striving to find Cortana a place in the crowded smart assistant market, and despite losing a minor feature, it's still adding functionality. Today, Cortana added IFTTT, and launched with interactions to link it up with 550 apps and de…

How to create a Test Account on Facebook without email or phone number

The content below is taken from the original ( How to create a Test Account on Facebook without email or phone number), to continue reading please visit the site. Remember to respect the Author & Copyright.

If you want to test something on Facebook, but are afraid of using your account, here is a simple solution made by Facebook. You can create a Test account on Facebook to try different things virtually – but it does […]

This post How to create a Test Account on Facebook without email or phone number is from TheWindowsClub.com.

Create a Discord Webhook with Python for Your Bot

The content below is taken from the original ( Create a Discord Webhook with Python for Your Bot), to continue reading please visit the site. Remember to respect the Author & Copyright.

Discord is an IRC-like chat platform that all the young cool kids are hanging out on. Originally intended as a way to communicate during online games, Discord has grown to the point that there are servers out there for nearly any topic imaginable. One of the reasons for this phenomenal growth is how easy it is to create and moderate your own Discord server: just hit the “+” icon on the website or in the mobile application, and away you go.

As a long-time IRC guy, I was initially unimpressed with Discord. It seemed like the same kind of stuff we’ve had for decades, but with an admittedly slick UI. After having used it for a few months now and joining servers dedicated to everything from gaming to rocket science, I can’t say that my initial impression of Discord is inaccurate: it’s definitely just a modern IRC. But I’ve also come to the realization that I’m OK with that.

But this isn’t a review of Discord or an invitation to join the server I’ve setup for my Battlefield platoon. In this article we’re going to look at how easy it is to create a simple “bot” that you can plug into a Discord server and do useful work with. Since anyone can create a persistent Discord server for free, it’s an interesting platform to use for IoT monitoring and logging by simply sending messages into the server.

A Practical Example

Weather bot posting to my Discord channel

I don’t want to get too bogged down with the specifics of how you can use Discord in your project, I leave that up to the reader’s imagination. But as an example, let’s say you wanted to create a weather monitoring station that would post the current temperature and a picture of the sky to your Discord server every hour or so.

Let’s also say that the temperature sensing is happening in the background and is available to our code as the variable CURRENT_TEMP, and that the image "latest_img.jpg" is also automatically popping up in the current directory where our Python script can get to it.

Setting Up the Discord Server

As mentioned previously, setting up a Discord server is exceptionally easy. All you really have to do is give the thing a name and click “Create”. Incidentally, you should setup the server on your computer via the Discord web interface, as not all of the options mentioned below are currently available from the mobile applications.

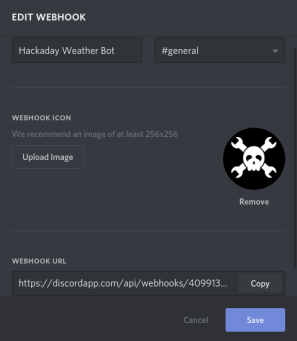
Once you’ve created it, you then need to go into the server settings for webhooks. This is where you will create your webhook entries and get the authentication tokens that your script will need to send messages into the server.

Each webhook needs its own name, and you can give them individual icons to pretty things up a bit. The configuration will also ask you what channel you want the webhook to have access to, which let’s you subdivide things nicely if you plan on having a lot of data get dumped into the server.

The final part of the webhook configuration is the most important, as it gives you the URL the webhook will use. The URL contains the authentication token and ID:

discordapp.com/api/webhooks/WEBHOOK_ID/WEBHOOK_TOKEN

Software Environment

As previously mentioned, I’ll be doing this in Python since that’s also what the cool kids are doing this days. There are Discord libraries available for pretty much any language you can think of though, so if you want to do something similar in your language of choice it shouldn’t be a problem and the server-side setup will still look the same.

The two libraries required are the ever popular Requests, which will handle the HTTP side of things for us, and discord.py which is the most popular Discord API wrapper for Python. Note that we need to use the development version of discord.py for this to work, as the stable build doesn’t currently have webhook support.

The Code

It’s actually quite simple to send a message into the Discord server with these libraries, and a basic implementation only takes a few lines:

#!/usr/bin/env python3
import requests
import discord
from discord import Webhook, RequestsWebhookAdapter, File

# Create webhook
webhook = Webhook.partial(WEBHOOK_ID, WEBHOOK_TOKEN,\
 adapter=RequestsWebhookAdapter())

# Send temperature as text
webhook.send("Current Temp: " + CURRENT_TEMP)

# Upload image to server
webhook.send(file=discord.File("latest_img.jpg"))

That’s all there is to it. Executing that code should send a message into the Discord server from the webhook bot created earlier.

Final Thoughts

Automatically generated stats posted to Discord

Discord has native applications for all major mobile and desktop operating systems, as well as a very polished web interface that you can use from any computer with a modern web browser without having to install anything. This ubiquity and ease-of-use make it an interesting platform for more than just chatting about games. Using Discord for remote monitoring and logging means that you, and anyone you wish to invite, can get instantaneous notifications and updates about anything you want.

Personally, I’m using a similar setup to post automatically generated stats for my Battlefield platoon directly into our Discord chat every Friday morning with a couple of Python scripts and a cron job running on a Pi Zero. But the only real limit is your imagination.

Microsoft’s Windows 10 Workstation adds killer feature: No Candy Crush

The content below is taken from the original ( Microsoft’s Windows 10 Workstation adds killer feature: No Candy Crush), to continue reading please visit the site. Remember to respect the Author & Copyright.

Now can you remove it from every Start Menu?

Readers with good memories may recall that when Windows NT was launched, it came in Workstation and Advanced Server editions, with the former fulfilling most duties of a server. There were no limits on TCP/IP connections, for example. Just as its developer Dave Cutler intended.…

PowerShell DSC and Puppet — Why It Is Not Either/Or

The content below is taken from the original ( PowerShell DSC and Puppet — Why It Is Not Either/Or), to continue reading please visit the site. Remember to respect the Author & Copyright.

In this Ask the Admin, I’ll discuss why Puppet and DSC together is often the best configuration management solution in mixed Windows/Linux environments.


If you are not familiar with Puppet, it is roughly equivalent to PowerShell Desired State Configuration (DSC), a PowerShell technology that’s built in to modern versions of Windows. Both Puppet and DSC are configuration management tools that allow system administrators and developers to define how servers should be configured using a declarative syntax.

In standard PowerShell code, or Ruby in the case of Puppet, you use imperative syntax to execute a series of instructions to achieve your required configuration.

  1. Install this component.
  2. Configure these settings.
  3. If x is true, let setting z be equal to y.
  4. Reboot.

To install and configure Active Directory in Windows Server using PowerShell, you need to know how to install the required roles and features and then how to configure them. But using declarative syntax, you state how you want your server to be configured. Or how you want it to ‘look’. You don’t need to know the technical steps required to achieve the desired result. Or as Puppet puts it, ‘Modeling instead of scripting’.

  1. Make sure Active Directory is present with these parameters (…)

This is a significant departure from how system administrators have traditionally configured Windows Server because the available tools for Windows weren’t designed with DevOps environments in mind.

Group Policy vs. Text-Based Configuration Management

Group Policy and DSC overlap with each other but solve different problems. You might build your server using DSC. I.e. decide which roles and features should be installed. Group Policy is better suited to managing configuration settings. For example, you might choose to apply Microsoft’s security baseline Group Policy template, which contains hundreds of recommended settings. DSC can be used to apply hundreds of security settings but the required manifests could become unwieldy to manage.

For more information about Microsoft’s security baseline Group Policy templates for Windows, see Microsoft Launches the Security Compliance Toolkit 1.0 on Petri.

Text-based declarative manifest files that determine how servers are configured have several advantages over Group Policy. The first is versioning and change control. The Advanced Group Policy Management (AGPM) tool provides version control for Group Policy but is only available to Microsoft customers with Software Assurance. AGPM is part of the Microsoft Desktop Optimization Pack (MDOP). But text files can be checked in to any source control solution, like GitHub. You are not locked into using a tool that is not widely available and only supports Windows.

On that note, text files don’t require special tools to edit them. Unlike Group Policy Objects (GPOs), which were designed to manage Windows via APIs, text files can be created, edited, and verified by anyone who has permission to read them. Text files are especially suited to the principles of DevOps, which include defining everything in plain text and that all code should be documented and versioned. You can’t script Group Policy settings, they need to set manually in the UI. And there are other arguments in the DSC vs Group Policy debate, such as DSC is easier to extend and is idempotent by nature.

Using Puppet and DSC Together

If DSC and Puppet are very similar, why would you use them both? In scenarios where Linux and Windows co-exist, Puppet is the logical choice because it is more mature than DSC and has a lot of support in the developer community. Besides the ability to manage Linux and Windows, Puppet can manage network devices, like Cisco switches, and cloud infrastructure, such as Azure virtual machines. Puppet has a supported PowerShell DSC module that has been rigorously tested and allows you to use Puppet to configure Windows Server using DSC. While PowerShell DSC can be used to manage Linux, it isn’t backed up by the huge library of modules that are available for Puppet.

The Puppet console dashboard (Image Credit: Russell Smith)

The Puppet Console Dashboard (Image Credit: Russell Smith)

When you download the PowerShell DSC module for Puppet, you get all the DSC resources that are currently available in the PowerShell Gallery at the time the module shipped. So, when using Puppet with DSC, you don’t need to grab DSC resources individually and install them on each client. This is particularly beneficial for servers that don’t have Internet access.

DSC is great but Puppet is a more mature configuration management solution. Unlike DSC, Puppet provides a dashboard that displays an explicit view of the compliance of your entire environment. There’s also the ability to generate reports. Microsoft’s DSC Environment Analyzer (DSCEA) resource creates compliance reports for Power BI or in HTML format but it is an add-on that needs to be configured separately.

Puppet manifests are more concise and intelligent than the DSC counterparts. Dependencies can be indicated using chaining arrows and resources refreshed when a dependent resource changes. Puppet manifests can be validated before they are run and changes simulated before being applied.

PowerShell DSC doesn’t maintain a record of changes made to nodes. Information is recorded about the status of the overall operation in the Event Log on each run, which you can pull out manually. The results can be stored on a DSC pull server if you choose to use one. If you want to see historical changes made to nodes, Puppet is a better solution. You can view historical changes in Puppet’s console with detailed information about the changes made and ‘changed from’ and ‘changed to’ values. If a DSC resource fails to run, the error will appear in the console. You’ll need to use DSC tools to understand why it’s failing but you will be made aware that something is wrong. Puppet also has better central management of configurations, roles, and permissions.

If you are in the process of deciding how to manage your infrastructure, Puppet should be on your radar. Even if you don’t need to manage Linux or other non-Microsoft infrastructure, Puppet offers many advantages over a DSC-only solution. And if you are already familiar with PowerShell DSC, learning how to write Puppet manifests isn’t a big learning curve.

Sponsored

Microsoft has a good introduction to the topic on Channel 9: Better Together: PowerShell Desired State Configuration (DSC) and Puppet. Check it out if you’d like to know more about how PowerShell DSC and Puppet can be used together. Over the next few weeks, I’ll be covering some of the basics of how to use Puppet to manage Windows Server on Petri.

The post PowerShell DSC and Puppet — Why It Is Not Either/Or appeared first on Petri.

Monzo given go-ahead to ‘passport’ banking licence to Republic of Ireland

The content below is taken from the original ( Monzo given go-ahead to ‘passport’ banking licence to Republic of Ireland), to continue reading please visit the site. Remember to respect the Author & Copyright.

 Monzo, one of a number of “challenger” banks in the U.K. aiming to re-invent the current account, has announced the first step in its plans for international expansion with news that is has regulatory approval to operate in the Republic of Ireland. Read More

The History of Unicode

The content below is taken from the original ( The History of Unicode), to continue reading please visit the site. Remember to respect the Author & Copyright.

2048: "Great news for Maine—we're once again an independent state!!! Thanks, @unicode, for ruling in our favor and sending troops to end New Hampshire's annexation. ???️"

How to Multitask in Windows 10 like a Pro

The content below is taken from the original ( How to Multitask in Windows 10 like a Pro), to continue reading please visit the site. Remember to respect the Author & Copyright.

Multitasking has grown so much into us that we have actually forgotten that we are doing it. Any veteran Windows user would be impressed on how much Windows 10 has improved starting from Windows 95. Not only managing multiple apps […]

This post How to Multitask in Windows 10 like a Pro is from TheWindowsClub.com.

If you haven’t already killed Lotus Notes, IBM just gave you the perfect reason to do it now, fast

The content below is taken from the original ( If you haven’t already killed Lotus Notes, IBM just gave you the perfect reason to do it now, fast), to continue reading please visit the site. Remember to respect the Author & Copyright.

Also: Big Blue’s Meltdown, Spectre status updated, and a mystery bug in AIX

IBM has warned that bugs in its Notes auto-updater mean the service can be tricked into running malicious code.…

The best desktop photo-editing apps

The content below is taken from the original ( The best desktop photo-editing apps), to continue reading please visit the site. Remember to respect the Author & Copyright.

Last month we covered the best mobile photo-editing apps, but if you're serious about photography you'll need more than the tools a phone or tablet can provide. Professionals rely on software from Adobe and others because of the power these programs…