Zendesk has always been all about customer service. Last spring it purchased Smooch to move more deeply into messaging app integration. Today, the company announced it was integrating WhatsApp, the popular messaging tool, into the Zendesk customer service toolkit.
Smooch was an early participant in the WhatsApp Business API program. What that does in practice says Warren Levitan, who came over as part of the Smooch deal, is provide a direct WhatsApp phone number for businesses using Zendesk . Given how many people, especially in Asia and Latin America, use WhatsApp as a primary channel for communication, this is a big deal.
“The WhatsApp Business API Connector is now fully integrated into Zendesk support. It will allow any Zendesk support customer to be up and running with a new WhatsApp number quicker than ever before, allowing them to connect to the 1.5 billion WhatsApp users worldwide, communicating with them on their channel of choice,” Levitan explained.
Levitan says the entire WhatsApp interaction experience is now fully integrated into the same Zendesk interface that customer service reps are used to using. WhatsApp simply becomes another channel for them.
“They can access WhatsApp conversations from within the same workspace and agent desktop, where they handle all of their other conversations. From an agent perspective, there are no new tools, no new workflows, no new reporting. And that’s what really allows them to get up and running quickly,” he said.
Customers may click or touch a button to dial the WhatsApp number, or they may use a QR code, which is a popular way of accessing WhatsApp customer service. As an example, Levitan says Four Seasons hotels prints a QR code on room key cards, and if customers want to access customer service, they can simply scan the code and the number dials automatically.
Zendesk has been able to get 1000 businesses up and running as part of the early access program, but now it really wants to scale that and allow many more businesses to participate. Up until now, Facebook has taken a controlled approach to on-boarding, having to approve each brand’s number before allowing it on the platform. Zendesk has been working to streamline that.
“We’ve worked tightly with Facebook (the owner of WhatsApp), so that we can have an integrated brand approval and on-boarding/activation to get their number lit up. We can now launch customers at scale, and have them up and running in days, whereas before it was more typically a multi-week process,” Levitan said.
For now, when the person connects to customer service via WhatsApp, it’s only via text messaging, There is no voice connection, and no plans for any for the time being, according to Levitan. Zendesk-WhatsApp integration is available starting today worldwide.
Azure Lighthouse was launched at Microsoft’s Inspire convention for partners in July and it provides partners with a single pane of glass for managing their customer’s cloud resources in one place. It utilizes Azure’s new Delegated Resource Management (ADRM) feature, which allows customers to delegate control over subscriptions, resource groups, and resources.
According to Erin Chapple, in a blog post introducing Azure Lighthouse, the new service lets partners monitor virtual machine (VM) health across hundreds of customers in a single view and create, update, and resize Azure resources of multiple customers with an API call using one access token. In other words, partners will no longer need to manage clients one-by-one.
Enabling higher automation across the lifecycle of managing customers (from patching to log analysis, policy, configuration, and compliance), Azure Lighthouse brings scale and precision together for service providers at no additional cost and that’s consistently for all licensing constructs customers might choose, including enterprise agreement (EA), cloud solution provider (CSP), and pay-as-you-go.
Microsoft says that the ability to use Lighthouse capabilities natively and through API integration is unique to Azure. For example, partners could use the API with their own monitoring solutions and applications. Another interesting feature is that customers can be onboarded using the Azure Marketplace or Azure Resource Manager (ARM) templates.
Manage Customer Cloud Services Using Azure Lighthouse (Image Credit: Microsoft)
Partners can publish managed services offers to the Azure Marketplace and then manage customers from their partner account. Because there is no need to log in to each customer’s Azure portal to perform management and monitoring functions, Lighthouse provides easier management at scale. Customers can granularly control the resources that partners can access, and customer information is always separated from other clients that partners might be managing.
Azure Portal Improvements for Lighthouse
Microsoft says that it doesn’t matter where customers bought Azure; partners will be able to manage services using Lighthouse. The Azure portal has been enhanced to accommodate Lighthouse. Customers will be able to see all their Managed Service Providers (MSP) and the actions that have been performed, as well as delegate additional resources or remove access for specific partners.
Partners can manage multiple customers in the portal from their own Azure subscription without needing to switch contexts. But Lighthouse isn’t restricted to the portal. It also works with Azure CLI, PowerShell, and ARM templates.
More Flexible Azure Management for Microsoft Partners
Partners managing Office 365 tenants have had similar capabilities for some time. It’s possible to see all managed O365 tenants from the Partner Center. Each customer can be managed separately, and partners can access O365 with global admin rights without having to switch contexts or enter different credentials. Azure Lighthouse works a bit differently but provides similar functionality and it has been carefully thought out to allow partners and customers a lot of flexibility in what can be accessed and how.
For more detailed information about Azure Lighthouse and several demos, including publishing managed services in the Azure Marketplace and managing multiple customers in the Azure management portal, check out this video on Microsoft’s website here.
It’s often imitated, but rarely improved. Artisan pasta maker Silvana Lanzetta shares the official recipe for authentic ragù bolognese as registered with Bologna’s chamber of commerce.
Fintech startup Revolut is launching its stock trading feature today. It’s a Robinhood-like feature that lets you buy and sell shares without any commission. For now, the feature is limited to some Revolut customers with a Metal card.
While Robinhood has completely changed the stock trading retail market in the U.S., buying shares hasn’t changed much in Europe. Revolut wants to make it easier to invest on the stock market.
After topping up your Revolut account, you can buy and hold shares directly from the Revolut app. For now, the feature is limited to 300 U.S.-listed stocks on NASDAQ and NYSE. The company says that it plans to expand to U.K. and European stocks as well as Exchange Traded Funds.
There’s no minimum limit on transactions, which means that you can buy fractional shares for $1 for instance. You can see real-time prices in the Revolut app.
When it comes to fees, Revolut doesn’t charge any fee indeed, but with some caveats. The feature is currently limited to Revolut Metal customers for now. It currently costs £12.99 per month or €13.99 per month to become a Metal customer.
As long as you make less than 100 trades per month, you don’t pay anything other than your monthly subscription. Any trade above that limit costs £1 per trade and an annual custody fee of 0.01%.
Eventually, Revolut will roll out stock trading to other subscription tiers. Revolut Premium will get 8 commission-free trades per month and basic Revolut users will get 3 commission-free trades per month.
Behind the scene, Revolut has partnered with DriveWealth for this feature. This is a nice addition for existing Revolut users. You don’t have to open a separate account with another company and Metal customers in particular get a lot of free trades.
Chromium & Chrome support command line flags, also called as switches. They allow you to run Chrome with special options that can help you troubleshoot or enable particular features or modify otherwise default functionality. In this post, I will share […]
The content below is taken from the original ( AWS gets a chatbot), to continue reading please visit the site. Remember to respect the Author & Copyright.
AWS, Amazon’s cloud computing arm, today announced the beta launch of the AWS Chatbot, a chatty little chap who slides into your Slack and Amazon Chime channels and can inform you of any issues with your AWS resources.
It’s hard to imagine DevOps teams that don’t use Slack or similar tools, so it’s actually a bit of a surprise that AWS, which has long offered all of the tools to build chatbots, didn’t launch a similar service before.
The bot hooks into the Amazon Simple Notification Service (SNS), which in turn allows you to integrate it with other AWS services. Right now, that list includes Amazon Cloudwatch, AWS Health, Budgets, Security Hub, GuardDuty and CloudFormation. That’s not exactly every AWS service, but it covers most of the bases for companies that want to keep an eye on their AWS deployments.
“DevOps teams widely use chat rooms as communications hubs where team members interact—both with one another and with the systems that they operate,” writes AWS’s product manager Ilya Bezdelev in today’s announcement. “Bots help facilitate these interactions, delivering important notifications and relaying commands from users back to systems. Many teams even prefer that operational events and notifications come through chat rooms where the entire team can see the notifications and discuss next steps.”
In good AWS fashion, it takes a bit of work to get everything set up for the AWS chatbot to work.
Right now, though, all of this seems to be a one-way street, too. You can get alerts to Slack, but at least in the beta, you can’t push any commands back to AWS yet. That means this chatbot likes to talk but isn’t much of a listener yet. Chances are, though, we’ll see more of that functionality once it hits general availability.
It would be fair to say that the Raspberry Pi team hasn’t been without its share of hardware issues, with the Raspberry Pi 2 being camera shy, the Raspberry Pi PoE HAT suffering from a rather embarrassing USB power issue, and now the all-new Raspberry Pi 4 is the first to have USB-C power delivery, but it doesn’t do USB-C very well unless you go for a ‘dumb’ cable.
Join me below for a brief recap of those previous issues, and an in-depth summary of USB-C, the differences between regular and electronically marked (e-marked) cables, and why detection logic might be making your brand-new Raspberry Pi 4 look like an analogue set of headphones to the power delivery hardware.
A Trip Down Memory Lane
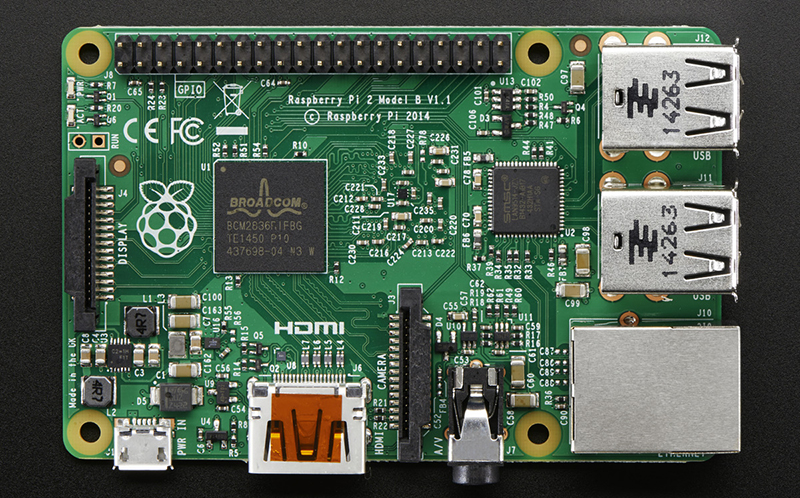
The Raspberry Pi 2, with the camera shy U16 IC in the lower left.
Back in February of 2015, a blog post on the official Raspberry Pi blog covered what they figured might be ‘the most adorable bug ever‘. In brief, the Raspberry Pi 2 single-board computer (SBC) employs a wafer-level package (WL-CSP) that performs switching mode supply functionality. Unfortunately, as is the risk with any wafer-level packaging like this, it exposes the bare die to the outside world. In this case some electromagnetic radiation — like the light from a xenon camera flash — enter the die, causing a photoelectric effect.
The resulting disruption led to the chip’s regulation safeties kicking in and shut the entire system down, fortunately without any permanent damage. The fix for this is to cover the chip in question with an opaque material before doing something like taking any photos of it with a xenon flash, or pointing a laser pointer at it.
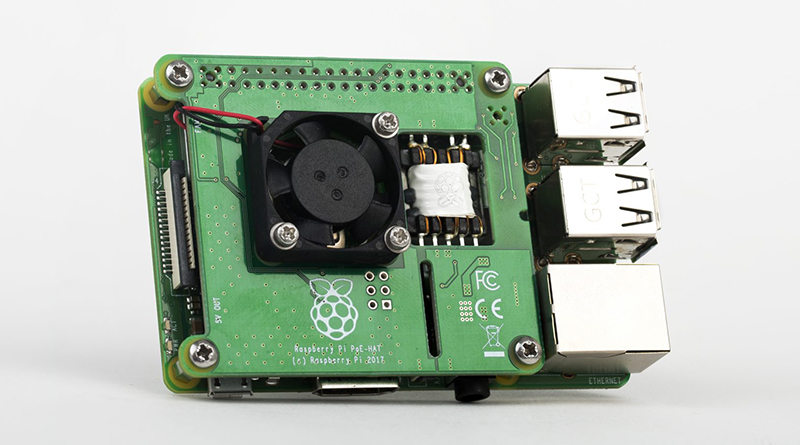
While the Raspberry Pi 2’s issue was indeed hard to predict and objectively more adorable than dangerous, the issue with the Power over Ethernet (PoE) HAT was decidedly less cute. It essentially rendered the USB ports unusable due to over-current protection kicking in. The main culprit here is the MPS MP8007 PoE power IC (PDF link), with its relatively sluggish flyback DC-DC converter implementation being run at 100 kHz (recommended <200 kHz in datasheet). Combined with a lack of output capacity (41% of recommended), this meant that surges of current were being passed to the USB buffer capacitors during each (slow) power input cycle, which triggered the USB chipset’s over-current protection.
Raspberry Pi board fitted with a PoE HAT
The solution here was a redesign of the PoE HAT, which increased the supply output capacitance and smoothed the output as much as possible to prevent surges. This fixed the problem, allowing even higher-powered USB devices to be connected. The elephant-sized question in the room was of course why the Raspberry Pi team hadn’t caught this issue during pre-launch testing.
USB Type-C is Far More Than Just a Connector
The new Raspberry Pi 4 was just released a few weeks ago, and is the biggest overhaul of the platform since the original Model B+ that defined the ‘Raspberry Pi form factor‘. But in less than a week we started hearing about a flaw in how the USB-C power input was behaving. It turns out the key problem is when using electronically marked cables which include circuitry used by the USB-C specification to unlock advanced features (like supplying more power or reconfiguring what signals are used for between devices). These e-marked cables simply won’t work with the Pi 4 while their “dumb” cousins do just fine. Let’s find out why.
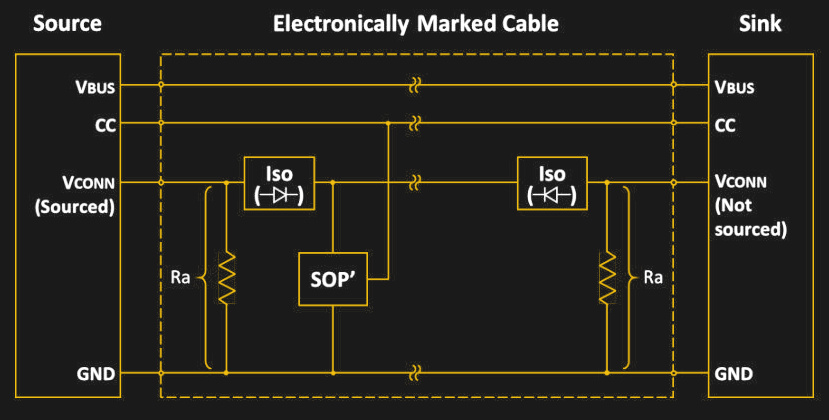
The USB-C specification is quite complex. Although mechanically the USB-C connector is reversible, electrically a lot of work is being performed behind the scenes to make things work as expected. Key to this are the two Configuration Channel (CC) pins on each USB-C receptacle. These will each be paired to either the CC wire in the cable or (in an e-marked cable) to the VCONN conductor. A regular USB-C cable will leave the VCONN pin floating (unconnected), whereas the e-marked cable will connect VCONN to ground via the in-cable Ra resistor as we can see in this diagram from the USB-C specification.
It’s also possible to have an e-marked USB-C cable without the VCONN conductor, by having SOP ID chips on both ends of the cable and having both the host and the device supply the cable with VCONN. Either way, both the host and device monitor the CC pins on their end measure the resistance present through the monitored voltage. In this case, the behavior of the host is dictated by the following table:
The Analog Raspberry Pi 4
Now that we have looked at what a basic USB-C setup looks like, it’s time to look at the subject of this article. As the Raspberry Pi team has so gracefully publicized the Raspberry Pi 4 schematics (minus the SoC side for some reason), we can take a look at what kind of circuit they have implemented for the USB-C sink (device) side:
As we can see here, contrary to the USB-C specification, the Raspberry Pi design team has elected to not only connect CC1 and CC2 to the same Rd resistor, but also shorted CC1 and CC2 in the process.
Remember, the spec is looking for one resistor (Rd) on each of the two CC pins. That way, an electronically marked cable connecting the Pi 4 board and a USB-C charger capable of using this standard would have registered as having the appropriate Rd resistance, hence 3A at 5V would have been available for this sink device.
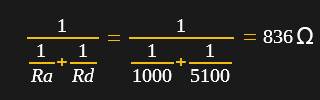
Since this was however not done, instead we get an interesting setup, where the CC connection is still established, but on the Raspberry Pi side, the resistance doesn’t read the 5.1 kOhm of the Rd resistor, as there’s still the Ra resistor in the cable on the other CC pin of the receptacle. The resulting resistor network thus has the values 5.1k and 1k for the Rd and Ra resistors respectively. This circuit has an equivalent circuit resistance of 836 Ohm.
This value falls within the range permitted for Ra, and thus the Raspberry Pi 4 is detected by the source as Ra + Ra, meaning that it is an audio adapter accessory, essentially a USB-C-to-analog audio dongle. This means that the source does not provide any power on VBUS and the Raspberry Pi 4 will not work as it does not get any power.
In the case of a non-electronically marked cable, this would not be an issue as mentioned earlier, as it doesn’t do this form of detection, with no Ra resistor to get in the way of making the Raspberry Pi 4 do its thing.
Testing is More Important than Developing
Much like with the PoE HAT issue, the question was quickly raised: why wasn’t this issue with the Raspberry Pi 4’s USB-C port found much sooner during testing. Back with the Pi 2 PoE HAT, the official explanation from the Raspberry Pi team was that they had not tested with the appropriate devices, had cut back on testing because they were late with shipping and did not ask the field testers the right questions, leading to many scenarios simply not being tested.
In a response to Tech Republic, the CEO of Raspberry Pi Ltd, Eben Upton has admitted to the Pi 4 USB-C error. And a spokesperson for Raspberry Pi Ltd said in a response to Ars Technica that an upcoming revision of the Raspberry Pi 4 is likely to appear within the “next few months”.
It seems obvious how The obvious cause for why this error managed to sneak its way into production. production seems obvious. Much like with the PoE HAT, a design flaw snuck in, no one caught it during schematic validation, the prototype boards didn’t see the required amount of testing (leaving some obvious use cases untested), and thus we’re now seeing another issue that leaves brand new Raspberry Pi hardware essentially defective.
Sure, it’s possible to hack these boards as a workaround. With the PoE HAT one could have soldered on a big electrolytic capacitor to the output stage of the transformer’s secondary side and likely ‘fixed’ things that way. Similarly one could hack in a resistor on the Raspberry Pi 4 after cutting a trace between both CC pins… or even simpler: never use an e-marked USB-C cable with the Raspberry Pi 4.
Yet the sad point in all of this is undoubtedly that these are supposed to be ready-to-use, fully tested devices that any school teacher can just purchase for their classroom. Not a device that first needs a trip down to the electronics lab to have various issues analyzed and bodge wires and components soldered onto various points before being stuffed into an enclosure and handed over to a student or one’s own child.
The irony in all of this is that because of these errors, the Raspberry Pi team has unwittingly made it clear to many that testing hardware isn’t hard, it just has to be done.
Compliant USB-C is Not Easy
In the course of writing this article, yours truly had to dive deep into the USB-C specification, and as a point of fairness to the Raspberry Pi design team, the first time implementing USB-C is not a walk in the park. Of all specifications out there, USB-C does not rank very high in user-friendliness or even conciseness. It’s a big, meandering, 329 page document, which does not even cover the monstrosity that’s known as USB-C Power Delivery.
Making a mistake while implementing a USB-C interface during one’s first time using it in a design is not a big shame. The USB-C specification adds countless details and complexities that simply do not exist in previous versions of the USB standard. Having this mess of different types of cables with many more conductors does not make life easier either.
The failure here is that the USB-C design errors weren’t discovered during the testing phase, before the product was manufactured and shipped to customers. This is something where any team that has been involved in such a project needs to step back and re-evaluate their testing practices.
The content below is taken from the original ( Gesture Controlled Doom), to continue reading please visit the site. Remember to respect the Author & Copyright.
The setup consists of a Jetson Nano fitted with a camera, which films the player and uses a convolutional neural network to recognise the player’s various gestures. Once recognised, an API request is sent to a laptop playing Doom which simulates the relevant keystrokes. The laptop is hooked up to a projector, creating a large screen which allows the wildly gesturing player to more easily follow the action.
The neural network was trained on 3300 images – 300 per gesture. [Nick] found that using a larger data set actually performed less well, as he became less dilligent in reliably performing the gestures. This demonstrates thatt quality matters in training networks, as well as quantity.
Reports are that the network is fairly reliable, and it appears to work quite well. Unfortunately, playability is limited as it’s not possible to gesture for more than one key at once. Overall though, it serves as a tidy example of how to do gesture recognition with CNNs.
French startup Stonly wants to empower users so that they can solve their issues by themselves. Instead of relying on customer support agents, Stonly wants to surface relevant content so that you can understand and solve issues.
“I’m trying to take the opposite stance of chatbots," founder and CEO Alexis Fogel told me. “The issue [with chatbots] is that technology is not good enough and you often end up searching through the help center.”
If you’re in charge of support for a big enough service, chances are your customers often face the same issues. Many companies have built help centers with lengthy articles. But most customers won’t scroll through those pages when they face an issue.
That’s why Stonly thinks you need to make this experience more interactive. The service lets you create scripted guides with multiple questions to make this process less intimidating. Some big companies have built question-based help centers, but Stonly wants to give tools to small companies so that they can build their own scenarios.
A Stonly module is basically a widget that you can embed on any page or blog. It works like a deck of slides with buttons to jump to the relevant slide. Companies can create guides in the back end without writing a single line of code. You can add an image, a video and some code to each slide.
At any time, you can see a flowchart of your guide to check that everything works as expected. You can translate your guides in multiple languages as well.
Once you’re done and the module is live, you can look back at your guides and see how you can improve them. Stonly lets you see if users spend more time on a step, close the tab and drop in the middle of the guide, test multiple versions of the same guide, etc.
But the startup goes one step further by integrating directly with popular support services, such as Zendesk and Intercom. For instance, if a user contacts customer support after checking a Stonly guide, you can see in Zendesk what they were looking at. Or you can integrate Stonly in your Intercom chat module.
As expected, a service like Stonly can help you save on customer support. If users can solve their own issues, you need a smaller customer support team. But that’s not all.
“It’s not just about saving money, it’s also about improving engagement and support,” Fogel said.
Password manager company Dashlane is a good example of that. Fogel previously co-founded Dashlane before starting Stonly. And it’s one of Stonly’s first clients.
“Dashlane is a very addictive product, but the main issue is that you want to help people get started,” he said. It’s true that it can be hard to grasp how you’re supposed to use a password manager if you’ve never used one in the past. So the onboarding experience is key with this kind of products.
Stonly is free if you want to play with the product and build public guides. But if you want to create private guides and access advanced features, the company has a Pro plan ($30 per month) and a Team plan (starting at $100 per month with bigger bills as you add more people to your team and use the product more extensively).
The company has tested its product with a handful of clients, such as Dashlane, Devialet, Happn and Malt. The startup has raised an undisclosed seed round from Eduardo Ronzano, Thibaud Elzière, Nicolas Steegmann, Renaud Visage and PeopleDoc co-founders. And Stonly is currently part of the Zendesk incubator at Station F.
Enterprise features including Enterprise features includiing support for hated ancient browser ready to evaluate
Microsoft had to consider businesses’ addiction to Internet Explorer 11 in its roadmap for Edge Enterprise, the business aspect of its new web browser based on Google’s Chromium project.…
Richard Ashbery, known for his ArtWorks, er, artworks1, has launched a new website dedicated to graphics programming in the version of BBC BASIC supplied on RISC OS Computers. The riscosbasic.uk site is aimed at anyone interested in creating geometric art through programing in BBC BASIC, and takes its inspiration from the collection of 55 BBC […]
Power Configuration or powercfg.exe powercfg is a command-line tool in Windows which allows you to configure power system settings. It is especially useful for laptops which run on battery and will enable you to configure hardware-specific configurations which are directly not[…]
The successor to Sony’s highly acclaimed A7R III has arrived. Today, at an event in New York City, the company introduced its A7R IV, a full-frame mirrorless camera that comes with a whopping 61-megapixel Exmor R sensor. Sony says this his new shooter is…
In the Instagram and YouTube age, your outdoor adventures basically didn't happen unless there are good images and videos to share. At least that's how it feels sometimes. So why is it that your photos and carefully curated montage clips don't visual…
In time for the holidays, Toys “R” Us parent company Tru Kids is planning to open two permanent stores. This time around, the stores will include things like theaters for movies and video games, STEAM (Science Technology Engineering Art and Math) wor… workshops and a treehouse where kids can play. To…
Lotus decided to make its latest hypercar not only all-electric but also incredibly powerful. The Evija is the company’s first car with an electrified powertrain, which translates into a disgusting amount of power (2,000 PS or roughly 1973 in horsepo…
DJI's new Ronin gimbal for mirrorless cameras was designed to be a compact version of the Ronin-S, making it much easier to carry for your photo or YouTube shoots. The single-handed 3-axis model, called Ronin-S Compact (or Ronin-SC), weighs only 2.4…
The content below is taken from the original ( Southwest Show videos now online), to continue reading please visit the site. Remember to respect the Author & Copyright.
The recordings of the four talks given at the 2019 RISC OS Southwest Show are now available to view on YouTube. I planned to spend a little time looking at and editing these videos, but in the end – other than trimming the start and finish, and joining sections together – decided not to because […]
The trucking world has been inundated in recent years by startups and large companies alike pitching an array of automated driving technology and business strategies, all aiming to solve the big three problems with freight: safety, fuel costs and driver shortages.
For Peloton Technology, a Silicon Valley company that launched in 2011, the answer doesn’t strip out the human driver. Instead, it wants to augment a human truck driver’s ability with automated vehicle technology. The company, which has raised $78 million from BP Ventures, Intel Capital, Volvo Group and a dozen other venture and strategic investors, wants to commercialize a partially automated vehicle platooning system that enables two trucks (and someday, maybe a whole string of them) to operate at close following distances.
Peloton Technology already has a product called PlatoonPro that six customers are using in their freight operations. Now, the company has unveiled an advanced product called Level 4 Automated Following that it says will double the productivity of truck drivers. Peloton Technology revealed details on the new automated platooning system Wednesday at the Automated Vehicle Symposium 2019 in Orlando.
PlatoonPro is considered a “Level 1” driver assistance system that requires drivers in both the lead and follow trucks. In this system, the driver in the follow truck must steer the vehicle. The system controls the powertrain and brakes to allow a close following distance and immediately reacts to acceleration or braking by the lead truck. The system boosts fuel savings by an average of 7%, the company says.
With the The new Automated Following system, a human driver is in the lead truck. But this time, the follow truck won’t have a human driver. The system combines vehicle-to-vehicle communication with radar-based active braking and software. Together, the human driver in the lead vehicle is able to guide the steering, steering acceleration and braking of the follow truck and connects the safety systems between the trucks with minimal latency, according to Peloton Technology.
“We’ve taken a different approach to commercial introduction of automation in Class 8 vehicles,” class 8 vehicles.” Peloton Technology CEO Josh Switkes said. “We see the drivers as the world’s best sensors, and we are leveraging this to enable today’s drivers to be more productive through automated following platoons.”
And Switkes isn’t kidding. The human driver is front and center to this technology. The lead truck relies completely on the skill set of the professional truck driver. The system works alongside any of the driver assistance features like collision warnings or automatic emergency braking that might come with the Class 8 truck. But it does not provide additional driver assistance features.
The L4 Automated Following product, which is being tested internally, will double the amount of freight a truck driver can haul in a single trip, according to the company.
VFX artists had a go with the feature film Cats. Universal unveiled a full-length trailer today that gave us the first look at what the film's human actors look like as CG-transformed felines. While the Broadway version of Cats relied on elaborate co…
Editor’s note:This is the second post in an ongoing tips series. If your company recently switched to Chrome OS, use these tips to get up to speed. If you’re an IT administrator, pass these tips along to your users to help them stay productive.
Last month, we shared tips on how to use a Chromebook if you switched from previously using a Mac. This month, we’ll explore similar topics for PC users, answering questions about keyboard shortcuts and finding files. If you’ve recently switched from using a PC with a Windows operating system to a Chromebook with Chrome OS, here are four must-read tips to help you get started.
1. How do I locate my apps and files? You’re probably used to accessing files and apps via the Start Menu on the bottom left-hand side of your PC. On a Chromebook, you access files and apps from the Launcher, which is the button that looks like a circle with a dot in the bottom of your screen.
Here’s how to use the Launcher: If you don’t have a touchscreen, click anywhere on the Launcher button. If you have a touchscreen, drag your finger up from the bottom part of your screen (we call this the “app shelf”). The Launcher will pop up—this is where you can access all of your apps, including Gmail, Google Drive, Docs, Sheets and Slides, as well as YouTube.
If you need to find a specific app, document or file, you can search in the search bar at the top of Launcher. Using predictive text based on machine learning, Google Search helps you find what you need quickly, whether it’s tracking down an app to use, searching the web, or finding a specific Doc you created.
2. How do I take a screenshot? If you want to take a screenshot of your entire screen on a Chromebook, press Ctrl + the Show windows button (Ctrl + F5). To capture a partial screenshot, press Shift + Ctrl + Show windows (Shift + Ctrl + F5), then click and drag your cursor over the exact area you want to capture. To take a screenshot on tablets, press the Power button + the Volume down button at the same time.
While we’re on the topic, there are loads of ways to work more efficiently with keyboard shortcuts. Check out our Help Center for other shortcut ideas.
3. How do I change my settings? For users familiar with a PC, the control panel is the place where you access settings like screen resolution, keyboard preferences, and privacy and security. On a Chromebook, you’ll find all of these options in Settings, which can be accessed in the bottom right of your screen.
Click the time in the bottom right corner of your screen. It will pull up different tools for you to use.
Click the gear/settings icon in the top right.
Scroll down to the setting options that interest you and make sure they match your needs.
Note: clicking “Advanced” at the bottom will get you even more options for settings. You can also enter keywords in the search bar to locate a specific setting.
4. How do I set up right-click? Right-click works a little differently on a Chromebook than on a PC (where you typically hit Shift + F10). You can either press the touchpad with two fingers to open the right-click menu, or you can click “Alt” and use just one finger on the touchpad. Once you do, you can scroll, moving left and right to move horizontally or up and down to move vertically. You can also switch your scroll direction. This article explains how, along with other helpful touchscreen tips.
Resources for IT admins to help users If you’re an IT admin, use these tips to help former PC users adjust to Chromebooks, or keep an eye out for more advice you can share—we’ll link new posts here as we publish them.


 Manage Customer Cloud Services Using Azure Lighthouse (Image Credit: Microsoft)


 Chromium & Chrome support command line flags, also called as switches. They allow you to run Chrome with special options that can help you troubleshoot or enable particular features or modify otherwise default functionality. In this post, I will share


 Power Configuration or powercfg.exe
  The successor to Sony’s highly acclaimed A7R III has arrived. Today, at an event in New York City, the company introduced its A7R IV, a full-frame mirrorless camera that comes with a whopping 61-megapixel Exmor R sensor. Sony says this
  In the Instagram and YouTube age, your outdoor adventures basically didn't happen unless there are good images and videos to share. At least that's how it feels sometimes. So why is it that your photos and carefully curated montage clips don't visual…
 In time for the holidays, Toys “R” Us parent company Tru Kids is planning to open two permanent stores. This time around, the stores will include things like theaters for movies and video games, STEAM (Science Technology Engineering Art and Math) wor…

 DJI's new Ronin gimbal for mirrorless cameras was designed to be a compact version of the Ronin-S, making it much easier to carry for your photo or YouTube shoots. The single-handed 3-axis model, called Ronin-S Compact (or Ronin-SC), weighs only 2.4…
 VFX artists had a go with the feature film Cats. Universal unveiled a full-length trailer today that gave us the first look at what the film's human actors look like as CG-transformed felines. While the Broadway version of Cats relied on elaborate co…