Microsoft’s Cloud PCs debut – priced between $20 and $158 a month

The content below is taken from the original ( Microsoft’s Cloud PCs debut – priced between $20 and $158 a month), to continue reading please visit the site. Remember to respect the Author & Copyright.

We tried ’em on Windows, iOS and Android, and can’t say they’re very exciting

First Look Microsoft has revealed the full range of options and pricing for its Windows 365 Cloud PCs, and The Register is not impressed – on price or performance.…

‘It’s the right thing to do, which is why it’s free’ – new ‘Carbon’ platform aims to give sustainability leg-up to 1,000 UK resellers

The content below is taken from the original ( ‘It’s the right thing to do, which is why it’s free’ – new ‘Carbon’ platform aims to give sustainability leg-up to 1,000 UK resellers), to continue reading please visit the site. Remember to respect the Author & Copyright.

'It's the right thing to do, which is why it's free' - new 'Carbon' platform aims to give sustainability leg-up to 1,000 UK resellers

A consultancy run by a gang of former HP execs is aiming to give the mass UK channel a leg-up on sustainability through its new platform.

Headed up by a quartet of HP alumni including former UK channel boss Trevor Evans, Consenna today unveiled ‘Carbon’, a free-to-use platform featuring a menu of self-serve, sustainability-focused marketing campaigns, training and education.

Evans joined Consenna as MD in 2019 after a spell at Apple, in the process reuniting with former HP colleagues Douglas Jeffrey and Paul Thompson, the former of whom founded Consenna in 2009. Another HP alumni, Simon Yates, has since joined in the role of product management director.

Talking to CRN, Evans said that Carbon is designed to appeal to smaller resellers who lack the inhouse clout to respond to rocketing customer demand for sustainable IT solutions. He cited research suggesting that at least 60 per cent of customers are now willing to pay more for a sustainable product or service.

“What we’re trying to do with Carbon is make it possible for every partner, in short order, to have products, services, campaigns, collateral, training – all the things that ordinarily a customer would ask for – at their fingertips in an unbiased way,” he said.

“It will appeal to companies who know their customers are asking for [sustainable IT solutions], and know their competition can offer it, but don’t know where to go in their company to provide it. We’d like to almost be that extended person in their office sat virtually at the click of a mouse. That’s our vision.”

Carbon will point reseller sales staff towards solutions in areas such as carbon offsetting and recycling, Evans indicated.

“It will have some go-to-places for a channel sales person to respond to a customer and say ‘I can provide this sustainability thread to the products I’m providing. I can tell you their carbon impact and give you a way to offset it, if that’s what you want to do’.

“We know there are some relatively good practices emerging in some areas of the channel to promote that, but we want to be able to offer it to the broader spectrum. Why should a particular reseller be at a disadvantage in their portfolio offerings just because they don’t know where to go?”

Consenna is aiming to enlist at least 1,000 resellers to Carbon by the end of the year. A distributor is likely to be recruited in the coming days, Evans added.

Positioning itself as a “provider of products and services to vendors that enable them to better leverage the channel”, Consenna’s headcount has risen from three to nearly 20 in the space of two years, with Evans brought on to help expand its repertoire.

It counts vendors such as HP, Lenovo, Microsoft and Fujitsu as its customers, but Carbon is both free and vendor-agnostic, Evans stressed.

“The reason Carbon evolved is because it’s the right thing to do, which is why it’s free. We feel strongly this is something our industry needs to address and we want to play a small part in that,” he said.

Hands On With the Raspberry Pi POE+ HAT

The content below is taken from the original ( Hands On With the Raspberry Pi POE+ HAT), to continue reading please visit the site. Remember to respect the Author & Copyright.

There’s a lot happening in the world of Pi. Just when we thought the Raspberry Pi Foundation were going to take a break, they announced a new PoE+ HAT (Hardware Attached on Top) for the Pi B3+ and Pi 4, and just as soon as preorders opened up I placed my order.

Now I know what you’re thinking, don’t we already have PoE HATs for the Pis that support it? Well yes, the Pi PoE HAT was released back in 2018, and while there were some problems with it, those issues got cleared up through a recall and minor redesign. Since then, we’ve all happily used those HATs to provide up to 2.5 amps at 5 volts to the Pi, with the caveat that the USB ports are limited to a combined 1.2 amps of current.

PoE vs PoE+
$20 for either of them. Choose wisely.

The Raspberry Pi 4 came along, and suddenly the board itself can pull over 7 watts at load. Combined with 6 watts of power for a hungry USB device or two, and we’ve exceeded the nominal 12.5 watt power budget. As a result, a handful of users that were trying to use the Pi 4 with POE were hitting power issues when powering something like dual SSD drives over USB. The obvious solution is to make the PoE HAT provide more power, but the original HAT was already at the limit of 802.3af PoE could provide, with a maximum power output of 12.95 watts.

The solution the Raspberry Pi Foundation came up with was to produce a new product, the PoE+ HAT, and sell it along side the older HAT for the same $20. The common name for 802.3at is “PoE+”, which was designed specifically for higher power devices, maxing out at 30 watts. The PoE+ HAT is officially rated to output 20 watts of power, 5 volts at 4 amps. These are the output stats, so the efficiency numbers don’t count against your power budget, and neither does the built-in fan.

More Watts Than We Bargained For

The official specs don’t tell the full story, evidenced by the initial announcement that claimed 5 amps instead of 4. That discrepancy bugged me enough, I reached out to the man himself, CEO [Eben Upton]. The head honcho confirmed:

The spec is that it will supply 20W, but it’s been designed to 25W to give us some engineering margin

So if you want to be super conservative, and ensure the longest possible life, keep your power draw at or under 20 watts. I tested the HAT to the point where it gave up, and not to let the cat out of the bag, 25 watts is still a bit conservative. More on that later.


We know there’s a lot of available power here, but it’s not exactly easy to get to. For instance, the Pi 4 can push up to 1.2 Amps of power through the USB ports. At 5 volts, that’s only 6 watts of power, where’s the rest? In theory there’s a simple answer, as the HAT delivers power back through the 5v GPIO pins. All we need to do is jumper on to those pins and… Those pins don’t protrude through the HAT at all.

Really an amateur job, but it works!

I would have loved to see an official solution to make the GPIO pins accessible with the HAT on, and not a inelegant solution like using those hokey pin extenders that were recommended for the original PoE HAT. Are we foiled, then? Nope. You see, there’s a good 1/4 inch of GPIO pin visible between the Pi and the HAT. It’s just enough room for a good old fashioned wire-wrapped connection, along with some solder for safety.

OK, now we have access to more than 6 watts of power. There are two obvious questions: How much power, and what can we do with it? To kill two birds with one proverbial stone, I grabbed a string of RGB LEDs and wired the voltage supply directly into the 5v rail. The PoE+ HAT has a wonderful feature — it adds a sysnode that tells you exactly how much current the HAT is providing. cat /sys/devices/platform/rpi-poe-power-supply@0/power_supply/rpi-poe/current_now

For testing the HAT, I invented a new unit of measure, the Cyberpunk Neon-purple Pixel. I used the PoE+ HAT to measure the power consumed by the Pi and Pixels, also recorded the power use reported by the PoE switch, and used a non-contact IR thermometer to find the hottest point on the HAT after a few minutes of powering the LED strip.

I repeated the experiment with the original PoE HAT, and you can review my raw results if you’d like. There are a couple minor caveats, mostly related to temperature measurement. My IR Thermometer doesn’t provide the rich data that a full IR camera does. Additionally, I was limited to measuring just one side of the PoE boards. I believe that the hottest spots on the original PoE HAT are on the underside of the board, while on the new HAT, seem to be on the side facing away from the Pi — that’s a win in itself. All that to say, my temperature measurements of the original HAT are probably quite a bit too low.

More Launch Problems?

So remember how the first iteration of the PoE HAT had some problems? The big one was that some USB devices could trip the over-current protection at much lower levels than they should have. There was the additional issue of the board getting ridiculously hot at full load. There have been reports of the PoE+ version having some similar launch warts. The problems that have been identified are: high temperature, high power draw from the HAT itself at idle, the 1.2 amp USB limit, a long bolt that contacts the camera connector, a louder fan, and odd behavior when powering the Pi and HAT over the USB C connector. I’ll step through these one at a time. These are legitimate concerns, and I’m not necessarily here to debunk them, but I will put them in context of my own testing. Edit: Shoutout to Jeff Geerling and Martin Rowan, linked above and below, for their early work on reviewing the PoE+ HAT.

First up is temperature. The PoE+ HAT measures nearly 52°C at idle, at its hottest measured point. That is quite warm, and is hotter than the 44.5°C I observed on the original PoE HAT under similar conditions. This seems to be in contention with what [Eben] had to say about temperatures:

Thanks to improved thermal design it should run cooler (measured at the hottest point on an uncased board) at any load.

I can think of one explanation that satisfies all the observations. The original HAT’s hottest point is between the HAT and the Pi itself. This is observable in the EEVBlog video linked above. I tested with the HATs installed on the Pis, making it essentially impossible to get a reading on the underside. Setting that explanation aside, my measurements indicated that the original HAT got very hot at higher power outputs, while the PoE+ HAT stayed quite stable. Above 7 watts of power output, the new HAT ran cooler as per my measurements.

The PoE+ HAT pulls 4.9+ watts of power to run an idling Raspberry Pi 4. The original HAT does the same thing for as little as 2.9 watts. At low power levels, the original HAT is definitely more efficient. The difference is that the original HAT runs at about 78% efficiency no matter how much power is being drawn, while the new PoE+ HAT can be as much as 88% efficient at higher power levels. The crossover point is somewhere between 1.5 and 2 amps of output. If power efficiency is of concern, you might want to stick with the original HAT for lower power use.

The USB ports on the Pis only supply 1.2 amps. This is annoying, but isn’t a weakness of the PoE HAT at all. We can hope for a future Pi revision that raises that limit. Until then, the workaround of tapping power directly from the 5v rail works nicely.

As for the long bolt, I’ll let [Eben]’s response speak for itself:

A number of people have found that the bolt touches, but does not damage, their camera connector. We’re likely to back it off to an 11mm bolt (10mm, as has been suggested in one or two places, is definitely too short) in a future production run.

The fan is louder at full speed, but quieter at its lowest speed. Additionally, it moves more air at full speed, 2.4 CFM compared to 2.2 from the older hardware. With a few tweaks to the fan’s trigger temperatures, the new fan can be quite a bit quieter overall. Just a note, if you have the PoE+ HAT, and the fan isn’t spinning at all, you probably need to pull the latest updates for the Raspberry Pi OS, as the enablement code has landed quite recently.

The final complaint is that the PoE+ HAT doesn’t properly block backfed power when it’s left on a Pi powered via the USB C plug. There is an annoying coil wine, and the HAT actually powers the high voltage side of its power supply circuit. This is obviously not ideal behavior. It would have been nice to have the backfeed protection, but the official documentation does address this: “When the Raspberry Pi PoE+ HAT is connected to your Raspberry Pi, your Raspberry Pi should only be powered through the ethernet cable. Do not use any additional method to power the Raspberry Pi.”

How Much Power

Cyberpunk Purple Pixels

Once I had my cyberpunk lighting rig set up, I thought it would be useful to find the hard limits and see how many pixels each HAT could power. The original HAT lit up 75 of them, but trying for 76 tripped the overcurrent protection. That indicates that 2.5 amps of output power is the threshold.

Now how many pixels can we turn cyberpunk purple with the PoE+ HAT? Once I hit 250 pixels, the resistance of the strip became a major factor, and increasing the driven pixels wasn’t really increasing the load. The last pixels were a noticeably different color as a result. To continue the experiment, I switched over to testing at pure white, AKA the individual red, green, and blue LEDs turned to 100% brightness. In this configuration, I was able to drive 140 pixels. The PoE+ Hat reported a maximum current of 5.4 amps, while my PoE switch showed that port pulling 30.6 watts of power, at a respectable 87.9% efficiency. The hard limit I finally hit was 5.5 amps at the HAT, at which point the Pi power cycled.

After a few minutes of driving the PoE+ HAT way beyond its rated power output, I measured 56.8°C at the hottest point I could find. That is an impressive, tough little board. I wouldn’t be comfortable running at those levels for long, or unattended, but it’s nice to know that it does work, and no magic smoke was released. Based on what Eben had to say about the device, 25 watts of power seems like the maximum power number to aim for. Given that the Pi itself will take at least 2.5 watts, essentially at idle, that leaves 22.5 watts of power you can potentially use for something clever. And all this with just an Ethernet cable running to the Pi. So the question, is what can you do with 22.5 watts? LED lighting is the idea that was obvious to me, but I’m confident the Hackaday community will continue to surprise me in what you can come up with, so let us know what you want to do with the PoE+ HAT.

Force all clients to only use the set DNS server of PFSense.

The content below is taken from the original ( Force all clients to only use the set DNS server of PFSense.), to continue reading please visit the site. Remember to respect the Author & Copyright.

submitted by /u/No-Introduction6905 to r/PFSENSE
[link] [comments]

10 Gigabit Ethernet for the Pi

The content below is taken from the original ( 10 Gigabit Ethernet for the Pi), to continue reading please visit the site. Remember to respect the Author & Copyright.

When people like Bell and Marconi invented telephones and radios, you have to wonder who they talked to for testing. After all, they had the first device. [Jeff] had a similar problem. He got a 10 gigabit network card working with the Raspberry Pi Compute Module. But he didn’t have any other fast devices to talk to. Simple, right? Just get a router and another network card. [Jeff] thought so too, but as you can see in the video below, it wasn’t quite that easy.

Granted, some — but not all — of the hold-ups were self-inflicted. For example, doing some metalwork to get some gear put in a 19-inch rack. However, some of the problems were unavoidable, such as the router that has 10 Gbps ports, but not enough throughput to actually move traffic at that speed. Recabling was also a big task.

A lot of the work revolved around side issues such as fan noises and adding StarLink to the network that didn’t really contribute to the speed, but we understand distractions in a project.

The router wasn’t the only piece of gear that can’t handle the whole 10 Gbps data stream. The Pi itself has a single 4 Gbps PCI lane, so the most you could possibly get would be 4 Gbps and testing showed that the real limit is not quite 3.6 Gbps. That’s still impressive and the network card offloading helped the PI’s performance, as well.

On a side note, if you ever try to make videos yourself, watching the outtakes at the end of the video will probably make you feel better about your efforts. We all must have the same problems.

If you want to upgrade to 10Gb networking on the cheap, we have some advice. Just be careful not to scrimp on the cables.

Microsoft to apply Project Natick findings to ‘both land and sea datacentres’

The content below is taken from the original ( Microsoft to apply Project Natick findings to ‘both land and sea datacentres’), to continue reading please visit the site. Remember to respect the Author & Copyright.

Microsoft to apply Project Natick findings to 'both land and sea datacentres'

A year after retrieving an experimental underwater datacentre from the Scottish seabed, Microsoft says it will look to apply its findings to both land- and sea-based datacentre builds. 

Microsoft dropped the 40-foot container off the coast of Orkney in 2018 to help inform its datacentre sustainability strategy. 

Talking to CRN, Spencer Fowers, principal member of technical staff at Microsoft Research, said the software giant is still in the process of analysing the data from the 864 servers that sat inside the capsule, which was pulled from the sea last July.  

The servers in the Natick datacentre were found to have one-eighth the failure rate of those on land, he explained. 

“And as we’ve begun to examine that, we’ve found that some of the biggest contributors to that increase in reliability have been the nitrogen environment, and then also just the hands-off style – there’s nobody inside to jostle the components or bump and disconnect things,” Fowers said. 

“That’s really improved our reliability.  

“We’re taking those findings and looking at ways we can apply them to improving land-based and underwater datacentres in the future.” 

Race to zero

With datacentres reportedly on course to generate two per cent of global Co2 by 2025, datacentre sustainability is a hot topic for channel partners looking to offer their customers the most sustainable compute options possible. 

All eyes are on the hyperscalers to up their game, with Google recently giving customers visibility over the Co2 emissions of its datacentre regions. 

Microsoft kicked off Project Natick back in 2014 with a 90-day deployment off the coast of California to determine if underwater datacentres were viable. 

The world’s oceans offer “free access” to cooling – which is one of the biggest costs for land-based datacentres, Fowers pointed out.

“You also get the benefit of proximity to customers – over 50 per cent of the world’s population lives within 200km of the sea,” he said. 

The Orkney deployment represented phase two of the project, Fowers explained. 

“The goal of phase two was to determine whether we could build a manufacturable underwater datacentre in a 90-day decision to power-on timeframe,” he said.

The project feeds into Microsoft’s goal of becoming carbon negative by 2030.

“We’ve made these big announcements around sustainability, and project Natick is a great example of how we are trying to find practical solutions,” he said. 

Planning for Windows 11 Deployment? This guide will help you get started

The content below is taken from the original ( Planning for Windows 11 Deployment? This guide will help you get started), to continue reading please visit the site. Remember to respect the Author & Copyright.

Windows 11 Deployment
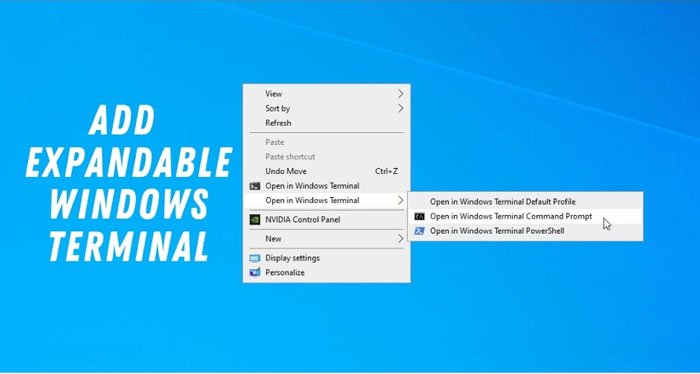
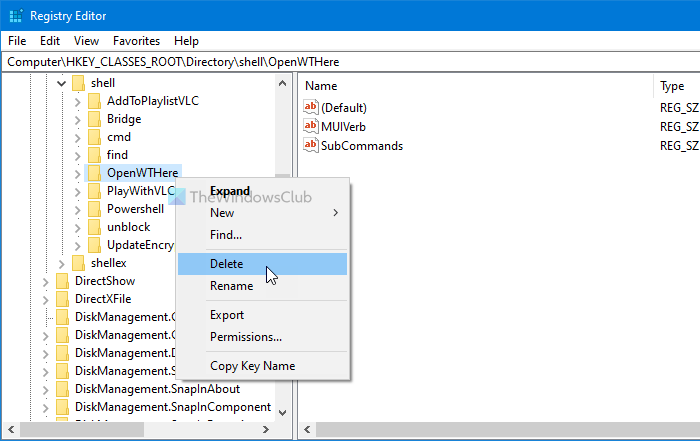
There are many things that are new with Windows 11, and businesses at some point will be looking to deploy Windows 11. but many of these things haven’t been placed at the forefront of the information dump by Microsoft. We understand that the software giant wants to focus on the most eye-catching features, but we […]

This article Planning for Windows 11 Deployment? This guide will help you get started first appeared on TheWindowsClub.com.

Lenovo launches device as-a-service in the UK

The content below is taken from the original ( Lenovo launches device as-a-service in the UK), to continue reading please visit the site. Remember to respect the Author & Copyright.

Lenovo launches device as-a-service in the UK

Vendor launches three-tier DaaS model which spans entire device portfolio

Lenovo has launched its device as-a-service (DaaS) offering in the UK spanning its entire device portfolio.

Partners can now sell Lenovo’s entire device portfolio, spanning laptops, desktops, workstations and tablets, through a monthly as-a-service model.

All authorised Lenovo partners now have access to the DaaS offering, claims Jane Ashworth, director of SMB and channel for the UK and Ireland.

Lenovo’s DaaS offering is split into three tiers: Simplify, Accelerate and Transform accessible through the Lenovo Partner Hub or through Lenovo.com.

Its Simplify tier is intended as a “starting point” and is targeted at small businesses. Partners are able to use Lenovo’s online tool to add devices and services on behalf of the customer and calculate the total monthly cost of the service.

The Accelerate tier enables partners to add in their own services to the quote, which could include configuration or consulting services.

Ashworth described the upper “Transform” tier as a fully customisable end-to-end solution and fully managed service which would include deployment services, advanced IT automation and intelligent services.

“It means that for every size of customer, for every partner, and for every complex requirement from an end user, we have a version that will fit that request for the partner,” said Ashworth.

The channel boss said that the launch builds on Lenovo’s pre-existing DaaS solution which included only the “Transform” tier of the offering and was targeted at larger corporate customers and partners.

Lenovo piloted the DaaS offering in Q4 last year with a handful of UK partners: CDW, Computacenter, Softcat, Bechtle, XMA, Ultima and Centerprise.

Ashworth said the offering was tweaked based on feedback from partners.

 “We tested it with the people on the sales floor because we needed to ensure that it fitted their needs and it was easy to use.” We did a lot of user testing from a process point of view and adapted the tool itself,” she said.

“We also got a lot of feedback around the Accelerate tier because our partners wanted to add in some of their own tailored services, that they’ve developed themselves and that’s their USP. So that’s where the Accelerate tier came from to give partners the flexibility they required.”

She added: “We’ve tweaked the model based on their feedback. And now we’re in full roadmap mode. So really, really excited about it, it couldn’t have come at a more important time for the market,” Ashworth added.

The DaaS offering comes after a stellar financial year for Lenovo, with group revenues for the year ending 31 March 2021 exceeding $60bn for the first time – 20 per cent higher than the previous year.

Lenovo’s PCSD (PC and smart devices) business in the UK enjoyed record revenues, surging by 46 per cent in Q4 to $12.4bn, Ashworth said, while its pre-tax income was up by 58 per cent year on year.

Its rivals have all launched new as-a-service options this year. Dell launched its Apex offering during this year’s Dell Technologies World in May, while HPE added storage to its own GreenLake as-a-service offering.

Cisco meanwhile launched its Cisco Plus offering in April, which made its IT infrastructure, networking, security, compute, storage and applications products available through an as-a-service model.

Best Project Management apps for Microsoft Teams

The content below is taken from the original ( Best Project Management apps for Microsoft Teams), to continue reading please visit the site. Remember to respect the Author & Copyright.

Best project management apps for Microsoft TeamsMicrosoft Teams has become an indispensable work-from-home tool for many companies. If you want to spruce up the experience while managing numerous projects, you should try out these project management apps for Microsoft Teams. All these apps are free to available, and you can install them whenever possible. Before getting started with the list, you should […]

This article Best Project Management apps for Microsoft Teams first appeared on TheWindowsClub.com.

FOURtress reviewed as a RISC OS machine

The content below is taken from the original ( FOURtress reviewed as a RISC OS machine), to continue reading please visit the site. Remember to respect the Author & Copyright.

RISCOSbits has been establishing a strong reputation for producing stylish cases for the Raspberry Pi boards running RISC OS with generally silly names. I already have a PiHard at work, but I do have a small space at home. So I decided to check out the new FOURtress. So what is it like as a RISC OS machine?

We have already had a quick look at the FOURtress in a previous article. The FOURtress is an overclocked Pi4 in a very compact case (which still has room for an SD drive inside). It boots straight into RISC OS and comes with a nicely customised desktop on top of the RISC OS Developments 5.28 release.

If you are using the Linux software for a dual boot system, there is a Files partition already setup to share files. You will see it if you boot into Linux. There is a !linux application for booting into Linux (which we will cover in more detail in another article).

There is a lot of additional software installed on the machine above the RISC OS Direct release. On the system there are the free versions on !Organizer, !Fireworkz, emulators, tools, etc. There is also a directory called Free Links with links to lots of sites with software which you can download. RISCOSbits have been rummaging around the internet and collecting software so you do not need to.

There is also some RISCOSbits specific software on the system including a Fan control application for the built-in fan. I have it set on automatic but have not managed to push RISC OS to the point where the fan was needed. So the noise level of the machine ranges from silent to very quiet hum (if I am using Linux).

In use the machine feels very fast. I find it as quick as any other RISC OS machine I have (including my Titanium) and it runs Iris just as well. I am actually running RISC OS off the card not the drive (which would be even quicker) so that I can have the much more disc hungry linux on the drive.

Lastly, the machine comes with a handly A5 start guide which will answers all your questions on setting up and maintaining the machine. I have also found RISCOSbits super-responsive to any questions I ask.

If you want a larger machine which will take some Pi plugins (like the HAT for Wifi), there are better choices around. If you looking for a very compact, polished and fast RISC OS machine with lots of software, the FOURtress should definitely be on your list. It can also run Linux, and we will be looking at that option next time.

FOURtress website

No comments in forum

[How To] Fitbit integration

The content below is taken from the original ( [How To] Fitbit integration), to continue reading please visit the site. Remember to respect the Author & Copyright.

Hi, I’ve written a small article that explains how to integrate Tasker with Fitbit, you can find it here.

I wanted to enable/disable some alarms on my Fitbit devices without having to do it manually.

I hope it helps 🙂

submitted by /u/pirasalbe to r/tasker
[link] [comments]

What is PowerShell splatting and how does it work?

The content below is taken from the original ( What is PowerShell splatting and how does it work?), to continue reading please visit the site. Remember to respect the Author & Copyright.

Hi all,

I recently posted an in-depth overview of the many uses of PowerShell splatting. Hopefully there is something useful in it for everyone. So, check it out at the link below and let me know what you think in the comments!

https://ryanjan.uk/2021/05/13/powershell-splatting/

Cheers!

submitted by /u/ryan-jan to r/PowerShell
[link] [comments]

Complete PC inside an old amplifier, with fully functional front

The content below is taken from the original ( Complete PC inside an old amplifier, with fully functional front), to continue reading please visit the site. Remember to respect the Author & Copyright.

Complete PC inside an old amplifier, with fully functional front submitted by /u/sabbathian to r/sffpc
[link] [comments]

Azure Virtual Desktop: The flexible cloud VDI platform for the hybrid workplace

The content below is taken from the original ( Azure Virtual Desktop: The flexible cloud VDI platform for the hybrid workplace), to continue reading please visit the site. Remember to respect the Author & Copyright.

When we launched Windows Virtual Desktop nearly two years ago, no one predicted a global pandemic would force millions of workers to leave the office and work from home. Organizations around the world migrated important apps and data to the cloud to gain business resilience and agility. And to support the new remote workforce, many of you turned to Windows Virtual Desktop to give remote users a secure, easy to manage, productive personal computing experience with Windows 10 from the cloud. It has been humbling to work alongside you as you pivoted your operations to meet new challenges—from supporting frontline healthcare workers at NHS to engineers at Petrofac to educators and students

Going forward, organizations will need to support an evolving set of remote and hybrid work scenarios. To help our customers and partners meet these new hybrid work demands, we are expanding our vision to become a flexible cloud VDI platform for nearly any use case—accessible from virtually anywhere. A modern VDI platform needs to be secure, scalable, and easy to manage, while delivering a seamless, high-performance experience to end users. It should also empower organizations with the flexibility to customize and build solutions with its core technology.

To support this broader vision and the changing needs of our customers, today we are announcing new capabilities, new pricing for app streaming, and changing the name of the Windows Virtual Desktop service to Azure Virtual Desktop.

New platform capabilities for security and management

We are continually adding new capabilities to the core Azure Virtual Desktop platform. Today we are also pleased to announce the public preview of new features that will help you onboard and better manage your Azure Virtual Desktop deployment.

  • Enhanced support for Azure Active Directory (coming soon in public preview): Azure Active Directory is a critical service used by organizations around the world to manage user access to important apps and data and maintain strong security controls. We are pleased to announce that you’ll soon be able to join your Azure Virtual Desktop virtual machines directly to Azure Active Directory (AAD) and connect to the virtual machines from any device with basic credentials. You’ll also be able to automatically enroll the virtual machines with Microsoft Endpoint Manager. For certain scenarios, this will help eliminate the need for a domain controller, help reduce cost, and streamline your deployment. While this is a major milestone, it’s just the beginning of the journey towards full integration with Azure Active Directory. We will continue adding new capabilities such as support for single sign-on, additional credential types like FIDO2, and Azure Files for cloud users.

Create a host pool for Azure Active Directory

  • Manage Windows 10 Enterprise multi-session virtual machines with Microsoft Endpoint Manager (available now in preview): Microsoft Endpoint Manager allows you to manage policies and distribute applications across devices. You can now enroll Windows 10 Enterprise multi-session Azure Virtual Desktop virtual machines in Microsoft Endpoint Manager and manage them in the Microsoft Endpoint Manager admin center the same way as shared physical devices. This simplifies management and provides a centralized view across both physical devices and virtual desktops. Read the Windows 10 Enterprise multi-session documentation to learn more.

Windows 10 Enterprise multi-session VMs in the MEM admin center

  • Deploy in minutes with new QuickStart experience (coming soon in preview): We are pleased to offer a streamlined onboarding experience for Azure Virtual Desktop in the Azure portal. This new experience will validate requirements, kick off an automated deployment, and will also implement best practices. With only a few clicks, you can set up a full Azure Virtual Desktop environment in your Azure subscription. You will find this new experience under “Quickstart” in the Azure Virtual Desktop blade in the Azure portal.

Create a Quickstart application

New pricing options for remote app streaming

Many organizations are using Azure Virtual Desktop to stream apps to their own employees who are covered by existing license entitlements. But many organizations also want to use Azure Virtual Desktop to deliver applications “as-a-service” to customers and business partners as well.

Today we are pleased to announce a monthly per-user access pricing option for organizations to use Azure Virtual Desktop to deliver apps from the cloud to external (non-employee) users. For example, this would enable software vendors to deliver their app as a SaaS solution that can be accessed by their customers. In addition to the monthly user price for Azure Virtual Desktop, organizations also pay for Azure infrastructure services based on usage.

Here’s what one ISV had to say about the new pricing option:

“Sage is trusted by millions of customers worldwide to deliver innovative business solutions to manage finances, operations and people. Streaming applications with Azure Virtual Desktop makes it easy to streamline user access to our solutions on the Azure cloud for a great online customer experience.” James Westlake, Director of Product Management, Sage.

Try it during our promotional period

The new per-user access pricing option will be effective on January 1, 2022. To help organizations get started now, we are pleased to offer a special promotion with no charge to access Azure Virtual Desktop for streaming first-party or third-party applications to external users. This promotion is effective from July 14, 2021, to December 31, 2021.

Pricing for monthly user access rights effective on January 1, 2022, will be:
•    $5.50 per user per month (Apps)
•    $10 per user per month (Apps + Desktops)

This promotion only applies to external user access rights. Organizations would continue to pay for the underlying Azure infrastructure. Organizations should continue to use existing Windows license entitlements, such as Microsoft 365 E3 or Windows E3 and higher, for app streaming to their employees. Visit our web page for more details.

Expanding partner ecosystem

As a cloud VDI platform, we work closely with our partners and empower them to build solutions that meet your needs. For example, Citrix and VMware provide desktop and app virtualization solutions that leverage the Azure Virtual Desktop platform capabilities, such as Windows 10 Enterprise multi-session, and allow you to maximize your existing investments and use the tools and solutions with which you are already familiar. We are also proud of our ecosystem of hundreds of partners who build custom solutions and provide technical consulting to help you deploy with confidence. Visit Azure Marketplace for more information on partner solutions, and the Advanced Specialization page for certified deployment partners.

Getting started

My team and I look forward to partnering with you to take full advantage of our flexible VDI platform in the cloud and unlock new end-user computing possibilities. We appreciate your ongoing support and welcome your feedback. Join us in our Tech Community to connect with my team and other customers and partners to share your feedback and suggestions. To learn more about these announcements, please sign up for our upcoming webinar.

Windows Virtual Desktop is now Azure Virtual Desktop

The content below is taken from the original ( Windows Virtual Desktop is now Azure Virtual Desktop), to continue reading please visit the site. Remember to respect the Author & Copyright.

Windows Virtual Desktop is now Azure Virtual Desktop submitted by /u/MisterJohnson87 to r/AZURE
[link] [comments]

PiTools reviewed

The content below is taken from the original ( PiTools reviewed), to continue reading please visit the site. Remember to respect the Author & Copyright.

R-Comp have now released some of the software they provide with their own Pi machines for other Pi users as PiTools. So I decided to install it on my PiHard system.
 
When you run it for the first time, it does a good job of setting itself up on your system and installing itself.

One option on the installation is to alter your CMOS settings. I did not choose this because my machine has a second drive installed so using slightly different settings.

The software is best installed in Apps and provides you with the same features you may have seen on the ARMBook and other R-Comp Pi based systems.

The lock screen function gives you a nice keyboard lockout option to password protect your machine.

The display tab gives you lots of configuration options and adds the very useful Big Mode you may have seen on the ARMBook. If you want to play games, the features for legacy support and additional MDF files may well appeal.

.

The keyboard option allows you to configure your settings and map different keys to certain tasks. I am a Mac guys so would prefer the options to include more Mac inclusive language (not everyone uses Windows). The options are helpful when accessing my Pi over VNC, especially from a laptop.

The Networking tab makes it easy to setup a remote connection and enable auto-detection. There are some nice features for booting without a network link and connecting later.

You can get a some of the functionality of PiTools with a selection of other programs, but PiTools packs a lot of additional functionality into each section. PiTools offers you a really slick and supported single solution, some nice additional benefits like Big Mode, and lots of extra functionality tucked away under the hood..

R-Comp are also very responsive with questions and feedback and have already released several updates to the software (which are free to existing users). The software can be purchased directly from PlingStore and costs 34.95.

No comments in forum

AWS ECS Anywhere goes live. Is it worth the Amazon fee?

The content below is taken from the original ( AWS ECS Anywhere goes live. Is it worth the Amazon fee?), to continue reading please visit the site. Remember to respect the Author & Copyright.

Amazon’s container service running on-premises: a turnaround for a company that once scorned hybrid cloud

ECS Anywhere, which enables on-premises or Edge container applications to be managed by AWS, is now generally available.…

Add Open Windows Terminal in Command Prompt, PowerShell profile context menu items

The content below is taken from the original ( Add Open Windows Terminal in Command Prompt, PowerShell profile context menu items), to continue reading please visit the site. Remember to respect the Author & Copyright.

Windows Terminal can let you open multiple Command Prompt, Windows PowerShell, etc., tabs in one window, and you can open it from the right-click context menu. However, as the default option opens the default startup profile, you can add an expandable menu to open any profile according to your requirements.

Add Open Windows Terminal in Default, Command Prompt, PowerShell profile context menu items

Add expandable Windows Terminal in context menu to open any profile

Let’s assume that your default startup profile is set as Command Prompt, but you want to open Windows PowerShell. At such a moment, you can use the context menu option to open Windows PowerShell in Windows Terminal app without administrator privilege. It is possible to get it done using the Registry Editor. Therefore, it is recommended to create a System Restore pointbefore heading to the steps.

Add expandable Windows Terminal in context menu to open any profile

To add expandable Windows Terminal in context menu, follow these steps:

  1. Open Notepad on your PC.
  2. Paste the following text.
  3. Click on File > Save As.
  4. Choose a location, enter a name with .reg extension, select All Files from Save as type list.
  5. Click the Save button.
  6. Double-click on the .reg file and confirm the addition.
  7. Right-click on your Desktop to find the options.

To learn more about these aforementioned steps, continue reading.

At first, open the Notepad on your computer and paste the following text:

Windows Registry Editor Version 5.00

[HKEY_CLASSES_ROOT\Directory\shell\OpenWTHere] "MUIVerb"="Open in Windows Terminal" "Extended"=- "SubCommands"=""

[HKEY_CLASSES_ROOT\Directory\Shell\OpenWTHere\shell\001flyout] "MUIVerb"="Open in Windows Terminal Default Profile"

[HKEY_CLASSES_ROOT\Directory\Shell\OpenWTHere\shell\001flyout\command] @="cmd.exe /c start wt.exe -d \"%1\""

[HKEY_CLASSES_ROOT\Directory\Shell\OpenWTHere\shell\002flyout] "MUIVerb"="Open in Windows Terminal Command Prompt" "Icon"="imageres.dll,-5323"

[HKEY_CLASSES_ROOT\Directory\Shell\OpenWTHere\shell\002flyout\command] @="cmd.exe /c start wt.exe -p \"Command Prompt\" -d \"%1\""

[HKEY_CLASSES_ROOT\Directory\Shell\OpenWTHere\shell\003flyout] "MUIVerb"="Open in Windows Terminal PowerShell" "Icon"="powershell.exe"

[HKEY_CLASSES_ROOT\Directory\Shell\OpenWTHere\shell\003flyout\command] @="cmd.exe /c start wt.exe -p \"Windows PowerShell\" -d \"%1\""

[HKEY_CLASSES_ROOT\Directory\Background\shell\OpenWTHere] "MUIVerb"="Open in Windows Terminal" "Extended"=- "SubCommands"=""

[HKEY_CLASSES_ROOT\Directory\Background\Shell\OpenWTHere\shell\001flyout] "MUIVerb"="Open in Windows Terminal Default Profile"

[HKEY_CLASSES_ROOT\Directory\Background\Shell\OpenWTHere\shell\001flyout\command] @="cmd.exe /c start wt.exe -d \"%V\""

[HKEY_CLASSES_ROOT\Directory\Background\Shell\OpenWTHere\shell\002flyout] "MUIVerb"="Open in Windows Terminal Command Prompt" "Icon"="imageres.dll,-5323"

[HKEY_CLASSES_ROOT\Directory\Background\Shell\OpenWTHere\shell\002flyout\command] @="cmd.exe /c start wt.exe -p \"Command Prompt\" -d \"%V\""

[HKEY_CLASSES_ROOT\Directory\Background\Shell\OpenWTHere\shell\003flyout] "MUIVerb"="Open in Windows Terminal PowerShell" "Icon"="powershell.exe"

[HKEY_CLASSES_ROOT\Directory\Background\Shell\OpenWTHere\shell\003flyout\command] @="cmd.exe /c start wt.exe -p \"Windows PowerShell\" -d \"%V\""

Click on File > Save As option and choose a location where you want to save the file.

Add expandable Windows Terminal in context menu to open any profile

Enter a name with .reg extension (for example, TermExpMenu.reg), select All Files from the Save as type drop-down list, and click the Save button.

Following that, double-click on the .reg file that you created and click on the Yes button.

If you wish, you could download our ready-to-use Registry file to add this context menu item.

You can now right-click on your desktop to find out the expandable Windows Terminaloption in the context menu to directly open any profile.

However, if you no longer need this context menu option and want to remove it, follow these steps.

At first, follow this tutorial to open the Registry Editoron your PC and navigate to these paths one after one:

HKEY_CLASSES_ROOT\Directory\shell\OpenWTHere

HKEY_CLASSES_ROOT\Directory\Background\shell\OpenWTHere

Right-click on the OpenWTHerekey and choose the Delete option.

Add expandable Windows Terminal in context menu to open any profile

Then, confirm the removal by clicking the OK button.

After that, you may have to restart your computer or sign out and re-sign into your user account to get the change.

Next, we will see how to add Open Windows Terminal as an administrator in the Context Menu.

That’s all! Hope this guide helped you adding an expandable Windows Terminal option in the context menu to open any profile you want.

Related reads:

Add expandable Windows Terminal in context menu to open any profile

This article Add Open Windows Terminal in Command Prompt, PowerShell profile context menu items first appeared on TheWindowsClub.com.

The UK loves cybersecurity so much, it’s going to regulate managed service providers’ infosec practices in law

The content below is taken from the original ( The UK loves cybersecurity so much, it’s going to regulate managed service providers’ infosec practices in law), to continue reading please visit the site. Remember to respect the Author & Copyright.

And you’re invited to speak your brains on Computer Misuse Act changes

+Comment The British government has vowed to create a legally binding cybersecurity framework for managed service providers (MSPs) – and if you want to tell gov.UK what you think, you’ve only got a few weeks to act.…

Improving your monitoring setup by integrating Cloudflare’s analytics data into Prometheus and Grafana

The content below is taken from the original ( Improving your monitoring setup by integrating Cloudflare’s analytics data into Prometheus and Grafana), to continue reading please visit the site. Remember to respect the Author & Copyright.

Improving your monitoring setup by integrating Cloudflare’s analytics data into Prometheus and Grafana

The following is a guest post by Martin Hauskrecht, DevOps Engineer at Labyrinth Labs.

Improving your monitoring setup by integrating Cloudflare’s analytics data into Prometheus and Grafana

Here at Labyrinth Labs, we put great emphasis on monitoring. Having a working monitoring setup is a critical part of the work we do for our clients.

Cloudflare’s Analytics dashboard provides a lot of useful information for debugging and analytics purposes for our customer Pixel Federation. However, it doesn’t automatically integrate with existing monitoring tools such as Grafana and Prometheus, which our DevOps engineers use every day to monitor our infrastructure.

Cloudflare provides a Logs API, but the amount of logs we’d need to analyze is so vast, it would be simply inefficient and too pricey to do so. Luckily, Cloudflare already does the hard work of aggregating our thousands of events per second and exposes them in an easy-to-use API.

Having Cloudflare’s data from our zones integrated with other systems’ metrics would give us a better understanding of our systems and the ability to correlate metrics and create more useful alerts, making our Day-2 operations (e.g. debugging incidents or analyzing the usage of our systems) more efficient.

Since our monitoring stack is primarily based on Prometheus and Grafana, we decided to implement our own Prometheus exporter that pulls data from Cloudflare’s GraphQL Analytics API.

Design

Based on current cloud trends and our intention to use the exporter in Kubernetes, writing the code in Go was the obvious choice. Cloudflare provides an API SDK for Golang, so the common API tasks were made easy to start with.

We take advantage of Cloudflare’s GraphQL API to obtain analytics data about each of our zones and transform them into Prometheus metrics that are then exposed on a metrics endpoint.

We are able to obtain data about the total number and rate of requests, bandwidth, cache utilization, threats, SSL usage, and HTTP response codes. In addition, we are also able to monitor what type of content is being transmitted and what countries and locations the requests originate from.

All of this information is provided through the http1mGroups node in Cloudflare’s GraphQL API. If you want to see what Datasets are available, you can find a brief description at https://developers.cloudflare.com/analytics/graphql-api/features/data-sets.

On top of all of these, we can also obtain data for Cloudflare’s data centers. Our graphs can easily show the distribution of traffic among them, further helping in our evaluations. The data is obtained from the httpRequestsAdaptiveGroups node in GraphQL.

After running the queries against the GraphQL API, we simply format the results to follow the Prometheus metrics format and expose them on the /metrics endpoint. To make things faster, we use Goroutines and make the requests in parallel.

Improving your monitoring setup by integrating Cloudflare’s analytics data into Prometheus and Grafana

Deployment

Our primary intention was to use the exporter in Kubernetes. Therefore, it comes with a Docker image and Helm chart to make deployments easier. You might need to adjust the Service annotations to match your Prometheus configuration.

The exporter itself exposes the gathered metrics on the /metrics endpoint. Therefore setting the Prometheus annotations either on the pod or a Kubernetes service will do the job.

apiVersion: v1
kind: Service
metadata:
  annotations:
    prometheus.io/path: /metrics
    prometheus.io/scrape: "true"

We plan on adding a Prometheus ServiceMonitor to the Helm chart to make scraping the exporter even easier for those who use the Prometheus operator in Kubernetes.

The configuration is quite easy, you just provide your API email and key. Optionally you can limit the scraping to selected zones only. Refer to our docs in the GitHub repo or see the example below.

 env:
   - name: CF_API_EMAIL
     value: <YOUR_API_EMAIL>
   - name: CF_API_KEY
     value: <YOUR_API_KEY>

  # Optionally, you can filter zones by adding IDs following the example below.
  # - name: ZONE_XYZ
  #   value: <zone_id>

To deploy the exporter with Helm you simply need to run:

helm repo add lablabs-cloudflare-exporter https://lablabs.github.io/cloudflare-exporter
helm repo update

helm install cloudflare-exporter lablabs-cloudflare-exporter/cloudflare-exporter \
--set env[0].CF_API_EMAIL=<API_EMAIL> \
--set env[1].CF_API_KEY=<API_KEY>

We also provide a Helmfile in our repo to make deployments easier, you just need to add your credentials to make it work.

Visualizing the data

I’ve already explained how the exporter works and how you can get it running. As I mentioned before, we use Grafana to visualize our metrics from Prometheus. We’ve created a dashboard that takes the data from Prometheus and puts it into use.

The dashboard is divided into several rows, which group individual panels for easier navigation. It allows you to target individual zones for metrics visualization.

Improving your monitoring setup by integrating Cloudflare’s analytics data into Prometheus and Grafana

To make things even more beneficial for the operations team, you can use the gathered metrics to create alerts. These can be created either in Grafana directly or using Prometheus alert rules.

Furthermore, if you integrate Thanos or Cortex into your monitoring setup, you can store these metrics indefinitely.

Future work

We’d like to integrate even more analytics data into our exporters, eventually reaching every metric that Cloudflare’s GraphQL can provide. We plan on creating new metrics for firewall analytics, DoS analytics, and Network analytics soon.

Feel free to create a GitHub issue if you have any questions, problems, or suggestions. Any pull request is greatly appreciated.

About us

Labyrinth Labs helps companies build, run, deploy and scale software and infrastructure by embracing the right technologies and principles.

Nezha

The content below is taken from the original ( Nezha), to continue reading please visit the site. Remember to respect the Author & Copyright.

Nezha D1 is a Linux-friendly RISC-V SBC based on Allwinner’s D1 SoC, plus 1GB RAM and microSD expansion. Key features include 4k HDMI, digital and analog audio, GbE, WiFi, BT, 2x USB, 40-pin expansion and a Raspberry Pi style form-factor.

How to manage or delete Credentials from Credential Manager using Command Prompt

The content below is taken from the original ( How to manage or delete Credentials from Credential Manager using Command Prompt), to continue reading please visit the site. Remember to respect the Author & Copyright.

Windows Credential Manager stores all the saved passwords automatically, and it is possible to manage them from the given interface. We have already seen how to add, remove or manage Credentials from Credential Manager using the interface – not let us see how to do it using the Command Prompt. You can execute all the commands in the Command Prompt or Windows Terminal.

How to manage Credentials using Command Prompt

To view Credentials from Credential Manager using Command Prompt, follow these steps-

  1. Search for cmd in the Taskbar search box.
  2. Click on the Run as administrator option.
  3. Click the Yes button.
  4. Type cmdkey /list command.
  5. Press the Enter button.

Whether you want to view, add, or delete credentials from the Credential Manager, you must open the Command Prompt with administrator permission. For that, search for cmd in the Taskbar search box, and click on the Run as administrator option.

Next, select the Yes option. Once the Command Prompt is opened, you can type the following command-

cmdkey /list

It displays the following information immediately-

  • Target
  • Type
  • User
  • Saved for

How to manage or delete credentials from Credential Manager using Command Prompt

By default, it shows all the saved credentials at once. However, if you want to filter these entries and find credentials from a particular networked computer, the following command works-

cmdkey /list:your-computer-name

Don’t forget to replace your-computer-name with the original name of the computer.

Add Windows Credentials in Credential Manager using Command Prompt

It is possible to add an entry in the Windows Credentials section in Credential Manager using the Command Prompt. It is possible to add an Internet or network address, user name, password, etc.

For that, open an elevated Command Prompt window, and enter this command-

cmdkey /add:computer-name /user:user-name /pass:your-password

Before pressing the Enter button, you need to change a few things in the above command. For example, replace the computer-name, user-name, and your-password.

How to manage or delete credentials from Credential Manager using Command Prompt

Once done, you can open the Credential Manager and find the entry under Windows Credentials section.

Delete credentials from Credential Manager using Command Prompt

It is possible to delete or remove saved credentials from the Credential Manager using Command Prompt like viewing and adding. For that, you need to follow the following steps.

Open the Command Prompt with administrator privilege, and enter the same command you used to view all entries. In other words, you have to enter this command-

cmdkey /list

It helps you note the Target, which is required to delete the credential entry from the Credential Manager. Next, enter this command-

cmdkey /delete:target-name

Don’t forget to replace the target-name with the original name that you copied earlier.

How to manage or delete credentials from Credential Manager using Command Prompt

Once done, you can find a message saying Credential deleted successfully.

It is possible to repeat these commands to add or remove credentials from the Credential Manager using Command Prompt.

Read: How to clear all Credentials from Credential Manager.

How to manage or delete credentials from Credential Manager using Command Prompt

This article How to manage or delete Credentials from Credential Manager using Command Prompt first appeared on TheWindowsClub.com.

Free SANS Cyber Security Summits: Sign up now, learn online, keep your network safe

The content below is taken from the original ( Free SANS Cyber Security Summits: Sign up now, learn online, keep your network safe), to continue reading please visit the site. Remember to respect the Author & Copyright.

Sometimes you need to lift yourself out of the cybersec trenches and look up to the summit

Promo Keeping your organization safe from cybercriminals and other ne’er do wells requires constant honing and refining of your own skills and knowledge.…

13 best practices for user account, authentication, and password management, 2021 edition

The content below is taken from the original ( 13 best practices for user account, authentication, and password management, 2021 edition), to continue reading please visit the site. Remember to respect the Author & Copyright.

Updated for 2021: This post includes updated best practices including the latest from Google’s Best Practices for Password Management whitepapers for both users and system designers.

Account management, authentication and password management can be tricky. Often, account management is a dark corner that isn’t a top priority for developers or product managers. The resulting experience often falls short of what some of your users would expect for data security and user experience.

Fortunately, Google Cloud brings several tools to help you make good decisions around the creation, secure handling and authentication of user accounts (in this context, anyone who identifies themselves to your system—customers or internal users). Whether you’re responsible for a website hosted in Google Kubernetes Engine, an API on Apigee, an app using Firebase, or other service with authenticated users, this post lays out the best practices to follow to ensure you have a safe, scalable, usable account authentication system.

1. Hash those passwords

My most important rule for account management is to safely store sensitive user information, including their password. You must treat this data as sacred and handle it appropriately.

Do not store plaintext passwords under any circumstances. Your service should instead store a cryptographically strong hash of the password that cannot be reversed—created with Argon2id, or Scrypt. The hash should be salted with a value unique to that specific login credential. Do not use deprecated hashing technologies such as MD5, SHA1 and under no circumstances should you use reversible encryption or try to invent your own hashing algorithm. Use a pepper that is not stored in the database to further protect the data in case of a breach. Consider the advantages of iteratively re-hashing the password multiple times.

Design your system assuming it will be compromised eventually. Ask yourself “If my database were exfiltrated today, would my users’ safety and security be in peril on my service or other services they use?” As well as “What can we do to mitigate the potential for damage in the event of a leak?”

Another point: If you could possibly produce a user’s password in plaintext at any time outside of immediately after them providing it to you, there’s a problem with your implementation.

If your system requires detection of near-duplicate passwords, such as changing “Password” to “pAssword1”, save the hashes of common variants you wish to ban with all letters normalized and converted to lowercase. This can be done when a password is created or upon successful login for pre-existing accounts. When the user creates a new password, generate the same type of variants and compare the hashes to those from the previous passwords. Use the same level of hashing security as with the actual password. 

2. Allow for third-party identity providers if possible

Third-party identity providers enable you to rely on a trusted external service to authenticate a user’s identity. Google, Facebook, and Twitter are commonly used providers.

You can implement external identity providers alongside your existing internal authentication system using a platform such as Identity Platform. There are a number of benefits that come with Identity Platform, including simpler administration, a smaller attack surface, and a multi-platform SDK. We’ll touch on more benefits throughout this list.

3. Separate the concept of user identity and user account

Your users are not an email address. They’re not a phone number. They’re not even a unique username. Any of these authentication factors should be mutable without changing the content or personally identifiable information (PII) in the account. Your users are the multi-dimensional culmination of their unique, personalized data and experience within your service, not the sum of their credentials. A well-designed user management system has low coupling and high cohesion between different parts of a user’s profile.

Keeping the concepts of user account and credentials separate will greatly simplify the process of implementing third-party identity providers, allowing users to change their username, and linking multiple identities to a single user account. In practical terms, it may be helpful to have an abstract internal global identifier for every user and associate their profile and one or more sets of authentication datavia that ID as opposed to piling it all in a single record.

4. Allow multiple identities to link to a single user account

A user who authenticates to your service using their username and password one week might choose Google Sign-In the next without understanding that this could create a duplicate account. Similarly, a user may have very good reason to link multiple email addresses to your service. If you’ve properly separated user identity and authentication, it will be a simple process to link several authentication methods to a single user.

Your backend will need to account for the possibility that a user gets part or all the way through the signup process before they realize they’re using a new third-party identity not linked to their existing account in your system. This is most simply achieved by asking the user to provide a common identifying detail, such as email address, phone, or username. If that data matches an existing user in your system, require them to also authenticate with a known identity provider and link the new ID to their existing account.

5. Don’t block long or complex passwords

NIST publishes guidelines on password complexity and strength. Since you are (or will be very soon) using a strong cryptographic hash for password storage, a lot of problems are solved for you. Hashes will always produce a fixed-length output no matter the input length, so your users should be able to use passwords as long as they like. If you must cap password length, do so based on the limits of your infrastructure; often this is a matter of memory usage (memory used per login operation * potential concurrent logins per machine), or more likely—the maximum POST size allowable by your servers. We’re talking numbers from hundreds of KB to over 1MB. Seriously. Your application should already be hardened to prevent abuse from large inputs. This doesn’t create new opportunities for abuse if you employ controls to prevent credential stuffing and hash the input as soon as possible to free up memory.

Your hashed passwords will likely already consist of a small set of ASCII characters. If not, you can easily convert a binary hash to Base64. With that in mind, you should allow your users to use literally any characters they wish in their password. If someone wants a password made of Klingon, Emoji, and ASCII art with whitespace on both ends, you should have no technical reason to deny them. Just make sure to perform Unicode normalization to ensure cross-platform compatibility. See our system designers whitepaper (PDF) for more information on Unicode and supported characters in passwords.

Any user attempting to use an extreme password is probably following password best practices (PDF) including using a password manager, which allows the entry of complex passwords even on limited mobile device keyboards. If a user can input the string in the first place (i.e., the HTML specification for password input disallows line feed and carriage return), the password should be acceptable.

6. Don’t impose unreasonable rules for usernames

It’s not unreasonable for a site or service to require usernames longer than two or three characters, block hidden characters, and prevent whitespace at the beginning and end of a username. However, some sites go overboard with requirements such as a minimum length of eight characters or by blocking any characters outside of 7-bit ASCII letters and numbers.

A site with tight restrictions on usernames may offer some shortcuts to developers, but it does so at the expense of users and extreme cases will deter some users.

There are some cases where the best approach is to assign usernames. If that’s the case for your service, ensure the assigned username is user-friendly insofar as they need to recall and communicate it. Alphanumeric generated IDs should avoid visually ambiguous symbols such as “Il1O0.” You’re also advised to perform a dictionary scan on any randomly generated string to ensure there are no unintended messages embedded in the username. These same guidelines apply to auto-generated passwords.

7. Validate the user’s identity

If you ask a user for contact information, you should validate that contact as soon as possible. Send a validation code or link to the email address or phone number. Otherwise, users may make a typo in their contact info and then spend considerable time using your service only to find there is no account matching their info the next time they attempt login. These accounts are often orphaned and unrecoverable without manual intervention. Worse still, the contact info may belong to someone else, handing full control of the account to a third party.

8. Allow users to change their username

It’s surprisingly common in legacy systems or any platform that provides email accounts not to allow users to change their username. There are very good reasons not to automatically release usernames for reuse, but long-term users of your system will eventually come up with significant reasons to use a different username and they likely won’t want to create a new account.

You can honor your users’ desire to change their usernames by allowing aliases and letting your users choose the primary alias. You can apply any business rules you need on top of this functionality. Some orgs might limit the number of username changes per year or prevent a user from displaying or being contacted via anything but their primary username. Email address providers are advised to never re-issue email addresses, but they could alias an old email address to a new one. A progressive email address provider might even allow users to bring their own domain name and have any address they wish.

If you are working with a legacy architecture, this best practice can be very difficult to meet. Even companies like Google have technical hurdles that make this more difficult than it would seem. When designing new systems, make every effort to separate the concept of user identity and user account and allow multiple identities to link to a single user account and this will be a much smaller problem. Whether you are working on existing or greenfield code, choose the right rules for your organization with an emphasis on allowing your users to grow and change over time.

9. Let your users delete their accounts

A surprising number of services have no self-service means for a user to delete their account and associated PII. Depending on the nature of your service, this may or may not include public content they created such as posts and uploads. There are a number of good reasons for a user to close an account permanently and delete all their PII . These concerns need to be balanced against your user experience, security, and compliance needs. Many if not most systems operate under some sort of regulatory control (such as PCI or GDPR), which provides specific guidelines on data retention for at least some user data. A common solution to avoid compliance concerns and limit data breach potential is to let users schedule their account for automatic future deletion.

In some circumstances, you may be legally required to comply with a user’s request to delete their PII in a timely manner. You also greatly increase your exposure in the event of a data breach where the data from “closed” accounts is leaked.

10. Make a conscious decision on session length

An often overlooked aspect of security and authentication is session length. Google puts a lot of effort into ensuring users are who they say they are and will double-check based on certain events or behaviors. Users can take steps to increase their security even further.

Your service may have good reason to keep a session open indefinitely for non-critical analytics purposes, but there should be thresholds after which you ask for password, 2nd factor, or other user verification.

Consider how long a user should be able to be inactive before re-authenticating. Verify user identity in all active sessions if someone performs a password reset. Prompt for authentication or 2nd factor if a user changes core aspects of their profile or when they’re performing a sensitive action. Re-authenticate if the user’s location changes significantly in a short period of time. Consider whether it makes sense to disallow logging in from more than one device or location at a time.

When your service does expire a user session or requires re-authentication, prompt the user in real time or provide a mechanism to preserve any activity they have not saved since they were last authenticated. It’s very frustrating for a user to take a long time to fill out a form, only to  find all their input has been lost and they must log in again.

11. Use 2-Step Verification

Consider the practical impact on a user of having their account stolen when choosing 2-Step Verification (also known as two-factor authentication, MFA, or 2FA) methods. Time-based one-time passwords (TOTP), email verification codes, or “magic links” are consumer-friendly and relatively secure. SMS 2FA auth has been deprecated by NIST due to multiple weaknesses, but it may be the most secure option your users will accept for what they consider a trivial service.

Offer the most secure 2FA auth you reasonably can. Hardware 2FA such as the Titan Security Key are ideal if feasible for your application. Even if a TOTP library is unavailable for your application, email verification or 2FA provided by third-party identity providers is a simple means to boost your security without great expense or effort. Just remember that your user accounts are only as secure as the weakest 2FA or account recovery method.

12. Make user IDs case-insensitive

Your users don’t care and may not even remember the exact case of their username. Usernames should be fully case-insensitive. It’s trivial to store usernames and email addresses in all lowercase and transform any input to lowercase before comparing. Make sure to specify a locale or employ Unicode normalization on any transformations.

Smartphones represent an ever-increasing percentage of user devices. Most of them offer autocorrect and automatic capitalization of plain-text fields. Preventing this behavior at the UI level might not be desirable or completely effective, and your service should be robust enough to handle an email address or username that was unintentionally auto-capitalized.

13. Build a secure auth system

If you’re using a service like Identity Platform, a lot of security concerns are handled for you automatically. However, your service will always need to be engineered properly to prevent abuse. Core considerations include implementing a password reset instead of password retrieval, detailed account activity logging, rate-limiting login attempts to prevent credential stuffing, locking out accounts after too many unsuccessful login attempts, and requiring two-factor authentication for unrecognized devices or accounts that have been idle for extended periods. There are many more aspects to a secure authentication system, so please see the further reading section below for links to more information. 

Further reading

There are a number of excellent resources available to guide you through the process of developing, updating, or migrating your account and authentication management system. I recommend the following as a starting place:

Related Article

Cybersecurity Awareness Month—New security announcements for Google Cloud

Today’s announcements include new security features, whitepapers that explore our encryption capabilities, and use-case demos to help dep…

Read Article

An Arduino With A Floppy Drive

The content below is taken from the original ( An Arduino With A Floppy Drive), to continue reading please visit the site. Remember to respect the Author & Copyright.

For many of us the passing of the floppy disk is unlamented, but there remains a corps of experimenters for whom the classic removable storage format still holds some fascination. The interface for a floppy drive might have required some complexity back in the days of 8-bit microcomputers, but even for today’s less accomplished microcontrollers it’s a surprisingly straightforward hardware prospect. [David Hansel] shows us this in style, with a floppy interface, software library, and even a rudimentary DOS, for the humble Arduino Uno.

The library provides functions to allow low level work with floppy disks, to read them sector by sector. In addition it incorporates the FatFS library for MS-DOS FAT file-level access, and finally the ArduDOS environment which allows browsing of files on a floppy. The pictures show a 3.5″ drive, but it also supports 5.25″ units and both DD and HD drives. We can see that it will be extremely useful to anyone working with retrocomputer software who is trying to retrieve old disks, and we look forward to seeing it incorporated in some retrocomputer projects.

Of course, Arduino owners needn’t have all the fun when it comes to floppy disks, the Raspberry Pi gets a look-in too.